How to Remove Control Arm Bushings Without a Press (Safely)
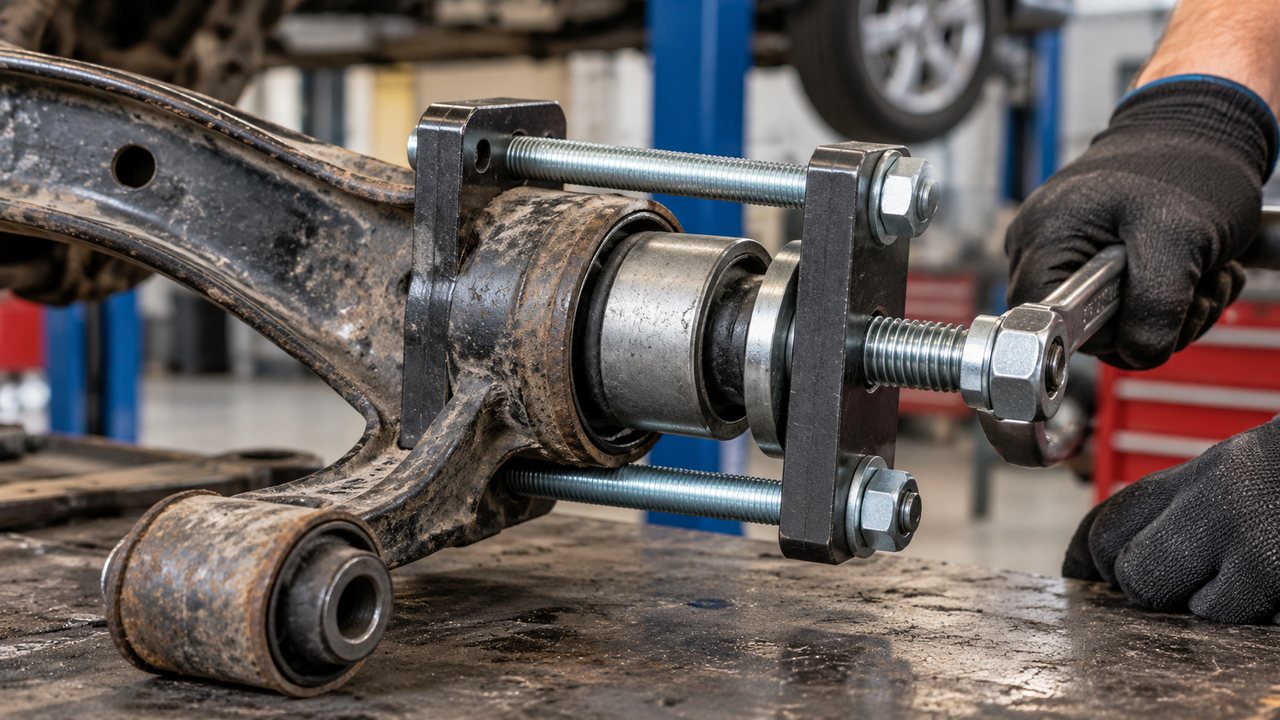
You can remove control arm bushings without a press by using a threaded-rod bushing extractor with correctly sized sockets or steel cups. The tool applies gradual, centered force to push the old bushing out of its housing. A screw-operated ball joint press or a vehicle-specific bushing removal kit can accomplish the same job without a large hydraulic shop press.
The catch is that not every control arm bushing comes out the same way. Some have a steel outer sleeve pressed into the arm. Others have a flange, a molded rubber body, or a design that requires the original outer shell to stay in place. Using the wrong method can distort the control arm, damage the mounting bore, or leave you with a new bushing that no longer fits securely.
For a conventional press-fit bushing with a metal outer shell, the basic method is:
- Confirm the bushing is separately serviceable and identify its removal direction.
- Secure the control arm and clean the area around the bushing.
- Place a receiving cup behind the bushing, large enough for its outer shell to pass through.
- Position a smaller driver against the bushing’s outer metal sleeve.
- Connect the cups with a suitable high-strength threaded rod, nuts, and hardened washers.
- Tighten the extractor gradually, checking that the bushing moves straight into the receiving cup.
- Remove the old bushing and inspect the empty housing before installing its replacement.
That’s the straightforward version. The details that make it work are cup sizing, alignment, and supporting the arm correctly. If the bushing refuses to move, don’t assume that more force is the answer.
Safety: This guide focuses on removing a bushing from a safely supported control arm, preferably after the arm has been removed from the vehicle. Control arms can be attached to components under substantial spring or torsion-bar load. Follow the vehicle-specific service procedure before disconnecting suspension hardware, never work beneath a vehicle supported only by a jack, and don’t loosen spring-retaining components as a shortcut.
First, Check What Type of Control Arm Bushing You Have
Before choosing a removal tool, look closely at the old bushing and its replacement. This takes only a few minutes, but it can prevent the most expensive mistake in the entire job: removing or damaging a sleeve that was supposed to remain in the control arm.
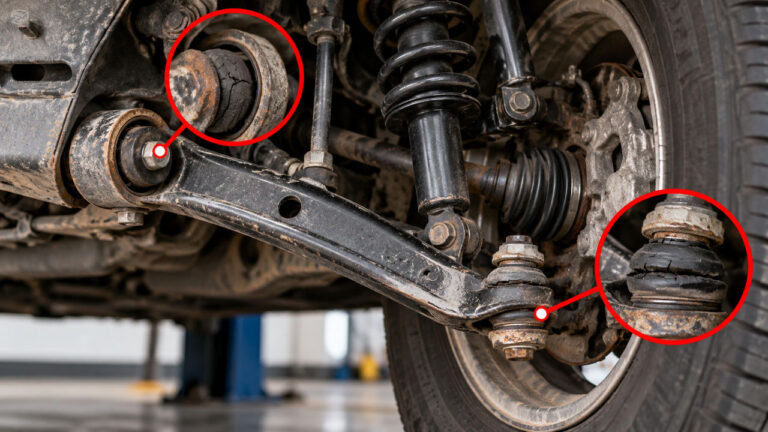
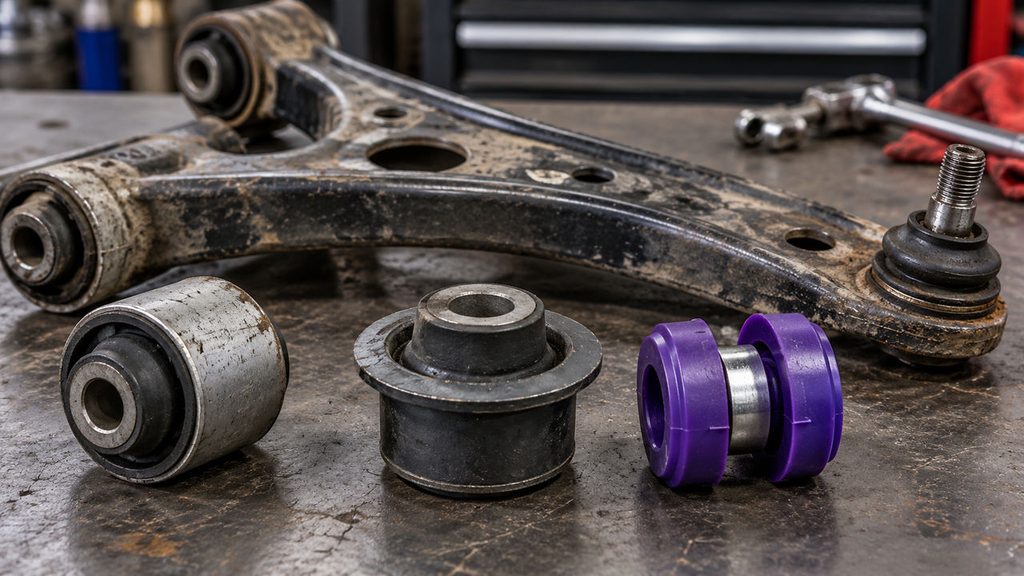
Many factory bushings are bonded-rubber assemblies with a metal inner sleeve, a rubber isolator, and a metal outer shell. The outer shell is held tightly in the control arm by an interference fit. On that design, the entire shell generally needs to come out when the bushing is replaced.
Other designs require a different approach.
| Bushing design | What to recognize | Removal consideration |
|---|---|---|
| Rubber bushing with steel outer shell | Metal sleeve pressed directly into the arm’s bore | Usually suited to a correctly sized screw-type extractor |
| Flanged or stepped bushing | Raised lip or different outside diameters | Must move in the manufacturer-specified direction |
| Hydraulic or compliance bushing | Fluid-filled rubber construction, sometimes with directional markings | May require specific tooling and orientation |
| Two-piece polyurethane bushing | Separate polyurethane halves and a central sleeve | Removal depends on the kit; an existing outer shell may need to stay |
| Rubber bushing without a conventional outer shell | Rubber fitted directly into a housing or retained by another arrangement | May need dedicated adapters or a different procedure |
| Non-serviceable control arm assembly | No approved separate bushing replacement procedure | Complete arm replacement may be required |
Pay particular attention to hydraulic bushings, offset bushings, and bushings with molded voids. Their position in the arm may be intentional. Installing one at the wrong angle can change how the suspension responds to braking, acceleration, and road impacts.
If the replacement bushing has arrows, painted marks, an asymmetric rubber pattern, or an offset center, find the installation instructions before removing the original. Photographing the old bushing in place can provide a useful reference, but it shouldn’t replace the manufacturer’s specified orientation.
Also, make sure the bushing really is the failed component. A worn lower ball joint or bent control arm can cause similar driving complaints. Our guide to bad lower control arm symptoms explains how those faults differ before you commit to repairing the bushings.
Tools You’ll Need to Remove a Bushing Without a Hydraulic Press
You don’t need a large workshop press, but you do need equipment capable of applying substantial force without bending, slipping, or breaking. A random collection of sockets and an ordinary hardware-store threaded rod isn’t automatically suitable.
For the threaded-rod method, gather:
- Suitable high-strength threaded rod or extractor screw: Use hardware rated for the load and compatible with the extractor components.
- Matching nuts and hardened washers: They must properly support the cups without deforming or pulling through them.
- A receiving cup: A heavy-duty steel cup or sleeve with enough internal clearance for the complete bushing to enter.
- A pushing driver: A steel adapter that contacts the correct face of the outer shell without bearing on the surrounding control arm.
- Hand wrenches or a ratchet: For applying force gradually and feeling changes in resistance.
- Bench vise or suitable support: To stabilize the arm without crushing or twisting it.
- Penetrating oil and cleaning supplies: For treating corrosion around the old shell before removal.
- Caliper or accurate measuring tool: To compare the shell diameter with the driver and receiving cup.
- Safety glasses and protective gloves: Press-fit components and loaded extraction hardware can release unexpectedly.
A dedicated manual bushing extractor kit is preferable to improvised hardware because its screw, adapters, and support cups are designed to work together. Some automotive parts stores offer suitable tools through rental or loan programs.
If you’re assembling a puller yourself, don’t guess its safe working capacity. Bent threaded rod, undersized washers, cracked sockets, or incompatible hardware can fail under load. Use properly rated components and keep your face and body out of the tool’s potential failure path.
How to Remove Control Arm Bushings Without a Press: Step by Step
This method applies primarily to a serviceable control arm bushing with a pressed-in outer metal sleeve. It uses a screw-driven puller rather than a hydraulic shop press.
For most home mechanics, working with the control arm removed and secured on a bench is easier than trying to position a universal extractor beneath the vehicle. Some applications support in-place removal with dedicated tools, but that isn’t a universal option.
Step 1: Secure the Control Arm and Inspect the Housing
With the control arm safely removed according to the vehicle’s service instructions, place it on a stable workbench or support it in a suitable vise.
The bushing housing should be supported close to the area where extraction force will be applied. Supporting only the distant end of a long control arm can let the metal flex instead of transmitting force through the bushing.
Take extra care with stamped-steel arms that have an open or U-shaped profile. They can deform if opposing surfaces are squeezed together without appropriate internal support. Aluminum arms also require careful support because damaging the bore can make the entire arm unusable.
Clean the exposed shell and examine both sides. Look for retaining rings, rolled edges, steps, flanges, corrosion, or any feature that could prevent the bushing from moving in the direction you’ve chosen.
Do not begin pushing until you’re certain the bushing is supposed to move that way.
Step 2: Mark the Bushing’s Orientation and Removal Direction
Before the original bushing disappears into the receiving cup, record its position.
Make note of any factory marks, offset inner sleeves, voids in the rubber, or differences in how far the shell protrudes from either side of the arm.
Some control arm bushings are centered in the bore. Others must sit at a particular depth or angle. A flange may also prevent removal in one direction even when the opposite side is open.
Measure the relevant dimensions or consult the service drawing. Don’t assume a bushing that looks symmetrical from a distance can be installed in either orientation.
Step 3: Clean the Shell and Treat Accessible Corrosion
Brush loose dirt and rust from the exposed edge of the bushing shell. If corrosion is present at the boundary between the outer shell and housing, a suitable penetrating oil may help free that joint.
Give the product time to work according to its directions, and wipe away excess fluid before handling the tool.
Penetrating oil can help with corrosion, but it won’t overcome a mechanical obstruction such as a retaining ring, flange, or step in the bore. If the bushing cannot physically pass through the opening, lubrication and extra force won’t solve the problem.
Keep in mind that preparing the old bushing for removal is different from preparing the new one for installation. Some replacement bushings require a clean, dry interference-fit surface and must not be installed with ordinary grease.
Step 4: Select the Correct Receiving Cup
This is one of the most important decisions in the procedure.
The receiving cup sits on the side toward which the old bushing will move. Its opening must be large enough to accept the outer shell, including any portion that needs to pass through the cup.
At the same time, the cup must rest securely on an appropriate part of the control arm surrounding the bore. A cup that’s too narrow blocks the bushing. A cup that’s too wide may provide inadequate support or slip from the arm.
Think of the receiving cup as an empty space with a strong supporting rim. The bushing needs somewhere to go, while the arm needs something solid to push against.
Check the available clearance before assembling the tool. If a mounting bracket, arm shape, or flange prevents the cup from sitting squarely, use an application-specific adapter rather than balancing an unsuitable socket against the metal.
Step 5: Position the Driver Against the Outer Metal Sleeve
On the opposite side of the bushing, position the pushing driver.
For a conventional metal-shelled bushing, the driver should apply force to the appropriate face of the outer metal shell. It must be small enough to enter the control arm bore without contacting or cutting into the housing.
A driver that presses only on the center sleeve or rubber can tear the bushing apart while leaving the outer shell stuck in the arm. You may remove the middle of the old bushing and still be left with the hardest part of the job.
Likewise, an oversized driver can press directly against the control arm rather than the bushing. That sends force into the wrong component and risks distorting the bore.
Measure and test-fit the adapters before applying any load. If the shell face is difficult to access, the answer may be a shaped adapter or a different extraction tool, not a smaller improvised contact point.
Step 6: Assemble the Threaded-Rod Extractor
Pass the extractor screw or suitably rated threaded rod through the bushing’s central opening and the selected adapters.
Arrange the components so that tightening the nut draws the pushing driver toward the receiving cup, forcing the old bushing into the open space.
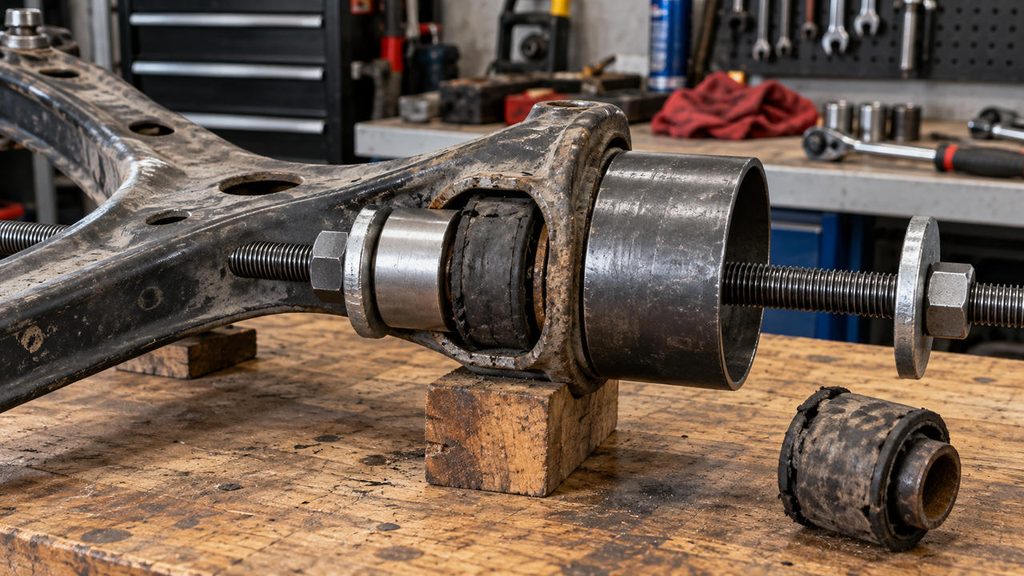
Use the hardened washers, nuts, and any thrust-bearing components specified for the tool. The washers must fully support their mating surfaces, and the threaded connection must have proper engagement.
If the extractor manufacturer calls for lubrication on the screw or thrust surfaces, follow those instructions. Lubricating the tool’s working threads is not the same as greasing the control arm housing or the replacement bushing.
Look at the assembly from more than one angle before turning the wrench. The threaded rod, driver, bushing, and receiving cup should share the same working axis.
If the cups are visibly tilted or the rod has to bend to pass through them, correct the setup before applying force.
Step 7: Apply Force Slowly and Watch for Movement
Begin turning the working nut with a hand wrench while keeping the extractor properly aligned.
As the screw develops force, the driver should push against the old shell and begin moving it into the receiving cup. A stubborn press-fit bushing may need considerable initial force, particularly if corrosion has developed around the shell.
Pause early and confirm that the bushing is actually moving. You should see the shell change position relative to the control arm, rather than the adapters bending or the arm itself deforming.
Continue with steady, controlled turns, checking the alignment as the bushing advances.
A sudden rise in resistance, audible cracking from the tooling, visibly distorted washers, or a rod beginning to bend is a reason to stop immediately. Don’t use a longer breaker bar or impact gun to overpower an uncertain setup.
If the shell starts moving crookedly, release the load, inspect the contact surfaces, and correct the problem before trying again. Forcing a tilted bushing through a tight bore can damage both the arm and the extractor.
Step 8: Remove the Old Bushing and Inspect the Bore
Once the old shell has cleared the housing, release the extractor load carefully and remove the bushing from the receiving cup.
Inspect the empty bore for rust, raised burrs, gouges, cracks, oval-shaped wear, and evidence that the previous bushing moved inside its housing.
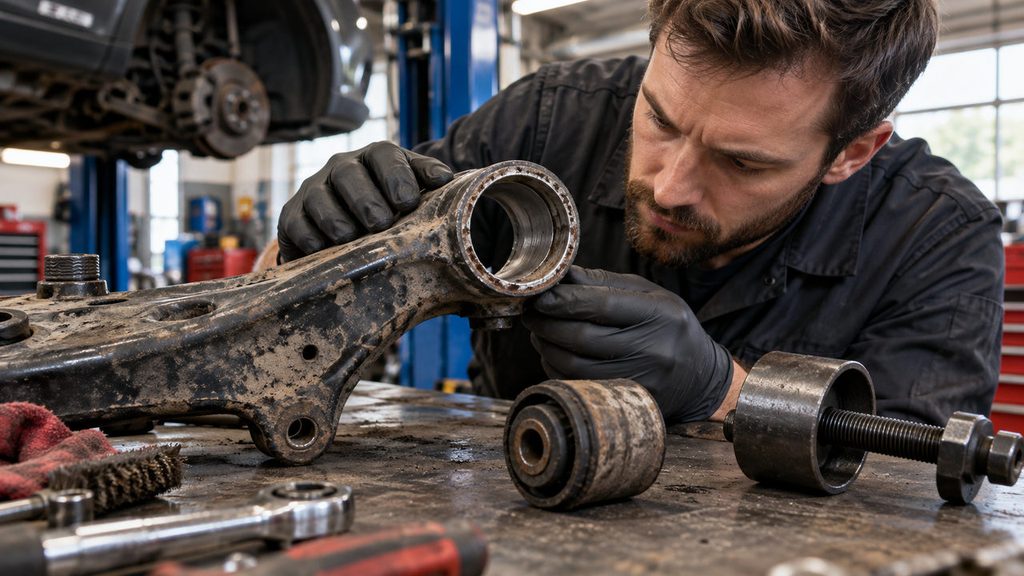
Light surface contamination may be removable with an appropriate cleaning method. But don’t enlarge the housing to make the new bushing easier to install, and don’t grind away structural material to hide extraction damage.
The new bushing depends on the correct fit between its outer surface and the control arm. If the bore has been stretched, cracked, or significantly scored, the original arm may no longer be suitable for reuse.
At this stage, the difficult part of a typical bushing-only repair is often complete. The next challenge is installing the replacement without undoing the work you’ve just done.
Other Ways to Remove Control Arm Bushings Without a Shop Press
A threaded-rod extractor is useful, but it isn’t the only manual tool that can apply controlled force. The best alternative depends on the shape of the arm, how accessible the bushing is, and whether suitable adapters are available.
Using a Ball Joint Press or C-Clamp Tool
A ball joint press kit uses a large screw-operated C-frame with interchangeable cups and adapters. Although it’s called a press, it doesn’t require the floor space or hydraulic equipment of a workshop press.
For a compatible control arm, the correct adapter pushes on the bushing’s outer shell while a receiving cup on the opposite side provides clearance for removal.
The advantage is that the screw and frame are part of a purpose-built tool rather than a homemade assembly. But a C-frame is not automatically compatible with every arm. Its opening may be too small, the adapters may not fit, or the arm’s geometry may prevent the tool from sitting squarely.
Only use it within the tool manufacturer’s intended applications and limits. A larger C-clamp does not solve the problem of an incorrectly supported bushing housing.
Using a Bench Vise
A sturdy bench vise can sometimes act as a small manual press for suitable bushings, especially when the arm and adapters fit comfortably between the jaws.
The principle remains the same: one adapter pushes on the correct part of the bushing while another provides space for the old component to exit.
The limitation is that many vises aren’t designed to withstand the extraction loads of heavily seized suspension bushings. Their jaws can become misaligned, their screws can be overloaded, and the arm may be difficult to support safely.
Don’t use a bench vise as a substitute for a suitable extractor when the bushing requires more force than the vise is rated to provide.
Using an In-Car Bushing Extractor
Some vehicle-specific tools can remove control arm bushings while the arm remains installed. They’re especially useful when removing the complete arm would require substantial additional work.
However, the tool must fit the exact bushing and provide a supported, unobstructed extraction path. Suspension spring loads, limited working clearance, and nearby components can make in-car removal unsuitable on other vehicles.
Don’t assume a universal extractor will work simply because it fits around the old bushing. Confirm that the arm can remain attached during the procedure and that the tool is approved for that application.
What If the Control Arm Bushing Won’t Come Out?
This is where a simple garage project can turn into an expensive one.
Maybe the extractor feels solid after the first few turns. The old rubber begins to separate, but the shell doesn’t move. Or the bushing shifts slightly before stopping completely.
Don’t immediately reach for more leverage. There are several different reasons a bushing can resist removal, and they need different solutions.
| What happens | Possible cause | Better next step |
|---|---|---|
| Extractor tightens but bushing doesn’t move | Wrong removal direction, corrosion, or inadequate tool alignment | Release force and verify fitment, retention features, and support |
| Rubber tears but outer shell stays | Driver is pushing on the inner sleeve instead of the outer shell | Reassess the shell and use tooling that supports the correct contact area |
| Bushing starts moving crookedly | Off-center driver, tilted receiving cup, or uneven support | Stop and realign before damaging the bore |
| Control arm begins to flex | Insufficient support or inappropriate tool arrangement | Use the correct support fixture or seek professional pressing |
| Threaded rod bends or washers deform | Tool overload, weak components, or misalignment | Stop immediately and replace the unsuitable setup |
| Mounting bolt won’t come out | Inner sleeve seized to the bolt or another fastening problem | Follow the vehicle-specific bolt removal procedure |
| Outer shell won’t fit into receiving cup | Cup opening too small or bushing has a flange | Use a compatible receiver and correct removal direction |
When the Rubber Comes Out but the Metal Sleeve Stays Behind
A badly deteriorated bonded-rubber bushing may come apart during removal. You might pull out the center sleeve and much of the rubber while the outer metal shell remains tightly pressed into the arm.
At that point, the remaining shell is still part of the old bushing. If the replacement requires the full shell to be removed, the job isn’t finished.
A purpose-built shell extractor or properly fitted tooling may still remove the remaining sleeve. When corrosion makes that impossible, experienced technicians sometimes relieve the shell’s interference fit by carefully splitting and collapsing it.
That technique demands particular care. Cutting too deeply can score the control arm bore, and damage that looks minor may affect how securely the new bushing is retained.
If you’re working with an aluminum arm, a thin housing, or a bushing shell that’s difficult to distinguish from the arm, professional removal is the safer choice.
There’s also an important exception: some aftermarket polyurethane conversion kits intentionally reuse an existing outer shell. Read the kit instructions before removing any remaining metal.
Should You Burn Out the Old Rubber Bushing?
You’ll find plenty of older tutorials recommending a propane torch to burn the rubber away. The idea is to remove the soft material so the remaining metal shell becomes easier to deal with.
For a home repair, I wouldn’t choose that method.
Burning rubber or polyurethane produces hazardous fumes and can expose nearby materials to excessive heat. Some control arms also have coatings, bonded components, or heat-sensitive parts that shouldn’t be treated with an open flame.
And even after the rubber is destroyed, the metal outer shell may still be stuck in the housing. You’ve added heat and fumes without necessarily solving the original interference-fit problem.
A correctly sized mechanical extractor is the cleaner first choice. For a severely seized shell, a shop with suitable fixtures and experience is often a better option than escalating to open-flame removal.
A Seized Pivot Bolt Is a Different Problem
Sometimes the bushing isn’t actually stuck in the arm. Instead, the long pivot bolt is rusted to the bushing’s inner metal sleeve, preventing the control arm from being removed from the vehicle.
That’s a fastening problem rather than a press-fit extraction problem. A threaded-rod tool designed to push out the outer bushing shell won’t necessarily free the seized bolt.
Depending on the vehicle, freeing the bolt may require a different service procedure, additional replacement hardware, or professional work around the subframe mounts.
Don’t force a mounting bracket apart or damage a captive nut trying to gain access. Repairing the surrounding chassis hardware can be much more difficult than replacing the bushing itself.
Can You Install the New Control Arm Bushing Without a Press?
Often, yes. If the replacement is a conventional metal-shelled press-fit bushing and the manual extractor is suitable for installation, a comparable screw-driven setup may be used in reverse to draw the new part into the housing.
But successful removal doesn’t automatically mean the same adapters are correct for installation. The new bushing must be supported without crushing its rubber, deforming its metal shell, or pushing on the wrong surface.
Before installing anything, confirm the following:
- Correct part: Compare the new and old bushings for outer diameter, width, flange, sleeve arrangement, and application.
- Correct orientation: Use the specified marks, offset position, rubber-void alignment, and insertion direction.
- Correct insertion depth: Some bushings sit flush; others must protrude or stop against a defined shoulder.
- Correct driver location: For a metal-shelled press-fit bushing, installation force normally belongs on the appropriate outer shell or shoulder, not the inner sleeve or rubber.
- Correct bore condition: The housing must be sound and properly prepared without being enlarged.
- Correct installation compound: Use only a lubricant or assembly product approved for the specific bushing design, if any.
Don’t coat every new bushing with grease simply because it makes installation easier. An interference-fit outer shell depends on secure retention in the housing, and the replacement manufacturer’s instructions determine whether any assembly lubricant is appropriate.
Aftermarket two-piece polyurethane bushings are different. Some are designed to be inserted in separate halves with a central sleeve and a specified lubricant. If your replacement uses that construction, our guide to grease for polyurethane bushings explains lubricant compatibility and where lubrication belongs.
For a replacement that requires a substantial interference fit, don’t use the control arm’s mounting bolt to draw the new bushing into place. The bolt is not a substitute for the correct installation tool, and forcing the assembly together can damage the bushing or mounting brackets.
Don’t Skip the Final Tightening Position
There’s one installation mistake that may not produce any obvious problem until weeks or months later.
Many conventional bonded-rubber control arm bushings work by twisting their rubber as the arm moves. Their inner metal sleeve is clamped in position by the pivot bolt, while the rubber flexes between the inner and outer sleeves.
If the pivot bolt is fully tightened with the suspension hanging at full droop, the rubber may already be twisted when the car returns to its normal ride height.
That unwanted preload can shorten bushing life and may contribute to abnormal suspension behavior.
For designs that require it, final tightening must be performed at the manufacturer’s specified suspension position, commonly normal ride height, using the correct torque procedure. Some applications also require replacement fasteners rather than reusing old bolts.
Don’t improvise by working beneath an inadequately supported vehicle to reach the bolts. A shop can use appropriate support equipment to position the suspension correctly and complete the tightening safely.
Once the repair is finished, the vehicle may also need its wheel alignment checked. Our alignment after suspension replacement guide explains when this is appropriate and why worn or incorrectly installed components should be corrected before alignment adjustments.
When Is It Better to Replace the Complete Control Arm?
Removing an old bushing without a hydraulic press can be satisfying, particularly when the control arm is otherwise in excellent condition. But saving the original arm isn’t always the best outcome.
Suppose you’ve removed one bushing and discover the other is badly worn, the ball joint has excessive play, and the arm’s mounting bore is corroded. Continuing with a bushing-only repair may leave several problems unresolved.
A complete replacement control arm often comes with new bushings already installed and may include a ball joint. It can avoid separate extraction and installation work when the original assembly is heavily deteriorated.
On the other hand, if the arm is straight, structurally sound, the bore is undamaged, and the correct replacement bushing is readily available, retaining the original arm may be reasonable.
The decision comes down to the actual condition of the components and the work required—not simply whether the old bushing can be removed.
For the financial side of that choice, our lower control arm bushing replacement cost guide compares bushing-only service with installing a complete arm, including how extraction labor can affect the final repair bill.
Common Mistakes When Removing Control Arm Bushings Without a Press
Most unsuccessful attempts aren’t caused by a lack of strength. They’re caused by the tool applying force in the wrong place or by an assumption about how the bushing is retained.
These mistakes are particularly worth avoiding:
- Pushing against the inner sleeve instead of the outer shell. The rubber tears while the outer shell stays stuck in the housing.
- Using a receiving cup that’s too small. The bushing has nowhere to go, so the force is transferred into the arm or tool.
- Ignoring a flange or retaining feature. The bushing is forced against a physical obstruction.
- Supporting the control arm too far from the bore. The arm bends or twists under the extraction load.
- Continuing when the bushing moves crookedly. The shell can score or distort the housing.
- Removing a sleeve that the replacement kit needs. Some polyurethane designs retain part of the original bushing assembly.
- Assuming all bushings install flush. Certain designs require a precise depth and orientation.
- Overloading improvised threaded hardware. A rod, washer, or socket can fail before the seized bushing moves.
- Tightening bonded-rubber pivots at the wrong suspension position. The new rubber begins its service life under unnecessary twist.
If the setup doesn’t look right before you apply force, it won’t become safer by tightening the nut. Stop and correct it while everything is still intact.
Frequently Asked Questions
Can you really remove control arm bushings without a hydraulic press?
Yes. Many separately serviceable, metal-shelled bushings can be extracted using a properly matched threaded-rod puller, manual bushing extractor, or screw-operated ball joint press. The tool must support the control arm correctly and apply force to the appropriate part of the bushing. Some applications still require dedicated equipment or professional pressing.
Can I remove control arm bushings with just a hammer?
Hammering is generally a poor first choice for a tightly fitted control arm bushing. Impacts can damage the arm, distort the housing, or separate the rubber without removing the metal shell. A controlled screw-type extractor is preferable when the bushing and arm design permit it.
What size socket removes a control arm bushing?
There is no universal socket size. The driver must fit the outer metal shell while clearing the control arm bore, and the receiving cup must be large enough for the shell to pass into it. Measure the actual bushing and check the application-specific procedure rather than copying socket sizes from another vehicle.
Can you remove lower control arm bushings without removing the arm?
Sometimes. Certain vehicles have dedicated in-car extraction tools that can service the bushing while the control arm remains installed. On other vehicles, limited clearance, arm construction, or suspension loading requires removing the arm. The manufacturer’s procedure determines whether in-place removal is appropriate.
How do you remove a seized control arm bushing sleeve?
First determine whether the seized component is the outer shell in the control arm or the inner sleeve stuck to a pivot bolt. They’re different problems. An outer shell may require a more suitable extractor or professional removal; an inner sleeve seized to a bolt requires the correct fastening and disassembly procedure. Don’t damage the arm or subframe to force either component free.
Do polyurethane control arm bushings need a press?
Not always. Some two-piece polyurethane bushings can be fitted using hand pressure or a suitable vise after the original components are removed and the housing is prepared. Other designs still require specialized tools. Always check whether the kit reuses the original outer shell and follow its lubrication and installation instructions.
Is heating the control arm bushing a good removal method?
Open-flame removal isn’t a good default DIY method. Burning rubber or polyurethane creates hazardous fumes, and excessive heat may damage adjacent parts, coatings, or the control arm. Mechanical extraction with suitable tooling is generally preferable. A severely seized bushing may be better handled by a professional shop.
Do you need an alignment after replacing control arm bushings?
An alignment check is commonly appropriate after control arm bushing replacement, especially when the arm or its mounting hardware has been removed. The exact requirement depends on the suspension design and what was disturbed. New bushings should be installed and all relevant hardware tightened correctly before the final alignment is checked.
Can I reuse a control arm if the bushing bore was damaged during removal?
Not without confirming that the arm still meets the manufacturer’s requirements. A distorted, cracked, enlarged, or heavily scored bore may no longer retain the new bushing securely. Don’t rely on extra adhesive, a larger bolt, or excessive tightening to compensate for a damaged housing. The arm may need replacement.
The Tool Matters, but the Setup Matters More
Removing control arm bushings without a hydraulic press is entirely possible on many vehicles. A threaded-rod extractor, a properly sized ball joint press kit, or a dedicated manual bushing tool can provide the controlled force needed to remove a press-fit sleeve.
What makes the difference is knowing exactly what you’re pushing against. The outer shell needs to move into a receiver with enough clearance, while the control arm remains properly supported. If the bushing starts moving sideways, the tool bends, or the arm flexes, the setup needs attention before the job continues.
And sometimes the most economical decision is to stop. A badly corroded sleeve, damaged housing, or unusually complicated arm may be worth taking to a suspension shop rather than risking a component that costs far more than the bushing.
With the right bushing design, compatible extraction tools, and careful preparation, you can remove the old component without owning a hydraulic press—and without turning a straightforward repair into a damaged control arm.