Leaf Spring U-Bolts: Sizes, Torque & Replacement Guide
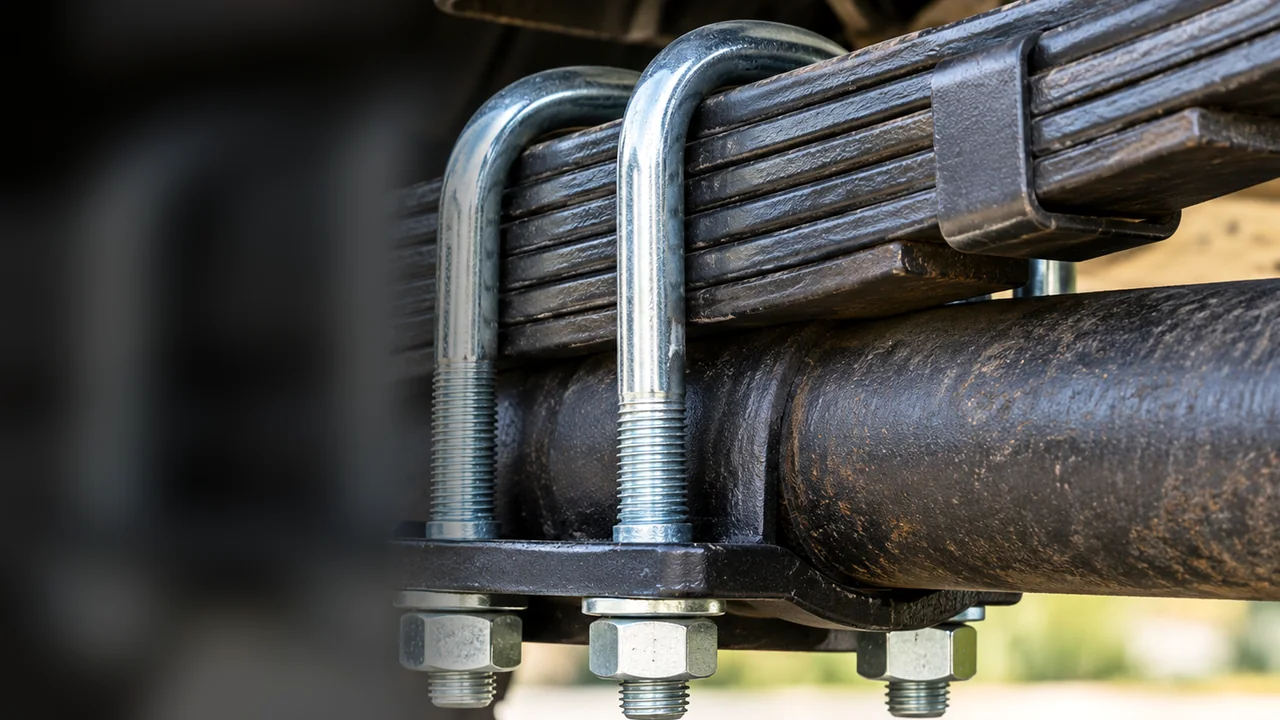
Leaf spring U-bolts are the heavy steel fasteners that clamp a leaf-spring pack securely to its axle seat. If you need replacements, match the bend shape, rod diameter, width, leg length, thread and the hardware specified for your axle. Do not choose a kit just because the nuts seem to fit. An undersized clamp, an incorrectly seated plate or the wrong torque can allow the axle and spring to move relative to each other.
For most leaf-spring repairs, the safe buying decision is new, application-correct U-bolts—not the old ones removed from the truck. They should be tightened evenly in the specified sequence to the vehicle or kit manufacturer’s torque requirement, with follow-up checks where that manufacturer calls for them. There is no single foot-pound value that applies to every pickup, lift kit or commercial axle. A torque chart for an unfamiliar bolt grade is not a substitute for the right service specification.
Leaf Spring U-Bolts: What to Check Before You Buy
Most people searching for leaf spring U-bolts are trying to solve one of three problems: replacing hardware during a spring job, finding longer clamps after an axle or suspension change, or checking a connection that may have worked loose. All three begin with the same question: what actually fits this axle, spring pack and spring plate?
The following comparison is a quick ordering guide. It isn’t a torque chart and it cannot identify a part number without your vehicle or actual suspension dimensions.
| Buying or repair question | What needs to match | Why it matters |
|---|---|---|
| Which U-bolt shape? | Round, square, semi-round or specified special bend | The crown must seat against the correct axle or spring surface |
| What size? | Rod diameter, inside leg spacing, leg length and thread | Incorrect size can distort the plate or prevent full clamp load |
| New spring pack or lift block? | Actual thickness of everything the clamp passes around | Stock-length U-bolts may no longer have enough usable thread |
| Which kit contents? | U-bolts, approved nuts, hardened washers and correct spring plate as required | Mismatched hardware can change how the load is carried |
| How tight? | Vehicle- or suspension-manufacturer torque and tightening method | Diameter alone does not give a safe universal torque |
| Reuse or retorque? | Separate instructions for removed fasteners and installed-fastener maintenance | Reusing a dismantled clamp is not the same operation as a specified retorque |
Where the U-Bolts Sit on a Leaf-Sprung Axle
On a typical solid rear axle, two U-shaped bolts straddle the axle or spring pack near each wheel. Their threaded legs pass through a spring plate and are secured with nuts and washers. The axle seat, spring center locating feature and plate form a clamped assembly. You might hear the plate called a spring plate, U-bolt plate, anchor plate or tie plate, depending on the vehicle and catalog.
An axle-over-spring setup may route the U-bolts over the axle tube, while another arrangement routes them over the spring pack. The exact path, plate position and bend depend on the suspension design. A product photo showing the same two U-shaped rods does not establish that it is the right arrangement for your truck.
What the Clamp Does That the Spring Center Pin Cannot
The spring’s center bolt holds the leaves in alignment during assembly, and its head commonly engages a locating hole in the axle seat. It is not intended to carry all the repeated acceleration, braking and road loads by itself. Proper U-bolt tension keeps the axle seat and spring pack firmly clamped together and limits movement at that interface.
When that clamp force is lost, the axle can shift relative to the spring. Loads may then be transferred to the locating pin in ways it was not designed to withstand. A sheared center pin or fresh sliding marks beneath the spring plate should prompt inspection of the entire axle-clamp joint, not merely replacement of a small bolt.
U-Bolt vs. Spring Eye Bolt: An Easy Parts-Counter Mix-Up
A spring-eye bolt passes through the spring’s front or rear mounting eye and its bushing. A U-bolt straddles the spring or axle to secure the axle seat. One provides a pivot connection; the other provides a rigid clamp at the axle. They may both be listed under leaf spring hardware, but they are not interchangeable and do not share one tightening procedure.
How to Measure Leaf Spring U-Bolts Without Guessing
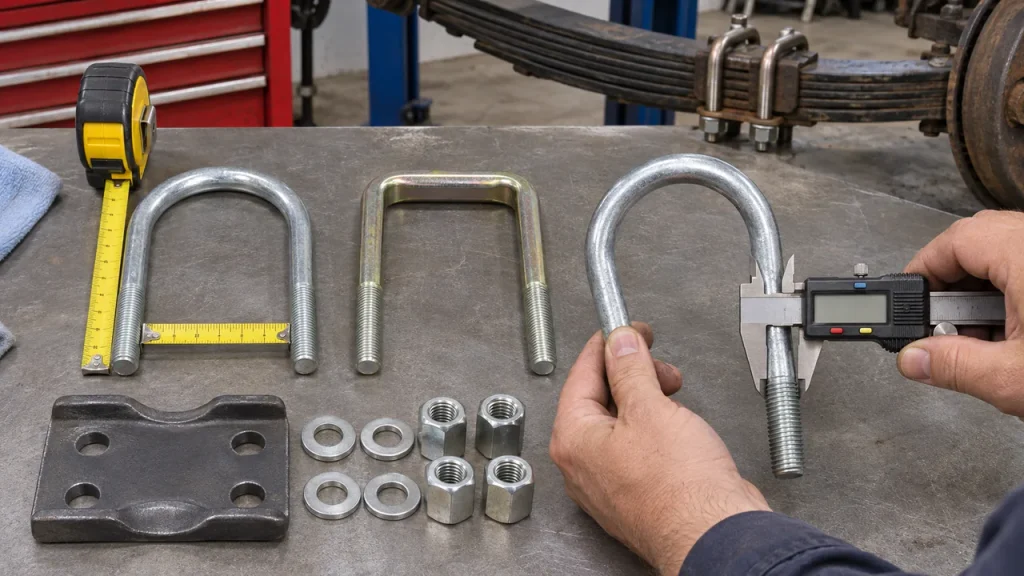
Catalogs commonly describe a U-bolt by its rod diameter, distance between the legs and leg length. Stengel Bros uses that three-part convention and also asks for the bend type. EATON Detroit Spring emphasizes measuring the space between the legs rather than guessing from how large a nut looks. The important detail is to confirm each supplier’s diagram before transferring measurements from one catalog to another.
Start With Rod Diameter, Not the Nut’s Hex Size
Rod diameter is the thickness of the steel bar that forms the U-bolt. Measure the rod itself with suitable calipers or obtain the specification from the correct part number. Do not infer it from a socket size: a hex nut can have a different wrench size from another nut fitted to the same nominal thread.
Thread diameter and pitch matter too. Inch-series hardware may be listed with a thread count per inch, while metric hardware uses a pitch in millimeters. A nut that starts turning but binds partway down is not evidence of compatibility. Never run a mismatched nut down with an impact wrench to make the threads “fit.”
Measure the Space Between the Legs—and Check the Catalog Convention
The usual inside width is the clear distance between the two parallel legs. That is different from measuring from one leg centerline to the other, or from outside edge to outside edge. Because some catalogs and engineering drawings use different conventions, the part diagram should tell you exactly which one the seller wants.
For round U-bolts going around an axle tube, its measured outside diameter helps identify the required fit, but the plate, seating radius and any axle coating or shaped saddle still have to be compatible. For square bends around a spring pack, the spring width and approved seating design are relevant. The rod should not be forced outward or inward to make it meet the plate holes.
Leg Length Changes With Spring Packs and Lift Blocks
A taller replacement spring pack, thicker axle seat or added lift block changes the distance the U-bolt must span. The new legs need enough usable threaded length to pass through the intended plate, hardened washers and full nuts, with the amount of thread engagement and protrusion required by the manufacturer.
More length is not automatically better. Excessively long legs may interfere with an axle bracket, brake line, shock mount or other components, and a threaded section that ends in the wrong place can leave the nut unable to clamp the plate. Measure the finished stack and follow the kit’s instructions rather than adding the advertised lift height to an old bolt length and calling the job done.
Bend Radius and Threaded Length Are Part of the Specification
Two U-bolts can share the same nominal width and length yet have different crown geometry. One may sit neatly against a curved axle tube while another touches only at its edges. On a spring-top mounting design, the intended bend may follow a square or semi-round seat. Incorrect crown contact can concentrate stress and shift as the fasteners tighten.
The length of the threaded portion is equally important. A plain shank caught where the nut needs to travel can prevent the plate from being seated. If a supplier asks for a custom U-bolt drawing, include the crown or bend profile and usable thread length alongside the three headline measurements.
Round, Square and Semi-Round U-Bolts Are Not Just Styling Choices
The shape is chosen around what the U-bolt is supposed to contact. Some kits even use forged or specially formed crowns for a particular axle housing. Match the original vehicle design or the instructions supplied with an engineered replacement kit, not a guess about which one looks stronger.
Round Bend: Common Around an Axle Tube
A round U-bolt forms a curved top intended to sit against a round surface, commonly an axle housing. In that application the correct inside bend and rod spacing matter. A loose-fitting crown may not distribute contact as intended, while a bend that is too narrow cannot be safely stretched open to clear the axle.
Square and Semi-Round: Follow the Seat Profile
Square bends are often found where the clamp crosses a flatter spring stack or shaped saddle. Semi-round profiles bridge applications that need a different transition between the crown and legs. The labels are useful search filters, but the real selection is the shape of the approved contact surface and plate pattern.
The spring’s width alone will not tell you whether the top should be flat, square, rounded or specially formed. Use a vehicle-specific kit or a properly dimensioned replacement drawing.
Forged Tops and Custom U-Bolts
Heavy-duty and specialty catalogs may list forged-top U-bolts, and spring shops can supply custom dimensions for unusual axle and spring combinations. That does not make a generic custom rod an acceptable substitute for safety-critical suspension hardware. Ask for an application-approved material grade, bend specification, thread, supplied nuts and tightening method.
Do not heat, re-bend, weld or straighten an old U-bolt to change its shape. Such modifications can undermine its strength and clamp behavior.
The Spring Plate, Nuts and Washers Matter as Much as the U-Bolt
Ordering two pieces of bent threaded steel is only part of the repair. A reliable clamp depends on the full contact stack, which is why a complete U-bolt kit can be a better purchase than two unidentified loose fasteners.
Inspect the U-Bolt Plate and Axle Seat
The spring plate distributes the clamping load and must sit squarely where the assembly was designed to bear. Look for distorted bolt holes, bowing, cracks, corrosion beneath the nuts and shiny marks that suggest the plate has shifted. The axle seat or saddle must also be sound and properly aligned with the spring’s locating feature.
A warped plate should not be forced flat by progressively tightening larger nuts. It can give misleading torque readings and leave one section of the spring pack poorly clamped. If the axle seat, center locating hole or plate is damaged, those components need attention before the new U-bolts go on.
Deep Nuts and Hardened Washers Are Not Decorative Extras
Many U-bolt kits use deep nuts and hardened flat washers designed for the fastener and clamp application. Their contact and thread engagement are part of achieving the intended preload. Ordinary soft hardware-store washers may deform; a random short nut may not provide the specified thread engagement.
Check whether the kit supplies two U-bolts and four nuts for one spring-to-axle connection, or parts for both sides of an axle. Terms such as rear axle U-bolt kit and pair are not consistent across retailers. Confirm the quantities rather than relying on a picture.
Material, Grade, Coating and Thread Pitch Must Agree
A U-bolt is not automatically better because a seller advertises a higher grade. The correct grade, thread form, surface finish and tightening specification must work as a system. Coated threads, dry threads and specially treated threads can produce different clamp loads at the same wrench reading.
Do not swap in generic nuts, reuse corroded old ones or mix inch and metric threads. If the kit specifies new prevailing-torque nuts or particular washers, that is part of the specified assembly—not an optional upgrade.
Leaf Spring U-Bolt Torque: Use the Right Spec and Sequence
A frequent search is “leaf spring U-bolt torque specs,” as though one number can be copied into any truck repair. It cannot. Torque depends on the particular fastener, its threads and finish, the clamped components and the manufacturer-approved procedure. A value listed for a commercial truck, trailer axle or aftermarket race spring may be completely wrong for your pickup.
Where to Find the Correct Torque Value
Start with the service information for the exact vehicle, axle and suspension package. If the mounting design comes from a specific engineered lift or replacement spring kit, check the instructions and hardware supplied with that kit, and resolve any difference from the OEM procedure before installation. A professional spring shop can help identify an unknown assembly.
The useful specification is more than a number. It may include fastener grade, whether the threads are clean and dry or prepared in a stated way, a staged tightening sequence, whether nuts must be new, and a later inspection or retorque requirement. A chart for bolt diameter alone does not capture all those conditions.
Tighten Evenly, Normally in a Cross Pattern
Many conventional four-nut spring plates are tightened progressively in a diagonal or crisscross sequence. This helps bring the plate down evenly rather than cocking it against the saddle. The actual stage values, order and finishing method must still come from the applicable instructions. Do not treat an illustration from another truck as a substitute for the correct procedure.
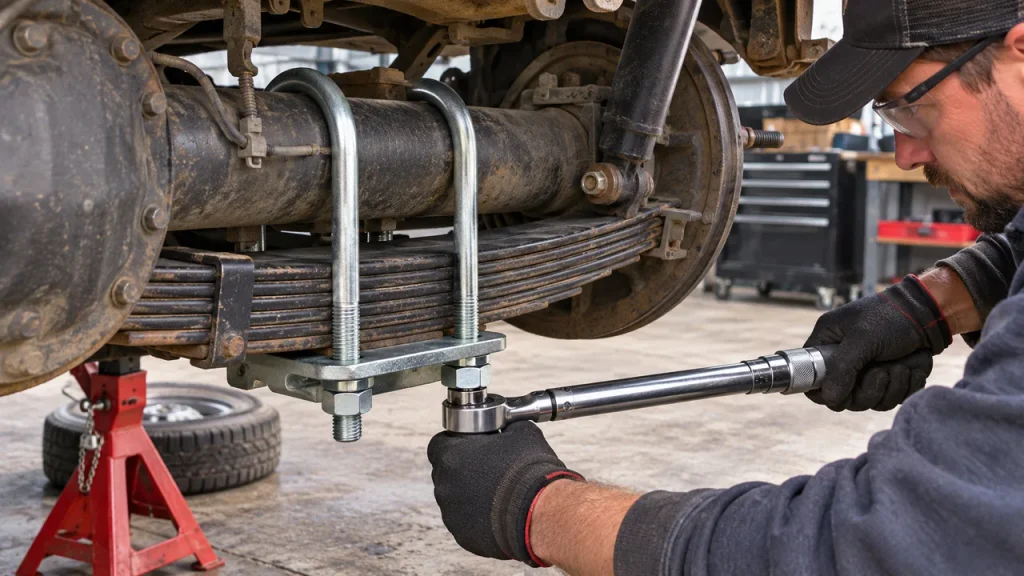
A calibrated torque wrench is used for the specified final tightening operation. An impact wrench may help with appropriate preliminary work, but using one as the sole way to establish a critical clamp load is unreliable. The shop should confirm that the plate seats correctly and that each fastener has the specified engagement rather than assuming four nuts that “feel tight” are enough.
Clean, Dry or Lubricated Threads? Follow the Written Procedure
Thread friction affects how applied torque translates into tension. Adding oil, anti-seize or grease to threads that were specified to be dry can change the preload and potentially overload the hardware. Conversely, certain manufacturers specifically describe thread preparation during their retorque procedures. These are not conflicting universal rules; they are different procedures for different fasteners.
A technician should not improvise with a lubricant or change a nut type to make tightening easier. Rusted, damaged or contaminated threads may warrant replacement and further inspection rather than a higher torque figure to force the nut along.
Retorque After Installation: Why the Interval Varies
Some spring and U-bolt manufacturers call for an early retorque after the assembly has settled, and others specify additional checks at particular mileage intervals. Automann’s published guidance, for instance, includes staged post-installation checks, while certain Ford maintenance instructions use schedules tied to a particular vehicle configuration. Neither schedule is universal.
Follow the exact service or kit instructions and record the required follow-up. A retorque is a specified check on an installed assembly, not permission to remove old U-bolts for another spring job. If the truck has already been driven with visible axle movement or damaged mounting parts, diagnose the connection first instead of simply applying a wrench and hoping it stays put.
Can You Reuse Leaf Spring U-Bolts?
When U-bolts have been removed for leaf spring or axle-clamp service, the usual recommendation is to fit new, correct fasteners. Major suspension-hardware suppliers explicitly advise against reusing removed U-bolts. They can have deformed or corroded threads, unknown fatigue history and a previous installation load that makes the next torque result unreliable.
Removed and Reinstalled Is Different From Still Installed
Suppose a spring shop removes a U-bolt to change a spring pack. That is reuse if the shop then reinstalls the same U-bolt, and the common manufacturer guidance is to replace it. By contrast, an existing clamped assembly may have a specified maintenance retorque procedure that does not involve disassembly. The terms sound similar but describe different operations.
A loose U-bolt discovered during service is not automatically fit for retightening. The spring plate may have shifted, the center pin may be damaged and the threads or bracket may already be compromised. Assess why the clamp load was lost before deciding what repair is permitted.
Why Matching the Old U-Bolt Is Not Enough
An old fastener can serve as a useful reference for bend and dimensions—provided the axle and spring arrangement were correct in the first place. It is not proof that the old length, grade or nut type should be copied without checking the actual installed stack. After a lift, a spring replacement or a previous improvised repair, the old U-bolt might already be the wrong part.
Keep the dimensions, discard the assumption that previously used hardware is sound, and verify the replacement against a correct catalog or engineering drawing.
What Loose or Damaged U-Bolts Can Look and Sound Like
A loose axle-to-spring clamp deserves attention even if the vehicle still seems to ride normally. It is a structural connection. The noise alone will not identify the failed component, but certain visual signs are harder to dismiss.
A Clunk on Acceleration, Braking or a Sharp Bump
A loose axle seat can move under changing loads, potentially producing a heavy knock as the driveline applies torque or the rear wheels cross an abrupt bump. On a leaf-sprung truck, that sound may seem to come from the axle center rather than a particular spring. Damaged shock mounts, loose cargo, a broken spring or driveline parts can sound similar.
Use our guide to suspension clunks and rattles to separate other common noise sources. This article deals with checking the axle clamp itself, not diagnosing every rear-end rattle.
Shiny Shift Marks, Rust Dust or an Uneven Plate
Look for polished metal where a saddle or plate appears to have rubbed, rust streaks emerging from a clamped joint, nuts sitting at visibly different heights, bent U-bolt legs or a plate that no longer lies square. Any of these can justify a closer inspection. Rust alone is not proof of lost torque; movement marks combined with loose or damaged hardware are much stronger evidence.
A technician should also inspect the axle tube and saddle for dents or stress, not merely the visible nuts. A plate that has worn a groove or opened up around the holes may no longer distribute the clamp force as intended.
A Broken Center Pin or an Axle That No Longer Tracks Straight
The spring center pin helps locate the axle seat. If U-bolt clamp force is lost, repeated axle movement can overload that locating feature. An axle shifted on a leaf pack, damaged locating hole or broken center bolt is a serious finding, not a minor noise complaint.
The vehicle might appear to dog-track, sit asymmetrically or feel unsettled under braking. Those symptoms are not exclusive to U-bolts; spring bushings, shackles, axle damage and tires can also affect tracking. If the axle or spring visibly shifts, or vehicle control has changed, stop driving and arrange professional recovery or repair.
When the Symptoms Point Elsewhere
A constant squeak at a spring eye, for example, suggests checking the pivot rubber and shackle as well as the axle clamps. A truck sitting low on one corner may have a sagging or broken spring even when all four U-bolt nuts are secure. Do not use U-bolt torque as a catch-all cure for ride-height, steering or damping complaints.
How Leaf Spring U-Bolts Are Replaced in a Shop
The basic task involves supporting the axle, removing the old clamp hardware, inspecting the contact surfaces and installing the correct new kit. The difficult part is controlling heavy components and restoring the exact axle-to-spring location. This is a high-level view of professional service, not a universal do-it-yourself sequence for working beneath an unsupported axle.
Before any fastener is loosened, the technician needs the vehicle’s actual lifting, support and assembly procedure. The normal checkpoints are:
- Identify the vehicle and existing assembly. Verify the axle, spring pack, U-bolt routing, bend style, plate, hardware specification and replacement kit.
- Support the frame and axle independently. Control the axle and spring load with approved equipment; removing clamps without that support can allow heavy parts to shift.
- Remove the old U-bolts and related hardware. Follow the vehicle’s sequence and replace fasteners designated as non-reusable. Watch for seized nuts, damaged threads and nearby brake or electrical lines.
- Inspect the axle saddle, spring pack and locating pin. Look for cracked leaves, a damaged center pin, worn locating holes, rust, distorted plates and contact surfaces that cannot seat correctly.
- Align the assembly and fit the new, correct kit. Confirm proper spring-to-axle location and use the specified plate, washers and nuts; do not force an incorrect bend into position.
- Tighten by the approved method. Apply the documented staged pattern, torque or other specified tightening method using suitable tools, and verify the plate is seated evenly.
- Complete the safety and follow-up checks. Inspect routing and clearance, verify the axle position, and record any required post-installation retorque or inspection interval.
Why the Axle Needs Its Own Support
A leaf spring helps both carry vehicle weight and locate a solid axle. Undoing the U-bolt clamps breaks the connection between those components. An axle can rotate or shift if it is not properly supported, especially with a loaded driveline, attached hoses and uneven suspension position.
This is why advice such as “just loosen all four nuts” is incomplete and potentially dangerous. A professional repair makes the vehicle and axle safe before the clamp is disturbed, then verifies the spring locating feature before tightening the new hardware.
Inspect Before Tightening: Spring Pin, Perch and Plate
Fresh U-bolts cannot restore a sheared locating pin, a cracked spring leaf, a crushed lift block or a badly corroded axle seat. The spring should be correctly centered on the saddle, with its locating feature engaged as designed, before final clamp load is applied. Otherwise the nuts may reach their specified torque while the axle is still positioned incorrectly.
If the plate is bowed or its holes are elongated, replacing only the rods does not resolve the underlying problem. The original repair instructions decide whether the plate, nuts, washers and associated parts must be renewed together.
Lift Blocks, Add-a-Leafs and Modified Suspension Fitment
Modification changes what a U-bolt must clamp. A longer spring pack or new lift block can make the factory hardware too short even when the axle tube and spring width remain unchanged. This is a reason to measure the complete installed setup, not to assume every “2-inch lift U-bolt kit” fits every 2-inch lift.
Extra Stack Height Does Not Equal a Universal Extra Leg Length
The U-bolt spans whatever sits between its crown and the plate, and that stack depends on whether the axle is above or below the springs, the thickness of the leaves, any spacer or block, the axle seat, and the plate’s shape. A lift block’s advertised height may help with initial selection but does not replace measuring the actual assembly.
Check that the new thread engagement and nut clearance are correct at the installed length. A lift may also change spring seat alignment, brake-line clearance and the location of shock hardware. A complete engineered kit should address those interfaces rather than simply supply longer rods.
Block Position and Axle Location Need Verification
Where an approved lift block is fitted, its locating features must match the axle saddle and spring center pin or approved locating hardware. U-bolts are not intended to compensate for a block that rocks, is offset or does not seat against the axle and spring correctly. The result may be a loose clamp even when the nuts have been tightened.
For the larger project scope and costs, our lift kit installation cost guide covers suspension changes beyond the U-bolt hardware. This page stays with selecting and securing the axle clamp.
Heavy-Duty Hardware Is Not a Payload Upgrade by Itself
A stronger-looking U-bolt does not increase the rated capacity of an axle, frame, tires, wheels, springs or vehicle. The clamping hardware must meet the designed load and retention requirements of the suspension, but changing its grade or diameter without an approved design does not raise the vehicle’s GVWR or towing rating.
Spring U-Bolts, Bushings, Center Pins and Shackles Do Different Jobs
They are often sold together during spring service, yet the failure of one does not automatically mean the others need replacing. Distinguishing the jobs also helps avoid creating two pages on SuspensionHQ that answer exactly the same question.
U-Bolts Clamp the Axle; Bushings Let the Spring Pivot
U-bolts retain the axle seat against the spring pack. Bushings at the spring eyes and shackles allow angular movement as the suspension travels. Worn rubber at a spring eye may creak or permit movement at the frame-side mount without any failure at the axle clamp.
If the problem is split rubber or a loose spring-eye sleeve, our leaf spring bushings guide explains how those pivots are inspected and replaced. Replacing U-bolts will not fix a torn shackle bushing.
The Center Bolt Locates the Spring Pack
The spring center bolt or center pin holds the leaves together and commonly provides a locating head for the axle saddle. Its job is not to replace U-bolt tension. A broken head can be evidence of axle movement or a separate assembly problem; changing it without restoring a correct axle clamp leaves the underlying issue unresolved.
Spring Replacement Is a Different Repair
A cracked main leaf, severe sag or a broken spring pack may require replacing the spring assembly rather than just its attaching hardware. A complete spring job normally involves inspecting and, where specified, renewing U-bolts as part of reassembly. The price of replacing spring packs, labor and related components belongs to our leaf spring replacement cost guide, not to a U-bolt buying article.
Ordering U-Bolts by Vehicle, by Size or as a Custom Set
Use vehicle fitment when the suspension is original. Use verified dimensions and actual component part numbers when it is modified or the history is uncertain. A truck may have an aftermarket axle, wider spring pack or special plate fitted long after it left the factory.
Stock Trucks: Start With the Exact Axle and Suspension Package
The year, make and model are only the first filters. Some pickups use multiple rear axle capacities, spring options or suspension packages, and there can be distinctions between two-wheel drive, four-wheel drive, dual-rear-wheel and commercial variants. Verify the correct axle and relevant build details rather than buying based on the truck name alone.
Modified Trucks: Record the Installed Dimensions
For a custom or non-original assembly, a suspension shop may need the following information before it can identify a suitable U-bolt set. The list also makes comparing different suppliers less frustrating.
- Bend type: round, square, semi-round or the approved special profile.
- Rod diameter and thread: actual steel diameter, thread pitch and the required fastener specification.
- Clear inside width: measured using the vendor’s stated dimension convention, plus axle diameter or spring width where appropriate.
- Leg and thread length: sufficient for the complete stack, plate and specified nut engagement.
- Plate and hardware: hole pattern, seat condition and required deep nuts, hardened washers or specific retainers.
- Application: axle and spring configuration, including any replacement spring pack, block or custom saddle.
A spring shop that receives those measurements can identify a standard replacement or determine whether a properly engineered custom part is necessary. Don’t order by a vague “fits most trucks” label when the clamp is holding the axle in place.
Price Depends on the Kit, Not Just the Steel
Common aftermarket U-bolt kits can be relatively inexpensive parts, but the total repair includes suitable hardware and the work needed to make the axle connection safe. Custom bends, heavy-duty sizes, unusual nuts and corroded mounting plates add expense. If the clamps are being replaced during a spring job, some labor overlaps; if a shop must correct a damaged perch or axle location, the job is no longer just a small fastener swap.
Ask the estimate to identify whether the price includes one pair of U-bolts for one spring seat, both axle sides, new washers and nuts, a plate if needed and the follow-up inspection requirements.
Questions That Come Up Before Tightening the New Hardware
Most last-minute mistakes happen when a familiar-looking U-bolt is assumed to behave like an ordinary bolt. These answers apply to conventional leaf-spring axle clamps; exact service requirements remain vehicle-specific.
Do You Replace U-Bolts Every Time You Replace Leaf Springs?
Typically, yes. Suppliers and many service manuals call for new U-bolts when the spring-to-axle clamp has been dismantled. They are relatively small parts compared with the consequences of lost clamp force. Follow the manufacturer’s replacement instructions for the nuts, washers and plate as well.
How Tight Should Leaf Spring U-Bolts Be?
Tight enough to achieve the manufacturer-specified clamp load using the approved torque and tightening sequence—not “as tight as possible.” A reading copied from a chart for a different grade or axle can be dangerously wrong. Use the correct exact-application procedure, including any required staged tightening and follow-up checks.
Can I Drive With a Loose Leaf Spring U-Bolt?
Do not continue driving with a confirmed loose or damaged axle-to-spring clamp. The axle can shift relative to the spring, damage the locating pin or surrounding hardware and affect stability. Arrange proper inspection and repair before normal driving resumes. A noise without confirmed looseness still warrants diagnosis, but it should not be assumed to be a U-bolt problem.
Do I Have to Replace the U-Bolts on Both Sides?
The answer depends on the repair and the manufacturer’s requirements. If both spring-to-axle connections are being dismantled, new U-bolts are normally needed at both locations. If only one assembly is removed, the untouched side may instead require a condition and torque inspection under the applicable maintenance procedure. Never reinstall the old U-bolts removed from one side simply because the other side was left alone.
Can You Cut the Excess Thread Off a Long U-Bolt?
Do not assume you can shorten a generic U-bolt safely. Some approved kits permit trimming after installation with a specified minimum thread protrusion and protection against thread damage; others do not. The correct leg length is preferable to improvising. Check the kit instructions, nearby brake lines and clearance before selecting or modifying any length.
Will New Leaf Spring U-Bolts Require Wheel Alignment?
Not automatically when an otherwise correctly located solid rear axle is reclamped without changing suspension geometry. But incorrect center-pin seating, axle movement, damaged spring mounts or a changed spring or lift setup can alter tracking or thrust angle. If the vehicle dog-tracks, pulls or has changed ride height, a suspension and alignment check is appropriate. Our alignment after suspension repairs guide explains when measuring wheel angles is helpful.
Before Final Torque, Verify the Spring Is Seated on the Axle
A U-bolt can reach a torque-wrench target while clamping an assembly that was assembled in the wrong position. The final check should therefore begin at the interface: the center locating feature engaged as specified, the axle saddle and spring pack fully seated, the plate flat and the U-bolt legs correctly positioned without contacting vulnerable nearby components.
If those conditions are not met, more torque is not the answer. Correct the damaged or misplaced parts first, then complete the specified tightening and any follow-up retorque schedule. That is what keeps a small set of fasteners from becoming a much larger axle and suspension repair.