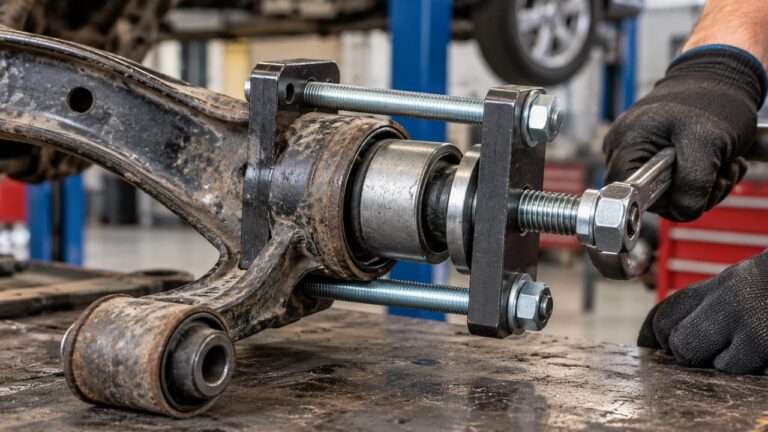
Shock Absorber Bushings: Symptoms, Types & Replacement
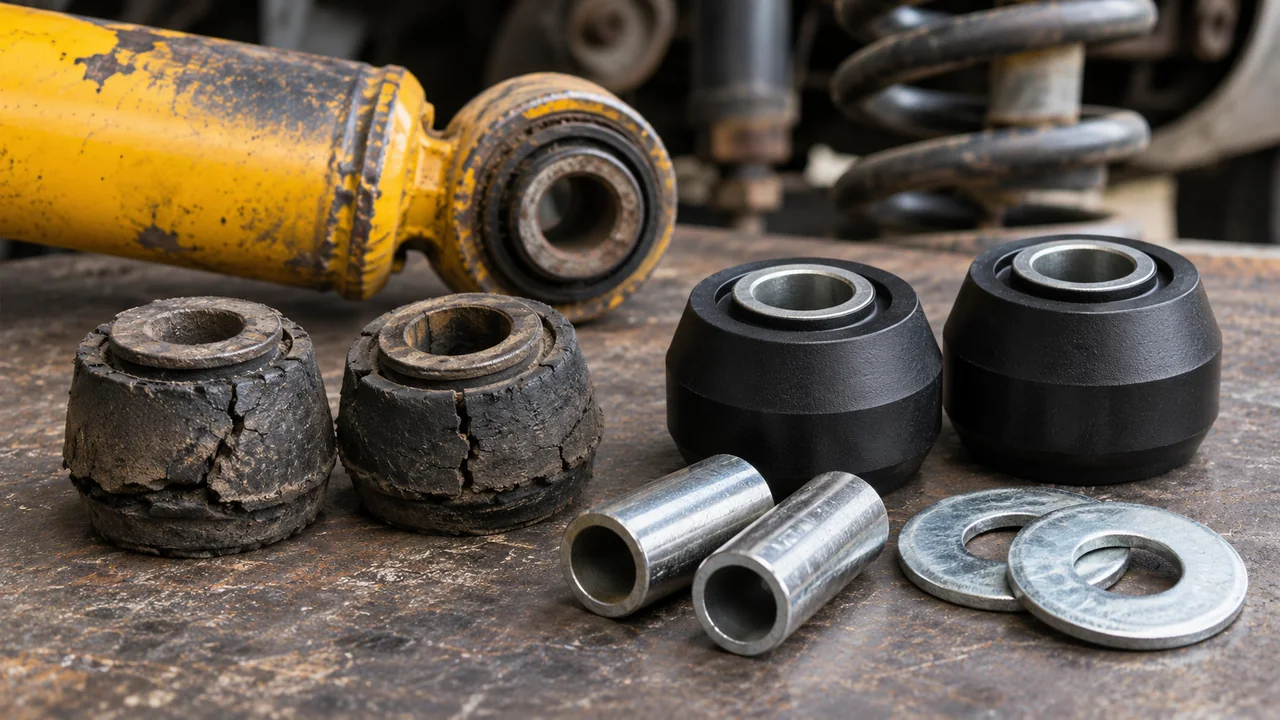
Shock absorber bushings are the rubber or polyurethane cushions at the points where a shock mounts to the vehicle. When one fails, the shock can knock against its bracket even though the damper still works. A sharp clunk over bumps, rubber split away from its metal sleeve, a displaced upper washer or visible movement at the mounting bolt are good reasons to inspect the bushing. Bouncing, tire wear and vague steering on their own are not enough to diagnose it.
Can you replace just the bushing? Often, yes—but not on every shock. Some eyelet bushings are serviceable inserts, and many stem-mount grommets come in separate hardware kits. Others are bonded, permanently installed or unavailable outside a complete shock assembly. Before ordering anything, identify the mount type, inspect the steel eye and bracket, and confirm whether the replacement includes the correct sleeve, washers and nut. The wrong hardware can create the same noise you were trying to cure.
Bad Shock Absorber Bushing Symptoms: What Actually Points to the Mount?
A worn shock mount is easy to blame because it sits near other components that make similar sounds. The best evidence combines the way the noise happens with something you can see or measure at the attachment point. That is much stronger than deciding every suspension knock means new shocks.
A Sharp Knock as the Wheel Crosses a Bump
A bushing that has lost its grip can allow the shock eye or mounting stem to shift when the suspension rapidly changes direction. That may produce a short knock on a pothole edge, speed bump or washboard road. Rear shock mounts often transmit the sound through the trunk floor or cargo area, making it seem as though something loose is rolling around inside.
Listen for a repeatable knock when that corner moves, rather than a noise that changes with engine speed. You still need to rule out exhaust hangers, spare-wheel hardware, sway bar links, control-arm joints and other possible causes. Our suspension clunks and rattles guide covers the broader diagnosis; here we are concerned with the shock’s attachment itself.
Split Rubber, an Off-Center Sleeve or Shiny Contact Marks
A torn rubber web, a sleeve visibly separating from its surrounding material, or a stem grommet squeezed out from under its washer is more persuasive than sound alone. You might also find bare, polished metal on a bracket where a loose shock eye has been striking it. A bolt that was secure but now moves within its mount requires an inspection of both the bushing and the hardware.
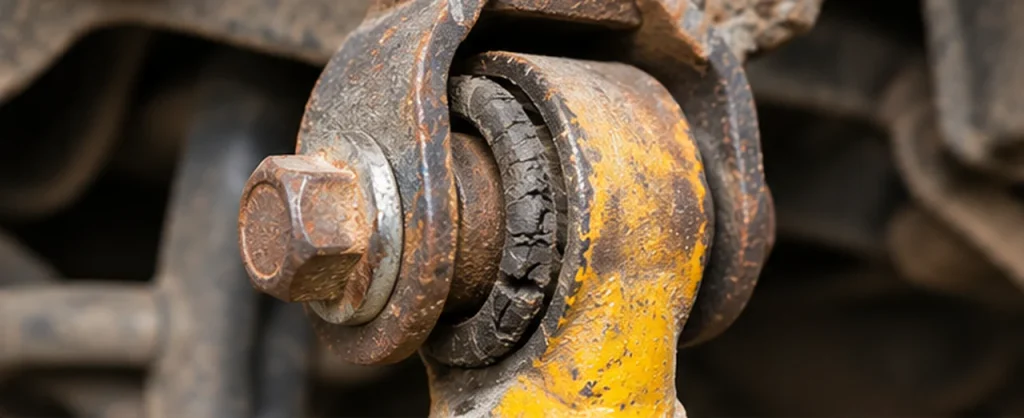
Not every fine surface crack proves the bushing has failed. Age-related checking can appear on otherwise intact rubber. Missing chunks, separation, abnormal clearance and metal-to-metal contact matter much more. Compare the part with the original mount design: some bushings have intentional shapes or reliefs that should not be mistaken for tearing.
What a Worn Bushing Usually Does Not Explain
A failed shock bushing is not automatically the reason a car bounces repeatedly, leans excessively or wears tires unevenly. Those complaints may involve worn damping, weak springs, tires, wheel alignment or other suspension joints. Severe mount damage can affect how the shock works, but a loose mounting cushion is a different failure from worn piston valves inside the shock absorber.
If the vehicle still controls body movement normally but makes a metallic tap at the shock bracket, investigate the mounting first. If it has poor damping and oil leaking from the shock body, inspecting the rubber alone will not fix the main problem.
Use these distinctions to decide what deserves a closer look, not to diagnose a car from a single noise.
| What you notice | Inspect at the shock mount | Also rule out |
|---|---|---|
| Short clunk over a sharp bump | Torn eyelet rubber, loose sleeve, shifting mounting bolt | Sway bar link, brake hardware, loose cargo |
| Tap or rattle high in a rear wheel well | Upper stem grommets, washers, nut and bracket | Exhaust hanger, rear spring seat, interior trim |
| Squeak with repeated low-speed suspension movement | Rubber rubbing the sleeve or a displaced mount | Control-arm and sway bar bushings |
| New shocks installed but the same knock remains | Reused grommets, wrong sleeve length, incorrect hardware stack | Other joints and the original source of noise |
| Excessive bouncing or fluid running down the shock | Inspect mount, but assess damper performance separately | Internally worn or leaking shock absorber |
Can You Replace Shock Absorber Bushings Without Replacing the Shocks?
Sometimes the least expensive repair is exactly what it looks like: a small bushing and the labor to install it. But the decision changes once the mount eye is worn oval, the shock stem is damaged, or the manufacturer does not supply that bushing as a service part.
When an Eyelet Bushing Is Sold Separately
Many conventional truck, SUV and rear shock absorbers use a round mounting eye with a rubber or polyurethane insert. On some designs that insert can be pressed out and replaced, together with an inner steel sleeve or crush tube. The damper can remain in service if its body, rod and eye are sound and it still provides proper damping.
Check the replacement shock’s manufacturer and part number, not just the vehicle. Two shocks intended for the same pickup can have different eye diameters or mounting sleeves. A bushing that fits the factory shock may not fit an aftermarket unit already installed on the truck.
Stem-Mount Grommets and Washers Are Often Separate Parts
Another common arrangement uses a threaded stem or stud passing through a bracket or body panel. Rubber grommets sit on one or both sides, usually with shaped washers and a retaining nut. These parts are often available as a shock absorber bushing kit, but the exact shape and stacking order are application-specific.
A flattened grommet can make an upper mount rattle without any failure inside the shock. If the threaded stem, mounting hole and bracket are healthy, renewing the specified grommets and hardware can solve the problem. Do not improvise with generic washers or tighten the nut until all the rubber has disappeared.
When the Complete Shock Is the Right Repair
Replacing the entire damper makes more sense when the eye is elongated or cracked, the stem threads are damaged, the bushing is non-serviceable, or the shock itself is leaking or no longer controlling motion properly. A fresh rubber insert cannot repair a wallowed-out steel bore or restore a failed damper.
If both parts are worn, compare the cost of a complete replacement with a bushing-only job. Our shock absorber replacement cost guide covers pricing for the dampers themselves; the decision here is whether the mounting hardware is independently repairable.
Where Are Shock Bushings Located? Three Mounts to Recognize
Before shopping by size, find the attachment you actually have. It is common for a single shock to use a different design at each end, so “upper bushing” and “lower bushing” are not complete part descriptions.
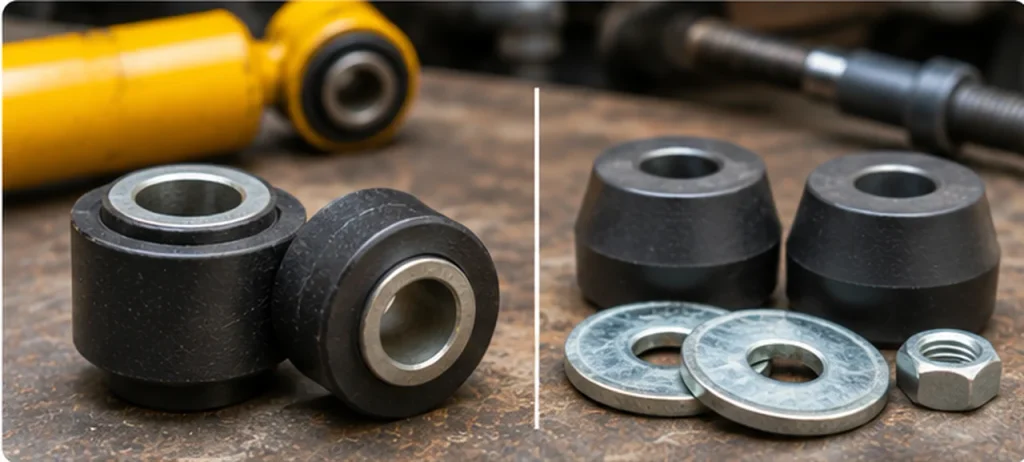
Eyelet Mount: A Round Loop With a Bushing Through It
An eyelet is the circular ring at the end of the shock. The bushing fills the space between that eye and a central sleeve or pin, while the mounting bolt joins the shock to a bracket on the frame, axle or control arm. Many rear shocks and truck dampers use this arrangement at one or both ends.
The rubber allows controlled compliance as the suspension changes angle. The steel sleeve, where fitted, gives the fastener a defined clamping surface. A missing or undersized sleeve can allow the bolt to crush the bushing or leave the assembly loose even when the nut appears tight.
Stem or Stud Mount: Grommets Around a Threaded Shaft
A stem-style mount passes through an opening in a body or chassis bracket. Typically, one grommet sits below the panel and another above, retained by washers and a nut. The parts may have tapered or cupped faces designed to locate them in the hole.
This is why a replacement kit must contain the right washers as well as the right rubber. Reversing a shaped washer, leaving out a spacer or installing a grommet upside down can change clamping pressure and alignment. Follow the vehicle- and shock-specific diagram rather than copying a generic photo.
Bar-Pin and Special Mounts Need Their Own Hardware
Some shock eyes contain a bar pin, cross pin or slotted mounting bar rather than a simple straight sleeve and through-bolt. Other designs use clevises or special brackets. The bushing may be bonded to that pin, or the pin may be removable only with a specified service method.
KYB’s mount terminology, for example, distinguishes E1 eye mounts, E2 eyes with a metal sleeve, E3 bar-pin eyes and S1 stem mounts. The codes describe different hardware, not different brands of rubber. Treat a bar-pin conversion as a design-specific modification, not a universal substitute for a standard eyelet bushing.
How to Tell Whether the Bushing Is Loose or the Shock Is Bad
The distinction is practical. A damper can work well while its mount knocks, and it can lose damping performance while its bushings still look nearly new. Check them as separate components.
Start With a Safe Visual Check
With the car parked on solid, level ground, use a light to examine the visible upper and lower attachments. Look for displaced rubber, rusty or shiny movement marks, a missing washer, damaged bracket holes and a sleeve sitting crooked in the shock eye. Photos taken from different angles can help a shop identify the mount type and show whether something has moved.
Do not crawl underneath a vehicle supported only by a jack. Some upper mounts are concealed by trim or the body and cannot be assessed reliably from the wheel opening. Never remove an attachment while a spring, axle or suspension component may be loading it unexpectedly.
The Technician Needs to Check Movement at the Actual Joint
On a suitable lift or inspection setup, a technician can determine whether the bolt, sleeve, eyelet and bracket move relative to one another beyond their intended compliance. They will also check bolt tightness to the correct specification, not simply lean on a wrench until the sound stops.
An intact bonded rubber bushing can flex normally without being loose. The concern is uncontrolled clearance or separated material allowing parts to strike. The acceptable movement and test position differ by design; an unloaded bushing may behave differently from one at normal ride height.
Inspect the Metal Before Ordering Rubber
The shock eye and vehicle-side bracket must still be round, properly aligned and free of cracks. A sleeve can wear a groove in the bolt; a loose bolt can enlarge a mounting hole. If the bracket or shock eye is damaged, pressing in fresh rubber is not a complete repair.
A shop should also evaluate the damper for significant fluid leakage, bending and loss of resistance. A light oil mist on some shocks is not the same as fluid actively running down the body. Separate the evidence rather than replacing everything because it is near the noisy corner.
Shock Absorber Bushing Sizes: Sleeve, Bolt and Eyelet Fitment
This is where many otherwise sensible repairs go wrong. A listing that says “shock bushing, 12 mm” may describe the bolt hole, not the diameter of the rubber that fits the eye. Matching one number does not establish fitment.
The Three Measurements That Matter for an Eyelet
Most eyelet-style repairs require checking the bushing’s outer fit in the eye, the inner sleeve’s hole for the mounting bolt, and the sleeve or assembly width across the bracket. Depending on the design, you may also need to check flange thickness, overall bushing length and whether the rubber is bonded to metal.
For example, KYB’s E2 mount description can use a notation such as 12 × 32, referring to a 12 mm sleeve inside diameter and 32 mm sleeve width. It does not tell you that every shock with a 12 mm bolt uses the same bushing outside diameter. Do not mistake an example code for a universal fitting size.
Why the Inner Metal Sleeve Is Not an Optional Spacer
The sleeve—often called a crush tube, inner tube or mounting insert—may take the clamping load of the bolt while the rubber isolates movement. Its length helps establish the installed width. If it is shorter, longer or narrower than specified, the bracket may pinch the wrong material or fail to clamp the assembly properly.
Do not substitute a stack of washers for a missing sleeve. A replacement kit should identify whether the sleeve is included, pressed in, reused or sold separately. If the old sleeve is heavily corroded or grooved, its condition must be addressed rather than hidden inside new rubber.
Shock Bushings by Size vs. Vehicle Fitment
A year/make/model lookup is a useful starting point for a vehicle with original shocks. But off-road trucks, lifted vehicles and cars with aftermarket dampers may no longer use the factory eyelet hardware. In those cases, identify the actual shock part number and its mounting dimensions and compare them with the vehicle bracket.
Avoid mixing inches and millimeters because the sizes look close. Bolt diameter, sleeve width and eyelet fit need exact verification. Even a small mismatch can leave unwanted movement or prevent proper assembly. Two different brands’ “universal” bushing kits are not automatically interchangeable.
What a Bushing Kit Should Include
A complete kit may contain one or more rubber inserts, inner sleeves, cupped washers, grommets, nuts or a bar pin. Some replacement shocks arrive with their eyelet bushings factory-installed, while others include loose mounting hardware in the package. Read the kit contents before ordering duplicates—or discovering that the mounting tube was not supplied.
For an eye-to-stem shock, you might need an eye bushing and sleeve at one end and a two-grommet washer stack at the other. A retailer selling a “pair” might mean two grommets for one mounting stem, not two complete vehicle corners.
Rubber vs. Polyurethane Shock Bushings
Material matters, but it comes after correct geometry and fit. A premium material in the wrong sleeve is still the wrong part.
OE-Style Rubber Is Usually the Baseline
Rubber is widely used because its compliance and vibration isolation suit the original design. A properly molded replacement can maintain the feel the vehicle was engineered for. On a stock daily driver with no unusual loads, matching the original material and the manufacturer’s specified hardness is generally a sensible starting point.
The condition of rubber depends on age, heat, ozone, road salt and exposure to petroleum products. Neither color nor a simple thumbnail test establishes its quality. Look for an exact application and a reputable part number rather than assuming every black rubber insert behaves alike.
Polyurethane May Be Firmer, but Is Not Automatically Better
Polyurethane is common in performance and off-road mounting kits. Formulations vary: some are relatively compliant, while others transmit more vibration than OE-style rubber. Certain designs can tolerate abrasion or exposure differently, but no material has a universal service-life advantage in every shock mount.
A polyurethane kit may specify special assembly grease, sleeve treatment or a particular installation orientation. Use the lubricant recommended by that kit’s manufacturer; do not assume ordinary chassis grease or dry assembly is always appropriate. An incorrectly lubricated or overtightened mount can squeak even when the material itself is new.
Does a Harder Bushing Improve Handling?
It may reduce movement at an individual attachment, but changing one shock bushing does not turn a worn damper into a firmer shock. The damper’s valving still determines its resistance to suspension movement. The most noticeable result of a correct bushing repair is often the absence of a knock, not a dramatic change in cornering performance.
A much harder bushing can also pass more noise into the cabin. If the vehicle is used for commuting rather than competition, restoring the original mounting behavior may be preferable to choosing the firmest product available.
How Shock Absorber Bushings Are Replaced
There is no responsible universal “remove two bolts and press the new one in” procedure. Some shocks are independent of the springs, while other dampers are part of assemblies with stored spring energy, hidden hardware or electronic connections. A shop must identify the design before loosening anything.
The sequence below describes the checkpoints in a professional repair, not a substitute for the vehicle’s service manual.
- Confirm the source of movement. Inspect both shock attachments, the bracket, sleeve and bolt, and separate bushing wear from damper failure.
- Identify and obtain matching parts. Verify the shock manufacturer, eye or stem type, exact dimensions, washers, sleeve and any replacement fasteners.
- Support the vehicle and suspension safely. Follow approved lifting points and take account of any axle, spring or suspension load before removing hardware.
- Remove the mounting hardware using the correct procedure. Keep the original order of grommets, washers and spacers documented; discard one-time-use fasteners when required.
- Service the bushing if the design permits it. Use the specified press or installation method, inspect the eye and bracket, and install the new insert without cutting, twisting or damaging it.
- Reassemble and verify. Position the mounts correctly, apply the manufacturer’s torque and ride-height procedure, and check for movement, contact and noise.
Stem Grommets and Eyelet Inserts Are Different Jobs
Stem grommets may slide off a threaded mount after the shock has been safely accessed, making their replacement relatively straightforward. A tightly pressed eyelet insert may need a bushing press and properly sized supports to prevent distortion of the shock eye. Some factory designs are not intended to be serviced separately at all.
Do not hammer on a shock body, force a sleeve through the wrong size opening or heat the mounting eye to burn out rubber. Those shortcuts can damage seals, finishes or a welded attachment. If a bushing is bonded to the eye, follow the approved replacement method or replace the complete unit.
Washer Orientation, Torque and Ride Height
Stem mounts frequently use shaped washers and grommets that must be assembled in a particular order. The correct compressed height may be established by a specified torque, shoulder, exposed-thread measurement or nut position depending on the product. Tightening until the grommets flatten completely is not an acceptable general rule.
Many bonded-rubber suspension bushings should be finally tightened at their specified normal ride position to avoid twisting the rubber at rest. Other shock mounting designs use sleeves that allow the fastener to be torqued in a different service position. Follow the actual vehicle and shock manufacturer’s instructions rather than applying one ride-height rule to every mounting style.
Check the Other Side, but Do Not Invent a Mandatory Pair Rule
Shocks themselves are commonly replaced in axle pairs when damping is worn. Bushings do not automatically need replacement in pairs simply because one has cracked. Inspect the opposite mount and replace it if it is deteriorated, damaged during access or specified by the kit or service procedure.
If both shocks are already being removed for other work, renewing aged serviceable mount hardware at the same time can save a second labor charge. Conversely, buying four new shocks to cure one confirmed loose grommet would often be unnecessary.
Shock Absorber Bushing Replacement Cost
The rubber part is often inexpensive; getting to it is what changes the bill. A small stem-mount kit may cost only a few tens of dollars, and some individual bushings cost less. Pricing changes substantially for specialty polyurethane hardware, OE-only kits, bar pins and unusual applications. A retail listing is not an installed repair estimate.
Why a Cheap Bushing Can Create a Larger Labor Charge
An accessible rear shock mount may take relatively little time to service. A seized through-bolt, corroded bracket, pressed-in eyelet or upper mount hidden behind interior trim can turn the same small-part repair into a more involved job. The price also changes if the shop discovers that the eyelet cannot accept a separate bushing.
Ask whether the quote covers one mount, both ends of one shock or both sides of an axle. Confirm whether new sleeves, washers, bolts and diagnostic labor are included. If the estimate changes to a complete damper, ask what condition makes bushing-only repair unsuitable.
Does Replacing the Bushing Require Wheel Alignment?
For a conventional standalone shock mounted to existing brackets, replacing its bushings does not normally change toe, camber or caster. An alignment may be appropriate if the repair disturbed control arms, a strut-to-knuckle connection, adjustable mounts or the vehicle already has alignment-related symptoms.
Our alignment after suspension repairs guide explains when checking wheel angles is different from adjusting them. The invoice should reflect what the shop actually moved, not the assumption that every suspension job requires an alignment.
Why Shock Mount Bushings Fail Early
Rubber ages, but premature failure often has a second cause. If a fresh mount quickly becomes noisy, look beyond the material before fitting the same kit again.
Dirt, Salt, Oil and Heat
Lower shock eyes are close to the road, where splash, grit and corrosion attack the hardware. Rubber can harden or crack with age; oil contamination can affect certain compounds. A leaking shock or nearby fluid source should be addressed because replacing the bushing while leaving it soaked may shorten the life of the repair.
Incorrect Hardware or an Overstressed Mount
A missing crush sleeve, wrong bolt diameter, reversed washer, loose retaining nut or rubber clamped in the wrong orientation can create abnormal movement. A badly selected aftermarket shock may put the mount in a position it was not designed to tolerate through full suspension travel.
On modified trucks, check that the shock’s eyelet and bracket widths are compatible and that the mount does not bind at droop or compression. A bushing cannot make an incorrectly sized or poorly located damper mounting safe.
Damage After an Impact or Previous Repair
An impact can bend a mounting tab or deform an eyelet. Rust can weaken the bracket around an otherwise healthy bushing. If the knock appeared immediately after new shocks were fitted, inspect the specific hardware supplied and the original bracket before assuming the new dampers are defective.
The repair should return both components—the flexible bushing and the metal connection—to the correct fit. Simply tightening a badly worn hole can conceal movement temporarily without restoring the mounting structure.
Shock Bushings Are Not Control Arm Bushings or Strut Mounts
The same word bushing appears throughout the suspension, but these parts do not all control the same motion. Keeping the distinction clear avoids ordering rubber for the wrong joint.
Shock Bushing vs. Control Arm Bushing
A shock bushing attaches a damper to a bracket. A control-arm bushing attaches an arm that helps locate the wheel. Both can clunk when worn, but severe control-arm bushing movement is more directly associated with changes in wheel position under braking and may affect alignment.
If the rubber is inside the control arm rather than the circular end of a shock, use our control arm bushing replacement cost guide for that different job. Replacing the shock’s mount will not correct a loose control arm.
Shock Bushing vs. Upper Strut Mount
A structural strut commonly attaches to the body through a larger upper mount, sometimes with a bearing that accommodates steering rotation. A standalone shock’s stem grommets or eyelet bushings are not the same assembly. The upper strut bearing can pop or bind during steering; an ordinary rear shock eyelet does not perform that steering function.
If the noise is concentrated at the front strut tower and appears when turning the steering wheel, our bad strut mount symptoms guide addresses that specific diagnosis. This article is about shock absorber attachment cushions, not replacing the strut bearing.
Common Shock Absorber Bushing Questions
A few practical questions tend to come up when the old bushing is visible or the parts counter offers several nearly identical kits.
Can I Drive With a Bad Shock Bushing?
A light squeak with no abnormal movement may allow time to book an inspection, but you cannot determine the safety of a mount by noise alone. If the shock is visibly detached, the bolt or bracket moves significantly, the wheel or tire is being contacted, or steering and stability have changed, stop driving and arrange professional help. A loose mounting point can damage surrounding metal and compromise the shock’s ability to control movement.
Are Shock Absorber Bushings Universal?
No. Some aftermarket suppliers sell size-based kits that fit several shocks, but compatibility still depends on mount style, eye diameter, sleeve length, bolt size, rubber profile and sometimes the exact damper model. “Universal” does not waive those measurements.
Should a Sleeve Turn Freely Inside the Bushing?
Not necessarily. Many rubber bushings are bonded to or grip the sleeve and accommodate normal movement through rubber flex, not free rotation at the bolt. Other designs use different interfaces. A sleeve spinning loosely inside torn rubber may indicate damage, while a properly specified smooth-running bearing or pivot arrangement has a different design. Check the shock’s mount specification rather than using free rotation as a universal test.
How Long Do Shock Bushings Last?
There is no dependable mileage interval for every vehicle. Heat, corrosion, road quality, load, design and installation all affect wear. Inspect during shock service or whenever noise, visible cracking or unusual movement is found; replace based on condition and the manufacturer’s inspection criteria.
Can a Bad Bushing Make a New Shock Clunk?
Yes. If old mounting hardware was reused, a sleeve is the wrong width or the washers were installed incorrectly, a new damper can knock on its first drive. That is why verifying the hardware stack and bracket matters before blaming the new shock or its internal valving.
Can I Replace Only the Lower Shock Bushing?
Yes, if the lower mount is independently serviceable, the shock and bracket are sound, and the exact replacement is available. Inspect the upper bushing at the same time, but do not assume it is the same size or style. A lower eyelet and an upper stem can require completely different kits.
Before You Buy Bushings, Inspect the Shock Eye and Bracket
The last check is metal, not rubber. A new insert can take up the intended gap in an undamaged mounting eye. It cannot make an elongated hole round again, straighten a bent bracket or compensate for a sleeve that does not fit the bolt. Those defects need their own repair decision.
For a lasting fix, the shop should be able to show you which rubber has failed, verify the correct bushing and sleeve dimensions, and explain whether the shock itself remains serviceable. If the mount is sound and only the cushion is worn, replacing the bushing can be a focused, economical repair. If the eyelet or hardware has been damaged by looseness, the job must address that damage as well.