How to Replace a Sway Bar Link: Steps & Stuck Nut Fixes
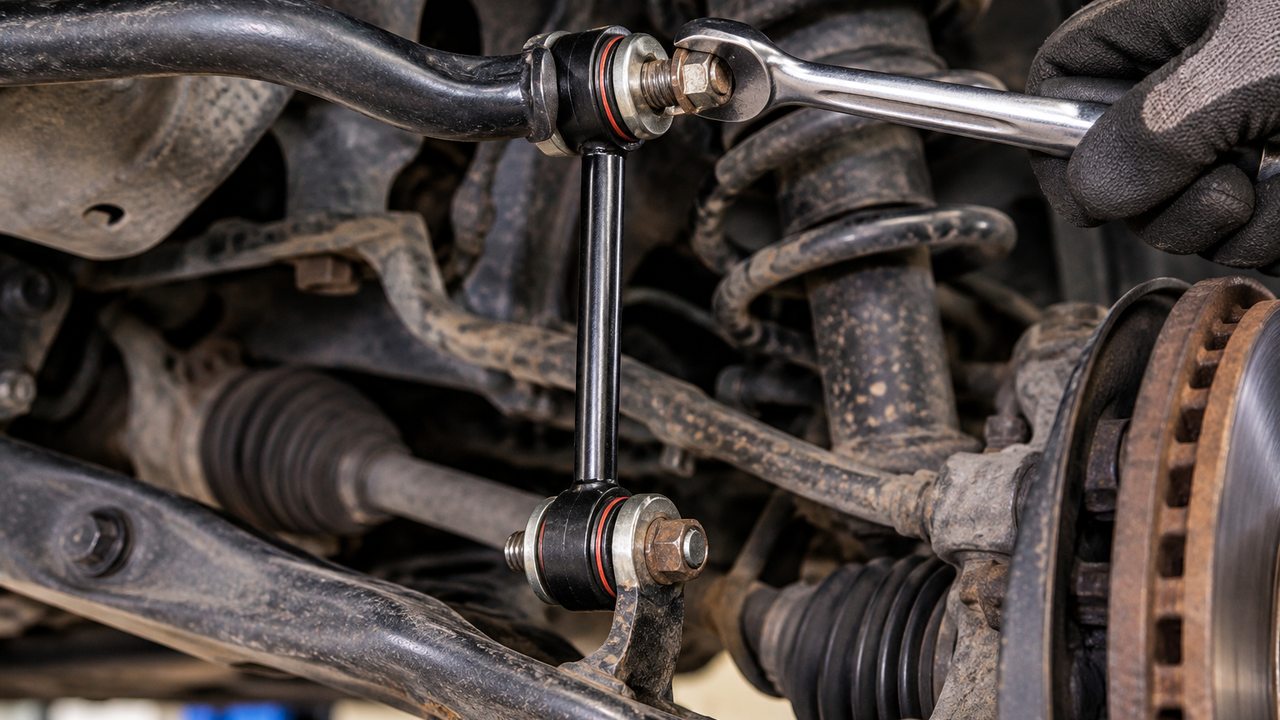
To replace a sway bar link, safely raise and support the vehicle, remove the wheel if necessary, loosen the nuts at both ends of the old link, and install the correctly matched replacement. Tighten the new hardware to the vehicle manufacturer’s specifications, then check for interference, looseness, and unwanted noise.
On many cars, replacing a sway bar end link is a manageable DIY repair that takes about 30–60 minutes per side when the hardware cooperates. The difficult part usually isn’t installing the new link. It’s getting the old one off after years of water, road salt, and dirt have corroded the exposed threads.
Here’s the basic replacement procedure:
- Confirm that the sway bar link is faulty and purchase the correct replacement.
- Support the vehicle safely, following the specified suspension procedure.
- Locate the link between the sway bar and the strut, control arm, or other mounting point.
- Clean the exposed threads and apply penetrating oil if necessary.
- Hold the stud with the appropriate Allen, Torx, or backing wrench while loosening the retaining nuts.
- Remove the old link and inspect both mounting points.
- Install the replacement without forcing the sway bar into position.
- Tighten the fasteners to specification at the required suspension position and check the repair.
If the nut spins without coming off: Look for a hex or Torx socket in the end of the stud, or wrench flats behind the ball-joint housing. Hold that feature stationary while turning the nut. This solves one of the most common problems encountered during sway bar link replacement without cutting anything.
These instructions cover conventional front and rear stabilizer links. Exact mounting arrangements vary, particularly on trucks, SUVs, vehicles with aftermarket adjustable links, and suspensions with electronic or disconnecting stabilizer systems.
Safety first: Never work under a vehicle supported only by a hydraulic jack. Use approved lifting points, appropriate jack stands or ramps, and wheel chocks. A sway bar can also hold torsional load when the wheels are at different heights. Follow the vehicle-specific support procedure before disconnecting a link, and keep your hands clear of components that could move as the connection releases.
Before You Start: Make Sure You’re Replacing the Right Part
The sway bar is the long metal bar running across the suspension. A sway bar link, also called a stabilizer bar link or sway bar end link, connects one end of that bar to the suspension.
On many MacPherson-strut cars, the front link runs between the sway bar and a mounting tab on the strut. On other vehicles, it connects the bar to a lower control arm. Rear links may attach to a suspension arm, knuckle, or another application-specific mounting point.
If you’re buying a replacement, compare the actual part rather than relying on a picture of a vaguely similar link. Check the overall length, stud angles, thread sizes, mounting style, and whether the part is designated for the left or right side.
Also, don’t replace the links just because you hear a clunk. Strut mounts, ball joints, control arm bushings, and sway bar mounting bushings can all create similar noises. If you haven’t confirmed the faulty component yet, our guide to bad sway bar link symptoms explains what to inspect before ordering parts.
Ball-Joint Links vs. Bushing-Style Links
Most replacement tutorials show a short metal rod with a small ball joint at either end. That’s common, but it isn’t the only design you’ll encounter.
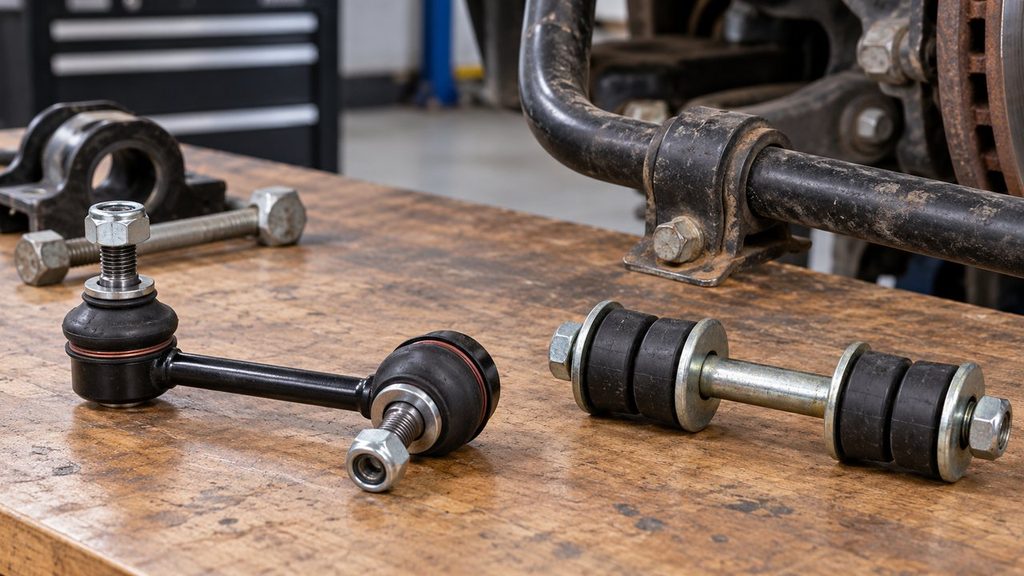
Some older cars, trucks, and SUVs use a long through-bolt, rubber bushings, washers, and a center sleeve. Aftermarket performance suspensions may use adjustable links with threaded bodies and locking nuts.
| Link design | How to recognize it | Important replacement detail |
|---|---|---|
| Ball-joint end link | Short rod with a ball stud and rubber dust boot at one or both ends | Stud may spin while removing the nut; use its specified holding feature |
| Bushing-style end link | Long bolt or rod passing through rubber bushings, washers, and a sleeve | Maintain the correct washer and bushing order; tighten to the specified compression or torque |
| Adjustable sway bar link | Threaded body or rod ends with locking nuts | Match the specified length and prevent unwanted sway bar preload |
| Specialized or disconnecting link | May include quick-disconnect hardware or an unusual mounting arrangement | Follow the system-specific engagement and installation procedure |
The bushings at the ends of a through-bolt-style link should not be confused with the larger bushings that hold the sway bar to the chassis or subframe. Those are separate parts with a different replacement procedure. If the worn components are the central mounts, see our guide to replacing sway bar mounting bushings instead.
Tools Needed to Replace a Sway Bar Link
You usually won’t need a suspension press or spring compressor just to replace a conventional end link. The right holding wrench, though, can make the difference between a quick repair and an afternoon spent fighting one nut.
Gather the following before lifting the vehicle:
- Correct replacement sway bar link: Check vehicle fitment and whether new nuts and other fasteners are included.
- Floor jack and appropriately rated jack stands: Unless the approved procedure permits working safely with the vehicle on suitable ramps or another support system.
- Wheel chocks: To prevent unintended vehicle movement.
- Lug wrench or suitable socket: If the wheel must be removed.
- Ratchet, sockets, and combination wrenches: Sized for the original and replacement hardware.
- Allen or Torx bits: For sway bar link studs with internal holding sockets.
- Thin open-end wrench: For joints that have wrench flats behind the stud housing.
- Torque wrench: To tighten the new fasteners to specification.
- Penetrating oil and a wire brush: For corroded exposed threads.
- Safety glasses and work gloves: Particularly when cleaning rusty hardware.
A suitable counterholding socket or specialized sway bar link wrench can also be helpful. These tools let you hold the stud while turning the nut, which becomes awkward when an Allen key and a conventional socket compete for the same space.
Have the manufacturer’s tightening specifications available. Don’t assume a new aftermarket link uses exactly the same hardware or torque as the original part. Some manufacturers supply updated nuts or require a particular installation method.
How to Replace a Sway Bar Link: Step by Step
This procedure applies to a typical separately replaceable ball-joint-style sway bar link. The same general sequence works on many front and rear suspensions, but the exact lifting points, component clearances, and tightening position must follow the relevant service instructions.
Step 1: Compare the Replacement Link With the Old One
Before removing anything, hold the new link near the old one and compare their shapes.
Check the distance between mounting centers, stud orientation, mounting-hole fit, and the position of the rubber boots. Links may look nearly identical in a parts catalog while having different stud angles or lengths.
Confirm whether the new link is directional. Certain designs are interchangeable from left to right, while others are side-specific or intended to face a particular way.
Inspect the supplied hardware too. Replacement links sometimes include self-locking nuts that differ from the factory fasteners. Use the specified hardware rather than automatically reusing rusty original nuts.
If the replacement doesn’t match the vehicle application, stop here. Trying to compensate for the wrong length by forcing the sway bar into position can create binding or unwanted preload.
Step 2: Lift and Support the Vehicle Safely
Park on firm, level ground and secure the vehicle against rolling. If the wheel needs to come off, loosen its lug nuts slightly before raising the vehicle.
Raise and support the vehicle using the manufacturer-approved locations. Remove the wheel if necessary for access.
Here’s an important detail: the sway bar connects the suspension on both sides of the vehicle. If one wheel is hanging while the opposite wheel remains on the ground, the bar may be twisted and can push against the link you’re trying to remove.
On many conventional suspensions, supporting both sides of the axle at comparable heights reduces the difference in sway bar position and makes the links easier to disconnect. Other applications specify a particular suspension position or additional support.
Don’t assume that raising one corner is always sufficient, and don’t try to overcome a loaded sway bar by pulling violently on the link. If the components are being forced out of alignment, reconsider the support arrangement before continuing.
Do not loosen spring-retaining hardware, control arm pivots, or other suspension connections merely to create space unless the service procedure specifically requires it.
Step 3: Locate Both Sway Bar Link Mounting Points
Follow the sway bar toward the wheel until you find the short link connecting it to the suspension.
On a typical front strut suspension, one end of the link is attached to the sway bar and the other to a bracket on the strut. A lower-control-arm-mounted design may place the second connection farther down.
Look behind each nut before choosing a tool. You may find a small hex recess in the end of the threaded stud, a Torx socket, or a pair of narrow wrench flats near the dust boot.
Knowing where that holding feature is now can save a lot of frustration when the stud begins spinning.
Check the surrounding brake hose, ABS wiring, CV boot, and other nearby components. Make sure you can move the tool without catching or damaging them.
Step 4: Clean and Loosen the Old Nuts
Brush loose rust and dirt from the exposed threads. If the hardware is corroded, apply a suitable penetrating oil and allow it to work according to the product instructions.
Fit the correct wrench or socket onto the retaining nut. Use another tool to hold the stud stationary if its design requires counterholding.
It helps to loosen both mounting nuts while the link is still seated securely in its mounting holes, following the specified disassembly order. Once one end is completely free, the link may become more awkward to hold.
Some nuts break loose immediately. Others turn a fraction of a revolution and stop because corrosion on the exposed threads has reached the nut. If resistance increases sharply, don’t keep forcing it until the stud or holding socket rounds off.
Work methodically. The old link is being discarded, but the sway bar, mounting tab, and surrounding suspension components are not.
Step 5: Remove the Old Sway Bar Link
Once both retaining nuts are loose, remove them using the appropriate counterholding tool and withdraw the studs from their mounting holes.
If the link doesn’t slide out freely, pause and check whether the bar is under torsional load or the stud is seized inside its mounting hole.
A small difference in suspension height can make the stud appear crooked against the bracket. Correcting the support position may allow it to come out without force.
Do not put your fingers between the sway bar and its mounting points while the connection is under load.
With the old link removed, inspect the holes in the sway bar and suspension bracket. Look for elongation, cracks, corrosion damage, or evidence that a loose stud has been moving inside the mounting hole.
A new link won’t repair a damaged mounting tab or oversized hole. Those problems need to be addressed before installation.
Step 6: Install the New Sway Bar Link
Position the replacement in the same mounting arrangement as the original, accounting for any updated installation instructions supplied with the new part.
Insert the studs through the correct holes and start the retaining nuts by hand. The nuts should engage their threads smoothly. Cross-threading a new stud is an avoidable way to ruin a replacement part before you’ve even finished the job.
If the second end doesn’t line up, don’t immediately pull it into position by tightening the nut. Check the vehicle’s support height and whether the opposite side of the suspension is creating sway bar twist.
On a conventional non-adjustable link, both ends should reach their mounting points when the suspension is positioned as specified. An adjustable link may require a separate length-setting procedure.
Make sure the joint bodies and rubber boots have adequate clearance from the strut, brake hose, spring, and wheel throughout the intended range of movement.
Do not twist, pinch, or puncture a new dust boot during installation. The boot helps keep moisture and grit away from the small ball-and-socket joint.
Step 7: Torque the Mounting Hardware Correctly
Tighten the link hardware according to the vehicle and replacement-part specifications. Use the required counterholding feature so the stud doesn’t rotate while the nut is tightened.
There’s no universal sway bar link torque that is correct for every car. Stud diameter, fastener design, mounting location, and aftermarket part specifications all matter.
The required suspension position also matters. Some manufacturers specify final tightening at normal ride height; others provide different procedures depending on the link construction and access.
For bushing-style end links, washer order, sleeve length, and rubber compression are especially important. Overtightening can crush the bushings, while insufficient tightening can leave the assembly loose.
If final tightening requires the suspension to be at ride height, use the approved support method or appropriate workshop equipment. Never crawl beneath a vehicle resting on an unsupported jack to reach a nut.
Don’t rely on an impact wrench for final tightening unless the specified procedure explicitly allows an appropriate method. A torque wrench provides a controlled way to complete the installation.
Step 8: Reassemble and Check Your Work
Before reinstalling the wheel, check that both ends of the new link are seated correctly, the nuts are secured, and no part of the assembly contacts nearby components.
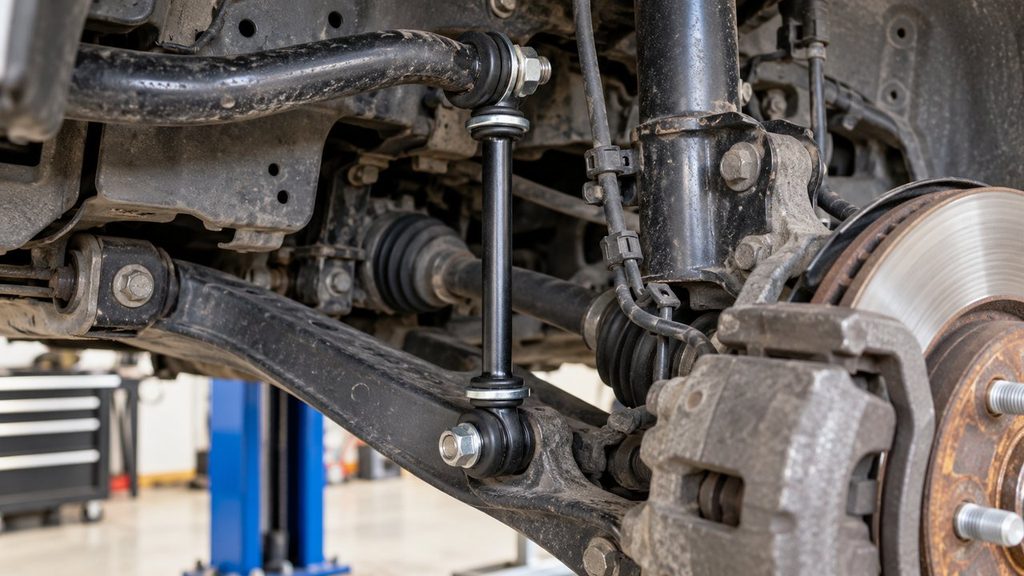
Verify that the dust boots are intact and that the link has no unintended looseness at its mounting points. A ball-joint-style link should articulate as designed, but its mounting studs must not move loosely inside the bracket or sway bar.
Reinstall the wheel if removed, lower the vehicle using the approved procedure, and torque the wheel fasteners to the manufacturer’s specifications.
Complete any final tightening or inspection required at normal ride height. Then check both sides of the axle before considering the repair finished.
Once everything has been verified, take a short, cautious test drive on a familiar road. Listen for unexpected knocks and pay attention to whether the suspension feels normal when turning or passing over small bumps.
If the noise remains, don’t automatically tighten the new link beyond specification. Recheck the installation and investigate other possible suspension faults.
How to Remove a Sway Bar Link That Keeps Spinning
This deserves its own section because it’s often the part of the job that actually stops people.
You put a socket on the nut, start turning, and discover that the entire stud rotates inside the old ball joint. The nut doesn’t move along the threads because nothing is holding the stud still.
Before reaching for a grinder, identify the stud’s holding feature.
Method 1: Hold the Stud With an Allen or Torx Bit
Many stabilizer links have a recessed hex or Torx socket at the exposed end of the stud.
Insert the correctly sized bit into that recess to prevent the stud from rotating. Use an appropriate wrench or counterholding socket arrangement to turn the retaining nut.
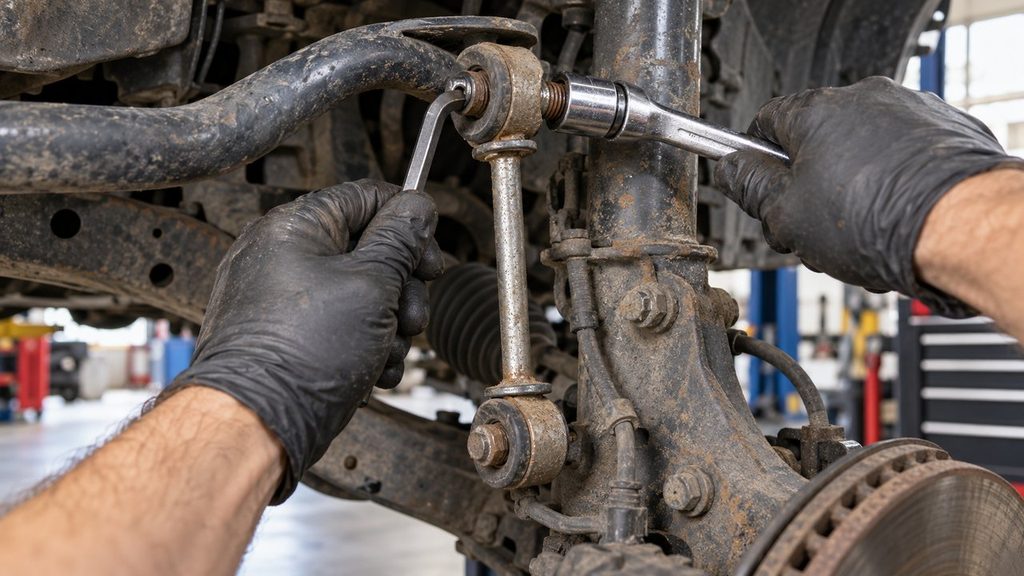
This works well when the recess is clean and undamaged. If the bit starts slipping, stop before rounding the recess completely.
Cleaning dirt and corrosion from the recess before inserting the bit can make a noticeable difference to how securely it engages.
Method 2: Use the Wrench Flats Behind the Joint
Some sway bar links have small flat surfaces on the stud, tucked behind the ball-joint housing or close to the rubber boot.
A thin open-end wrench can grip those flats while a second wrench loosens the nut.
It’s easy to miss them because they’re often narrow and partly hidden by the boot. Look carefully before assuming the joint has no way to hold it.
Don’t squeeze or tear the boot on a new replacement joint. Protect its sealing surfaces and use the designated holding feature.
Method 3: Deal With Rust Before Applying More Force
If the nut starts turning but jams on corroded threads, clean the exposed threads with a wire brush and apply penetrating oil suitable for the application.
When the threads and hardware are still serviceable, controlled movement back and forth may help work through corrosion. Don’t continue if the stud twists, the thread strips, or the holding feature is beginning to fail.
Inspect the nut and exposed threads for deformation. A heavily corroded self-locking nut may not be worth saving, especially when new hardware is supplied with the replacement link.
The goal isn’t to preserve an old nut at any cost. It’s to remove it without damaging the surrounding suspension or creating a safety hazard.
When Cutting Is the Only Practical Option
Sometimes the stud’s holding socket is stripped, the wrench flats are badly corroded, or the nut has effectively seized to the threads.
A professional may choose a suitable nut splitter or controlled cutting method to remove the old hardware. But cutting close to a strut, brake hose, ABS wire, or rubber CV boot introduces risks that don’t exist with ordinary hand-tool removal.
A grinder can throw sparks and fragments, damage nearby components, and remove material from mounting surfaces if it slips. Open-flame heating is also a poor default solution around rubber boots, fluid lines, and protective coatings.
If you can’t remove the fastener with the correct holding tools and safe access, having a workshop remove the seized link is preferable to damaging the vehicle to save a small part.
What If the New Sway Bar Link Doesn’t Line Up?
You’ve removed the old link, but the replacement won’t reach both mounting holes. One stud fits neatly, while the other seems too high, too low, or angled away from the bracket.
That doesn’t automatically mean you’ve purchased the wrong link. The suspension may be sitting at a different height on one side, causing the sway bar to twist.
First compare the new and old parts. If the dimensions match, check the support arrangement and the position of the opposite wheel. The service procedure may require the suspension on both sides to be at similar heights or at a specified ride-height position.
Once the load is properly controlled, the mounting points should align without excessive force.
Don’t pull a badly misaligned stud into place by tightening its nut. Doing so can damage the threads or place an unintended load on the new joint.
For an aftermarket adjustable end link, confirm the specified installed length and adjustment procedure. Certain performance setups use link adjustment to eliminate sway bar preload at normal ride height, but that adjustment should follow the suspension manufacturer’s instructions.
Can You Replace Sway Bar Links Without Lifting the Vehicle?
On some vehicles, yes—but only if you have safe access to the mounting points and the procedure permits working at normal ride height.
For example, certain trucks or SUVs have enough ground clearance to reach a sway bar end link without removing the wheel. Suitable drive-on ramps may also provide working space while keeping both wheels on an axle at a comparable suspension height.
That doesn’t mean the same approach works on a low passenger car. If you can’t see the fasteners or position your tools safely, proper lifting and support are necessary.
Don’t work beneath a vehicle supported by an ordinary jack, unstable blocks, or an improvised ramp. Even a simple link replacement isn’t worth the risk of a vehicle shifting or falling.
Can you replace the link without removing the wheel? Also sometimes. On a vehicle with sufficient clearance, the mounting nuts may be reachable with the wheel installed. Removing the wheel generally improves visibility and access, especially on strut-mounted front links.
Front vs. Rear Sway Bar Link Replacement
The basic operation is similar at either axle, but the working space and connection points can be different.
Replacing Front Sway Bar Links
Front sway bar links commonly attach to the strut or lower control arm. On many cars, removing the front wheel exposes both retaining nuts.
Steering the knuckle may change tool access on some vehicles, but it can also move hoses, wires, and suspension components closer to your working area. Follow the service procedure and check clearances before doing so.
Front-wheel-drive vehicles can have CV axle boots and ABS sensor wiring close to the link. Avoid damaging those parts while loosening stubborn hardware.
Replacing Rear Sway Bar Links
Rear links may be shorter, mounted at different angles, or attached directly to an independent rear suspension arm. Some SUVs and trucks use bushing-style links instead of the ball-joint design commonly seen at the front.
Watch for interference from exhaust components, rear brake lines, and nearby suspension members. If the rear axle is solid, the specified lifting and support procedure may differ substantially from that for an independent rear suspension.
Not every vehicle has a rear sway bar. If there’s no rear stabilizer bar fitted, there are no rear sway bar links to replace.
Should You Replace Both Sway Bar Links at Once?
Replacing sway bar links in pairs is common, but it isn’t mandatory in every case.
The left and right links on an axle usually have the same age and have been exposed to similar road conditions. If one ball joint is loose after years of use, it’s worth checking the other before putting everything back together.
However, if one link was damaged by a localized impact and the opposite link remains in good condition, replacing only the damaged side may be reasonable.
For adjustable performance links, follow the manufacturer’s instructions about matching lengths, setting preload, and whether the installation should be treated as a pair.
Don’t mix parts of different lengths or mounting designs simply because they attach to the same holes. Correct fitment matters more than whether both links are new.
Do You Need an Alignment After Replacing Sway Bar Links?
Usually, no. Replacing only conventional sway bar links doesn’t normally alter toe, camber, or caster because the links transfer sway bar forces rather than setting the wheel’s alignment angles.
There’s an exception when other suspension or steering components were disturbed during the repair. If you loosened a strut-to-knuckle connection, adjusted a control arm mounting point, or replaced another wheel-locating component, alignment may be needed.
An alignment check is also reasonable if the vehicle already pulls to one side, has uneven tire wear, or suffered an impact that may have damaged other suspension parts.
Our guide to alignment after suspension repairs explains which replacements normally affect wheel geometry and which do not.
Common Sway Bar Link Replacement Mistakes
The new link may be inexpensive, but a few installation errors can create fresh knocking noises, shorten its life, or damage the mounting points.
Pay particular attention to these mistakes:
- Working with one side of the sway bar heavily loaded: The link may move suddenly when its retaining nut is removed.
- Using the wrong replacement length: A link that’s too short or too long can create interference and unintended forces.
- Forcing a misaligned stud into a mounting hole: The issue may be suspension position, not inadequate leverage.
- Overtightening the new nuts: Excessive torque can damage threads, studs, or rubber components.
- Ignoring the stud holding feature: Spinning the joint unnecessarily can damage the holding socket or make proper tightening difficult.
- Reusing hardware that must be replaced: Follow the supplied instructions for new self-locking nuts and other specified fasteners.
- Installing bushing washers in the wrong order: Bushing-style links depend on correct assembly and compression.
- Leaving the dust boot pinched: A damaged boot can allow contamination into a new ball joint.
- Failing to check mounting-hole wear: A loose connection may continue knocking even with a new link.
- Assuming every clunk comes from the end link: Worn strut mounts, control arm bushings, and other joints can remain noisy after the repair.
One final mistake is easy to overlook: judging the finished repair only by whether the old noise has disappeared. You still need to verify that the fasteners are correct, the link has adequate clearance, and the suspension operates without binding.
Frequently Asked Questions
Is it hard to replace sway bar links?
On many conventional cars, sway bar link replacement is a relatively approachable suspension repair for someone comfortable using hand tools and safely supporting a vehicle. Rusted nuts, spinning studs, limited access, and unusual link designs can make the job much harder. The difficulty depends more on the vehicle and hardware condition than the size of the part.
How long does it take to replace sway bar links?
About 30–60 minutes per side is a reasonable estimate for an accessible conventional link with cooperative hardware. A first-time DIY repair may take longer, particularly if the wheel must be removed or the link stud requires counterholding. Severe corrosion can extend the job considerably.
Can you replace a sway bar link without cutting the old one?
Usually, yes. Many stuck links can be removed using penetrating oil and the correct Allen, Torx, or backing wrench to prevent the stud from spinning. Cutting becomes a consideration when the old fastener is badly damaged or seized and other suitable methods have failed. Protecting nearby components is essential.
Can I change sway bar links myself?
Yes, if the vehicle uses serviceable links, the mounting points are accessible, and you can safely support the suspension and tighten the fasteners to specification. If the job involves difficult corrosion, an unfamiliar active sway bar system, or uncontrolled component movement, professional assistance is the safer choice.
Are sway bar links universal?
No. Although many links look similar, the mounting-center distance, stud angles, thread dimensions, joint design, and fitment can differ. Some aftermarket adjustable links cover several applications, but they still must meet the suspension manufacturer’s requirements.
Do sway bar links have to be tightened with the car on the ground?
It depends on the design and the installation instructions. Some links should receive final tightening at normal ride height, while others have a different specified procedure. This is particularly important for rubber-bushed and adjustable designs. Follow the vehicle and part manufacturer’s requirements rather than assuming every link is tightened at full suspension droop.
Should you replace sway bar links when replacing struts?
Not automatically. Many strut replacement procedures require disconnecting the sway bar link, but a serviceable link can often be reused if its joint, boot, stud, and mounting hardware remain in acceptable condition. If the link is already loose, damaged, or must be destructively removed, replacement makes sense.
Do new sway bar links need grease?
Most sealed ball-joint-style sway bar links arrive lubricated and don’t require additional grease. Some heavy-duty aftermarket links have serviceable grease fittings, while certain bushing-style or adjustable designs have their own lubrication requirements. Use the manufacturer’s instructions and never puncture a sealed dust boot to add grease.
Can a new sway bar link still make a clunking noise?
Yes. Incorrect tightening, damaged mounting holes, wrong link length, or interference with another suspension component can produce noise after installation. The original clunk may also have come from a different worn part. Verify the repair before assuming another new link is necessary.
When Should You Let a Mechanic Replace the Link?
There’s a difference between a straightforward link replacement and fighting a seized fastener in a cramped suspension assembly.
If the retaining nuts come loose with the correct tools and the suspension can be supported safely, the repair may be perfectly reasonable at home.
But professional help makes sense when a link stud is badly seized, the mounting bracket is damaged, the bar remains under uncontrolled tension, or special equipment is needed to reach the connection.
If you’re comparing DIY work with paying a workshop, our sway bar link replacement cost guide explains how parts, labor, and corroded hardware affect the overall repair bill.
A Straightforward Repair—Until the Hardware Fights Back
Replacing a sway bar link is often one of the more accessible suspension repairs. The part is small, the mounting points are usually easy to recognize, and the actual installation is relatively simple when everything lines up.
The trick is preparing for the problems that aren’t obvious from the replacement part sitting in its box: rusty threads, a spinning stud, or a sway bar that has shifted because one wheel is at a different height.
Use the correct holding tools, keep the suspension safely supported, and don’t force a new link into a position it doesn’t naturally reach. Finish with the specified tightening procedure and a careful inspection of both mounting points.
Get those details right, and you can replace a worn sway bar link without turning a relatively small repair into a much bigger suspension problem.