Rear Shock Extensions: Fitment, Uses & Shock Travel
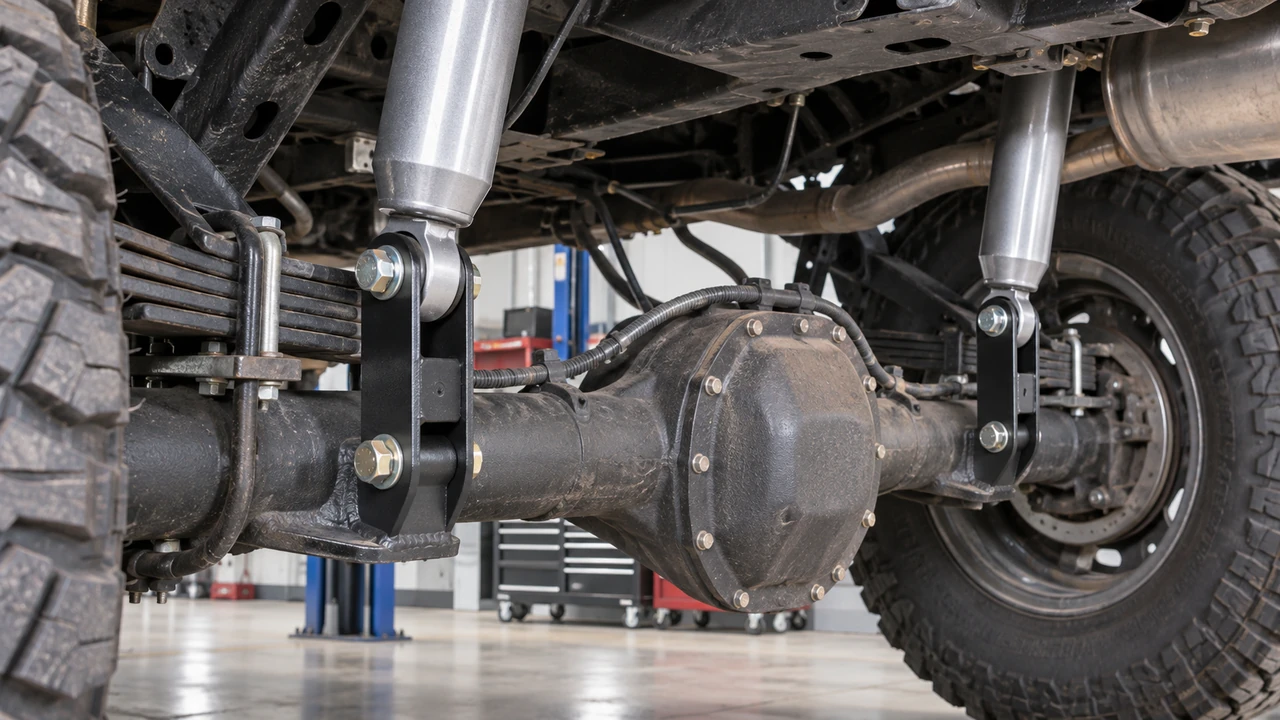
Rear shock extensions reposition a shock absorber’s mounting point so a factory-length rear shock can work with certain lifted or otherwise modified suspensions. If you have added a rear lift block and the original shock now sits close to full extension at normal ride height, a vehicle-specific shock extender kit may be an alternative to buying longer shocks. The catch is important: an extension does not increase the shock’s internal stroke. It trades mounting position for a different usable range, which can create a compression problem if the kit is wrong.
For most pickup owners, the decision is straightforward: match the truck, suspension kit, shock type, and the manufacturer’s intended rear lift range; then verify both full bump and full droop. Do not choose a bracket simply because it says “adds 2 inches” or because the bolt fits your shock eye. A longer shock is often the better purchase when the suspension truly needs more operating travel, not just a revised mounting position.
Do You Need Rear Shock Extensions After a Lift?
The question is not how tall the truck looks. It is whether the existing shocks can operate between the new rear suspension limits without topping out or bottoming out. The following situations give you a useful starting point before shopping.
| Your rear suspension setup | Best starting decision | What can rule it out |
|---|---|---|
| Small rear lift, factory shocks still within safe working range | Keep current hardware if the lift maker allows it | Insufficient extension reserve or revised mounting clearance |
| Rear block lift and factory shocks approach full extension | Check the lift maker’s specified rear shock extender kit | Compressed shock could bottom out before the bump stop |
| Complete lift kit already includes relocation brackets | Use the supplied, application-matched components | Mixing brackets or shocks from other kits |
| Long-travel rear suspension or larger new droop range | Investigate properly sized longer-travel shocks | An extender cannot create internal damper stroke |
| Rear shock is worn, leaking, bent, or the mounts are damaged | Repair or replace the failed part first | An extension cannot fix wear or structural damage |
| Lowered pickup with a flip kit | Use only the lowering system’s specified shock relocation parts | A lifted-truck extension may move the shock the wrong way |
A rear lift block changes the axle-to-frame relationship on a leaf-sprung pickup, but its advertised height is not always the net height added. Replacing a factory block with a taller one is different from stacking another block. Our rear lift blocks sizing guide covers that decision; here we are concerned specifically with what the changed ride height does to the shock absorber.
A Rear Block Can Leave a Stock Shock Too Extended
Picture a Silverado that used to sit comfortably near the middle of its rear shock travel. After the rear is raised, the axle sits farther from the frame at rest. If the same shock now hangs close to its fully extended length, it has little reserve for speed bumps, driveway transitions, or axle articulation. The result can be a harsh top-out and repeated loading of the mounting bolts.
A correct extension can shift the existing shock into a more suitable part of its stroke. That is the legitimate reason to buy one. It is not a general rule that every truck with a 2-inch rear lift needs an extender, nor is every 2-inch extension correct for a 2-inch lift.
When Leaving the Factory Mounts Alone Is Better
Some mild lift kits are engineered to retain the factory shocks without added brackets. Others include shocks designed for the new height. If the manufacturer already specifies both arrangements, adding another shock extension could duplicate a change and create damage rather than prevent it.
Look for the lift kit’s exact part number and notes about shock length, trim package, and model year. The fact that the factory shock bolts back on after a lift only tells you the holes line up. It says very little about what happens at the suspension limits.
What Rear Shock Extensions Change—and What They Cannot Change
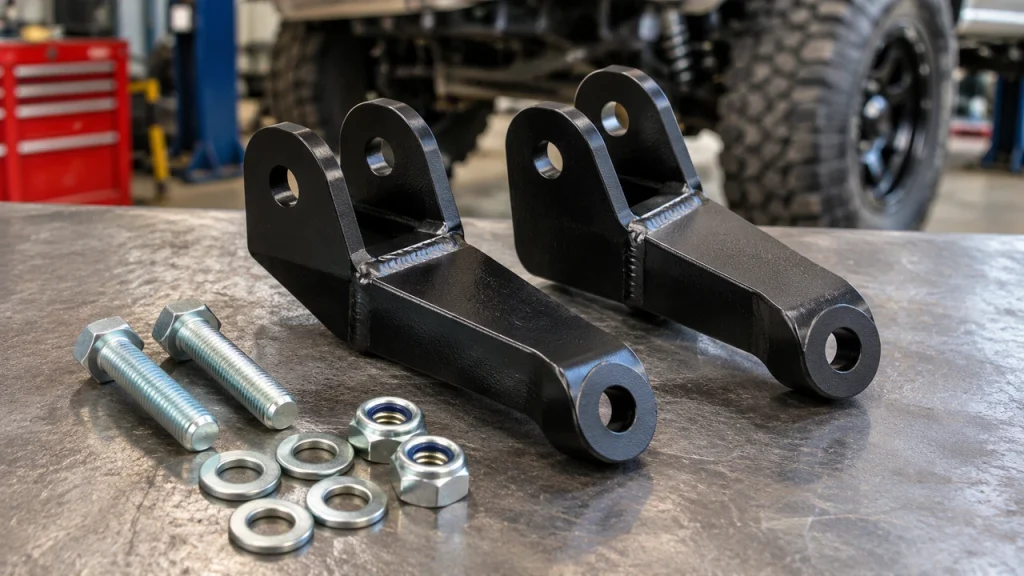
A rear shock extension is usually a fabricated metal bracket or a model-specific adapter. Some bolt at the lower axle mount, others alter the upper frame attachment, and a few attach to a shock’s threaded stud. The common result is a different position for one end of the damper, not a different piston, shaft, or oil volume inside it.
They Move the Shock Mount; They Do Not Add Shock Stroke
With a simple in-line adapter, moving a shock mount by about 2 inches can make the assembly behave as if it had more overall reach between the original attachment points. However, both the effective fully extended and fully compressed lengths shift. The original shock’s available compression-to-extension distance remains essentially unchanged.
Real brackets often use an offset or a changing shock angle, so the added reach is not always exactly the bracket’s advertised measurement. A product described as a 2-inch shock extender is not a guarantee of 2 inches of added wheel travel. Measure along the actual mounting geometry rather than adding its dimensions to the lift height.
Full Droop: Avoid Topping Out the Shock
At full droop, the rear axle reaches its farthest approved separation from the chassis. The shock must be able to extend far enough for that movement while retaining the reserve specified by the suspension and damper manufacturers. If it becomes the unintended hard stop, the rebound loads can damage mounts, bushings, or the shock itself.
A bracket may solve insufficient extended reach on an otherwise compatible setup. But do not deliberately let the axle hang farther simply because the extension makes it possible. Brake hoses, ABS wiring, leaf-spring geometry, drive shafts, joints and any limit straps also define the safe droop limit.
Full Bump: The Overlooked Risk of Bottoming Out
Here is where a cheap extension can get expensive. Raising the effective mounting length can mean the shock runs out of compression sooner. At full bump, the vehicle’s bump stops should protect the shock from becoming a metal-to-metal compression stop. If the bracket makes the shock bottom first, its shaft, body, bushings, or mount can be damaged.
Consider a purely illustrative in-line arrangement: a shock with a 15-inch compressed length and a 24-inch extended length has 9 inches of stroke. A straight 2-inch extension could make the assembly’s approximate effective range 17–26 inches. It still has 9 inches of shock stroke, and a vehicle whose mounting points close below 17 inches at full bump would fail that simple fit check. Offsets and angles make actual on-vehicle measurements essential.
Measure the Mounting Points, Not the Lift Height
For a modified rear suspension, a qualified technician should establish three center-to-center distances: normal ride height, the nearest approved full-bump position, and the farthest permitted droop position. Record the shock’s catalog extended and compressed lengths using its specified eye or stud measuring convention; do the same with the proposed adapter geometry.
Our shock length calculator is useful for comparing those distances. An angled extension or one that changes the pivot position needs physical cycling as well; a calculated pass alone does not prove the bracket clears the axle or has adequate strength.
How to Choose a Rear Shock Extension Kit That Fits
Retail listings tend to group rear shock extender brackets by truck model and lift height. That filters out some obviously wrong parts, but it does not check whether your truck still has the stock shock, which spring system it uses, or what an earlier owner changed underneath. These are the fitment details worth checking before checkout.
Upper, Lower, and Stud-Mount Extensions Are Different Parts
On some GM pickups, the extender is a steel bracket that changes an eyelet mounting point. Other lift kits place the relocation piece at the axle; some Subaru-oriented products attach at a shock’s upper threaded stud. They are different designs with different load paths. A stud extension should never be substituted for an eyelet bracket just because the word “shock extension” appears in both listings.
Look at the existing top and bottom attachments. Does the shock have an eye and bushing, a stud, or a clevis? Is the bracket designed for that axle or frame location? An extension built for a specific lower mount may require its offset hole to face a particular direction. Reversing it can change clearance even though all the bolts still fit.
Bolt Diameter, Sleeve Width, Offset, and Support
Check the bore of the shock-eye sleeve, mounting-tab spacing, supplied bolt length, thread engagement, and the direction of the load. Many purpose-built adapters support the shock eye between two tabs; a generic single tab or loose spacer stack is not necessarily equivalent. The steel gauge is only one part of the design—how the load reaches the axle or frame matters too.
Make sure the bracket clears the axle tube, differential housing, exhaust, tire and nearby suspension parts throughout travel. If the original mount is cracked or corroded, attaching a stronger-looking extension to it is not a repair. Our shock mount brackets guide covers damaged mounts and custom fabrication separately.
A Two-Inch Extension Is Not a Two-Inch Lift Kit
The numbers on a product listing describe different things. A block might be 3 inches tall but replace a factory 1-inch block, adding roughly 2 inches of net rear lift. A shock extension advertised at approximately 2 inches is describing its own geometry, not an obligation to install exactly 2 inches of rear lift. Even the same part number may have different approved block combinations by vehicle.
For instance, ReadyLIFT’s GM 1500 rear shock extensions, part 67-3809, are listed for certain 1- through 4-inch rear block applications depending on the vehicle; the maker describes approximately 2 inches eye-to-eye. The range is an application statement, not a universal rule. The year-specific and suspension-specific installation notes remain decisive.
Check Whether the Kit Includes Everything
Some packages contain two brackets and mounting hardware. Others are a single extender, or only the adapter bodies without all the mounting bolts. Check whether the new fasteners, hardened washers, nuts, spacers and any sleeves are included. If the listing shows a single side, doubling the advertised price may change the buying decision.
Do not plan to reuse damaged or stretched bolts, replace a locknut with whatever is lying in the toolbox, or substitute hardware with unknown specifications. A poorly retained rear shock bracket has to survive repeated impacts, not merely hold the shock while the truck is parked.
Rear Shock Extensions vs. Longer Rear Shocks
Both solutions can help a modified truck use its rear suspension correctly, but they are not interchangeable. A relocation bracket keeps the existing damper. A purpose-built longer shock may have a different extended length, compressed length, travel and damping tune. Which one is better depends on how much useful stroke the suspension needs and how healthy the original shocks are.
| Decision factor | Rear shock extension | Properly specified longer shock |
|---|---|---|
| Existing shock condition | Retains current damper, including its age and damping | Replaces the damper and allows a fresh specification |
| Available internal stroke | No increase to the existing shock stroke | Can provide different stroke when safely matched to geometry |
| Fitment work | Must verify bracket, hardware, orientation, bump/droop | Must verify shock mounts, collapse, extension, damping |
| Typical appeal | Compatible mild lift with healthy factory shocks | More travel demand, worn shocks, or a comprehensive lift |
| Main failure to avoid | Bracket shifts shock into compression bottom-out | Longer shock may also bottom or permit unsafe droop |
Keep OEM Shocks When the Kit Was Designed for Them
A relatively new daily-driver Silverado with a mild rear block lift is a plausible case for a matching extension kit. If the lift manufacturer has engineered the bracket for that vehicle, the existing shock is in good condition, and the full-range check passes, paying for another set of dampers might not improve anything meaningful.
That said, “maintains factory ride” is marketing shorthand. The rear suspension’s new height, available droop and axle angle may change how the truck feels even if you keep the exact same shock. The extender itself has no damping mechanism to smooth out bumps.
Buy Longer Shocks When Travel or Damping Is the Real Problem
If the rear suspension has been reworked for frequent off-road travel, the stock shock may be too short and have too little stroke for the operating envelope you need. Similarly, fitting a spacer to a leaking, worn-out or incorrectly tuned shock only preserves the original problem. In those cases, a matched damper and suspension package deserves priority.
The distinction matters most on heavy trucks that tow or run rough tracks at speed: shock valving, thermal capacity and spring control may matter far more than the cost of an adapter. Our lifted-truck shock buying guide deals with choosing those replacement dampers; this article focuses on whether retaining the current ones makes sense.
Do Not Stack Extenders or Mix Two Different Solutions
A common trap is adding a shock extension that was intended for factory-length shocks while simultaneously fitting longer-than-stock dampers. The assembly can become too long at compression. Other mistakes include fitting a second bracket to “gain more droop,” installing a leveling bracket from another model, or trimming a bump stop to clear an adapter.
Before modifying a complete lift kit, read its instructions end to end. The manufacturer may explicitly specify either shock extensions or replacement shocks. Treat that distinction as a fitment requirement, not as an optional preference.
Chevy, GMC, Ford, Ram, and Jeep Fitment Notes
One keyword brings together several very different vehicles. Product listings often show broad year ranges, but a shock extension is not a universal rear-lift accessory. The safest approach is to verify the exact configuration the bracket was designed to serve, including factory suspension options and current aftermarket components.
Silverado and Sierra 1500: Why ReadyLIFT 67-3809 Appears Everywhere
The GM half-ton pickup market dominates many U.S. results for rear shock extensions. ReadyLIFT’s 67-3809 is a useful example: a fabricated steel pair sold for specified GM 1500 rear block applications so owners can retain factory-length shocks. ReadyLIFT catalogs the part under a broad 1999–2026 GM full-size truck/SUV heading, but that does not establish compatibility with every year, trim or rear suspension option.
Check the exact ReadyLIFT 67-3809 product and fitment notes before ordering. Do not assume all Silverado and Sierra generations, rear suspension packages, composite leaf configurations, or factory premium-shock options are interchangeable. A listing that fits your model name may still exclude your exact suspension.
Ford F-150, F-250, and Ram 2500: Check the Whole Kit
Ford and Ram lift packages can use different top or bottom shock locations, heavier-duty bushings, and alternate axle brackets. The phrase “rear shock extension” may describe a manufacturer-supplied component inside a complete lift, not a standalone bolt-on part for every truck of that generation. Heavy-duty 2500/3500 trucks also vary widely in shock length and rear spring arrangement.
If you are replacing a lost extender from an existing lift, identify the original kit before browsing by vehicle. Measuring the width of the factory shock eye is not enough: the bracket’s offset and hardware may have been chosen to clear that particular axle or frame.
Jeep JK, JL, and Gladiator: Coil-Spring and Axle Travel Matter
Jeep owners sometimes search for rear shock extensions when a coil-spring lift makes the factory shocks seem short. But that does not make a generic GM-style lower bracket appropriate. On a solid-axle Jeep, coil retention, bump-stop length, control-arm travel, driveshaft angles and rear brake hose slack all matter at full droop and bump.
A Jeep-specific lift kit might use relocation hardware, longer dampers, or a different combination entirely. Match the exact TJ, JK, JL or Gladiator setup and avoid assuming a bracket intended for one axle generation fits another. Check whether the manufacturer calls for shock extensions at all.
Subaru Lift Kits and Other Less Common Shock Extenders
Not every result is a pickup axle bracket. Some Subaru rear lift arrangements use a threaded shock-shaft extension with matching spring or subframe components. The installation process and safety requirements are different from bolting a fabricated tab to a truck axle. Golf-cart and motorcycle “rear shock extensions” also appear in broad keyword searches; they should not be treated as automotive pickup fitment advice.
If the product description calls for disassembling a spring-and-shock unit, it is not a casual substitute for a truck extension bracket. Spring compression can be dangerous. Use the designated kit and a technician with the correct equipment rather than trying to copy a generic pickup installation video.
Installation Checks That Matter More Than Bolt-Up Fit
This is not a universal step-by-step installation guide; bracket locations, fasteners and tightening order vary by kit. A mechanic can use the following checks to decide whether the specific assembly is safe. A parked truck that looks fine from the side is not evidence that the rear shocks will survive a full suspension cycle.
Support the Vehicle and Follow the Exact Bracket Orientation
The axle, frame and springs must be controlled with suitable workshop equipment while the shock mount is disconnected. Never work under a vehicle supported only by a jack. On some axle-mounted extension kits the manufacturer specifies exactly which way an offset hole points, the supplied bolt positions and when the bolts are finally tightened.
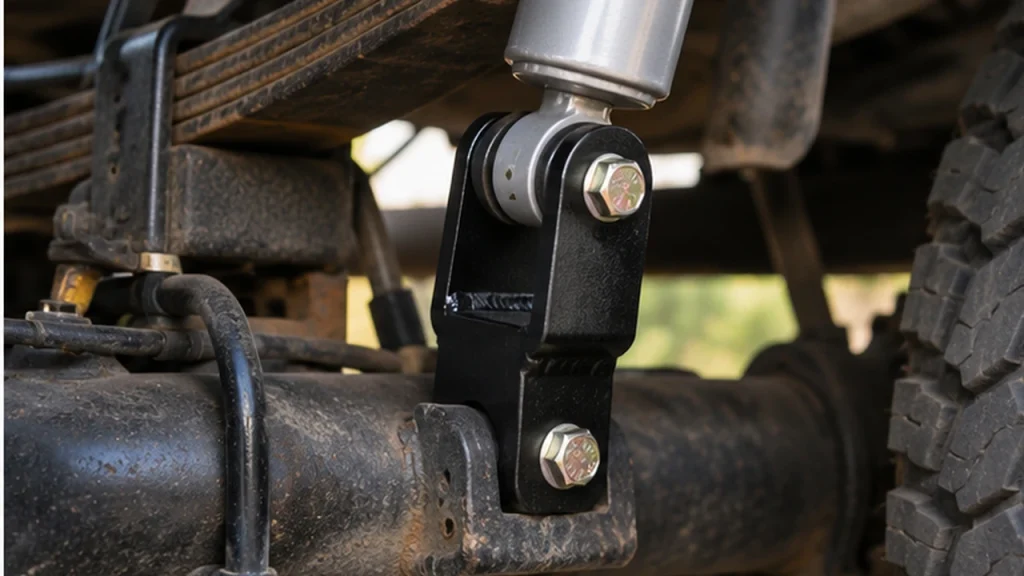
Those details are not cosmetic. A reversed offset may bring the shock body too close to the axle or make the mount articulate poorly. Do not invent torque figures: use the exact instructions for your part number and the vehicle’s service manual for factory mounting points.
Check Compression, Droop, and Full Articulation Before Driving
After the bracket is positioned, a qualified installer should verify the shock’s permitted full-bump and full-droop operating range against the new mount geometry. Include uneven left-right axle movement where applicable; a solid rear axle does not always move symmetrically. Look for a shock body touching the housing, a bushing twisting beyond its design, or hardware approaching a brake line.
If any part reaches an unsafe limit, stop and revise the parts choice. A spring lift does not authorize more wheel travel than the remaining components can accommodate, and a shock extension should never become a workaround for a badly positioned bump stop.
Brake Hoses, ABS Wiring, and Driveshaft Clearance Still Set Limits
A bracket can reduce shock top-out without changing the brake hose, center flex line, parking-brake cable, differential vent tube or ABS wiring. At droop, none of those should be pulled taut. At bump, the bracket should not pinch them against the axle or frame. Driveshaft joints must also remain within the vehicle’s approved movement range.
If the hose is stretched at the newly available droop limit, the truck needs attention before driving; see our extended brake lines fitment guide for hose and relocation-bracket options. More droop on paper is not useful when the brake system becomes the limiting strap.
Final Torque and Post-Installation Inspection
Confirm all new and reused fasteners against the kit’s torque specifications, including whether a rubber-bushed pivot must be tightened at settled ride height. Inspect thread engagement, locknuts, bolt clearance and any witness marks where the adapter could move under load. Follow the manufacturer’s retorque or reinspection interval after driving and after off-road use.
If a clunk appears immediately after installation, do not assume it is simply a new shock settling in. Loose brackets, incorrect spacer stacks and a shock reaching a travel stop can all make noise. Continuing to drive could turn a correctable installation issue into a torn mounting point.
Common Rear Shock Extension Problems
Most reported problems come back to geometry or incompatible hardware rather than the idea of using an extension. Pay attention to when the noise or impact happens: extension at the top of a driveway tells a different story from a sharp hit as the rear axle compresses.
The Shock Bottoms Out Over Large Bumps
If the damper reaches its compressed limit before the factory bump stop, the extension may have shifted the mounting point too far for the vehicle’s uptravel. A longer replacement shock that already has a greater collapsed length can make the issue worse when combined with an extender. Check compression clearance, witness marks and the parts list before replacing another shock.
Do not attempt to “fix” this by removing the bump stop or guessing at its height. The safe full-bump limit must be established for the entire suspension, including tire and frame clearance.
A Hard Clunk at Droop or on Driveway Transitions
A sharp pull or bang when the rear wheel drops into a dip may indicate the shock is topping out, but a loose bushing, broken mount or other suspension part can sound similar. An extender may be missing, undersized or installed incorrectly; alternatively, the vehicle may now permit more droop than the rest of its components can support.
Start by inspecting the fasteners, bracket contact points and shock condition, then recheck the suspension’s droop limit. If a cable or hose is taut, treat that as a safety fault rather than a noise complaint.
The Bracket Hits the Axle, Exhaust, or Shock Body
A universal-looking bracket may bolt into the original eye mount but position the shock at the wrong angle. Contact marks on the axle tube, shock canister, brake cable or exhaust mean it is not a working fit. Tightening the bolts harder does not correct interference.
Compare the installed orientation with the actual kit instructions, including whether the adapter belongs on the upper or lower end and whether each side is mirrored. A product photo of a different model year is not a substitute.
Bushings Wear Quickly or the Shock Mount Loosens
Extra leverage, mismatched sleeve widths or a bolt that is not properly supported can accelerate bushing wear and loosen the mount. Some lift adapters use specific washers or crush sleeves to prevent the bracket from collapsing when tightened. Do not add random spacers to fill a gap unless the manufacturer authorizes them.
If the parent mount is cracked, bent or severely rusty, deal with that structural problem before driving. An extension can move the load farther from the original bolt and make an already compromised mounting point fail sooner.
What About Lowered Trucks and Factory Electronic Shocks?
The search results also contain extension brackets for lowering kits and vehicles with special damper systems. They need separate judgment. A rear suspension lowered with a flip kit changes the relationship between axle, chassis and shock differently from a leaf-block lift; an electronically controlled shock introduces yet another compatibility question.
Lowering Flip Kits Use Their Own Shock Relocation Geometry
Belltech and other lowering manufacturers sell rear shock relocation hardware for specific dropped trucks. Those brackets can be useful where a lowering conversion changes shock angle or mount clearance, but their purpose and orientation are dictated by the lowering package. A bracket marketed for a lifted Silverado should not be installed on a lowered Silverado just because the two products fit an eyelet.
If your truck uses a flip kit, verify the lowering manufacturer’s shock and bracket requirements as one system. The same full-bump and full-droop checks still apply, but the available clearances and mounting geometry are different.
Premium OEM Shocks, Air Suspension, and Adaptive Damping
Some trucks and SUVs have premium shocks, air leveling, electronic damping or model-specific mounting hardware. A standard extender kit may be explicitly excluded even when the vehicle is listed in a broad catalog. The original shock may also have a different extended length, making the adapter unnecessary or dangerous.
That is why the original shock part number matters. Check the trim, factory suspension option and lift kit notes before relying on a year/make/model filter. A generic online fitment checker often cannot identify what is actually installed under the vehicle.
What to Verify Before Ordering Rear Shock Extenders
A quick order check is worthwhile even when the part is inexpensive. Write down the exact lift kit, the original or replacement shock numbers and the three measured shock-mount positions. The following list is deliberately specific to shock extensions rather than a general suspension shopping checklist.
- Truck details: year, make, model, drivetrain, rear axle and factory suspension option
- Lift details: manufacturer, part number, actual net rear lift and the type of rear spring or block
- Shock details: brand, part number, upper/lower mounting styles, extended and compressed lengths
- Extension design: approved upper or lower location, offset direction and actual mounting displacement
- Hardware: eye width, sleeve diameter, fastener grade, supplied bolts and any side-specific brackets
- Full travel: safe compression limit, approved droop, bump-stop engagement and shock reserve
- Nearby components: brake hose, ABS cable, driveshaft, exhaust, axle housing and tire clearance
- Instructions: exact kit application notes, torque sequence and retorque interval
If the supplier cannot confirm the fitment and your current shock specifications, do not use a universal extension as a guess. A different shock or a complete lift kit with engineered mounting hardware may be less expensive than repairing a broken bracket later.
Rear Shock Extension FAQs
These are the questions buyers usually have after comparing ReadyLIFT-style brackets with longer replacement shocks. The short answers depend on the specific lift, but they help rule out the most common misunderstandings.
What are rear shock extensions used for?
They reposition a rear shock mount so the existing shock can work at a modified suspension height, most often with certain rear lift kits. They do not repair a worn shock or increase the shock’s internal travel.
Are rear shock extenders safe?
A properly designed, vehicle-specific kit can be safe when installed according to its instructions and checked throughout suspension travel. A mismatched bracket can cause the shock to bottom out, top out, bind or damage its mount. Fitment and clearance matter more than the word “heavy-duty.”
Do I need shock extensions for a 2-inch rear lift?
Not automatically. Some 2-inch rear lift kits retain stock shocks without adapters, some specify an extension, and others require replacement shocks. Check the actual rear height change, existing shock dimensions and the lift manufacturer’s notes.
Can a 2-inch rear shock extension add 2 inches of suspension travel?
No. It changes mounting position and may alter the available reach between the original mounts, but the shock piston still has the same internal stroke. In some geometries an extension can improve usable droop while reducing compression clearance. Both ends must be checked.
Can I use rear shock extensions with Bilstein 5100 shocks?
Only if the specific extension kit and shock application explicitly allow that combination. A lift kit engineered for factory-length shocks may not be suitable for a longer Bilstein 5100; some manufacturers specifically exclude certain factory premium shocks or shock lengths. Never assume matching eye bolts prove compatibility.
Do rear shock extensions work with a 3-inch lift block?
Some kits do, but the answer depends on the truck and whether the advertised block height equals the net added lift. Check the extension manufacturer’s approved applications and the shock’s actual full-bump and full-droop clearance.
Should rear shock extensions go on the top or bottom mount?
Wherever the approved kit specifies. Some install at a lower axle eyelet, others at an upper mount or threaded stud. Their shapes, directions and fasteners differ. Do not relocate a bracket to the opposite end just because it appears to fit.
Are rear shock extensions better than longer shocks?
They are an economical option when the current shocks are sound, travel is adequate and an application-matched bracket has been designed for the lift. Proper longer shocks are preferable when the suspension needs a different stroke, the current shocks are worn, or the lift manufacturer specifies replacement dampers.