Hydraulic Bump Stops: Size, Stroke & Mounting Guide
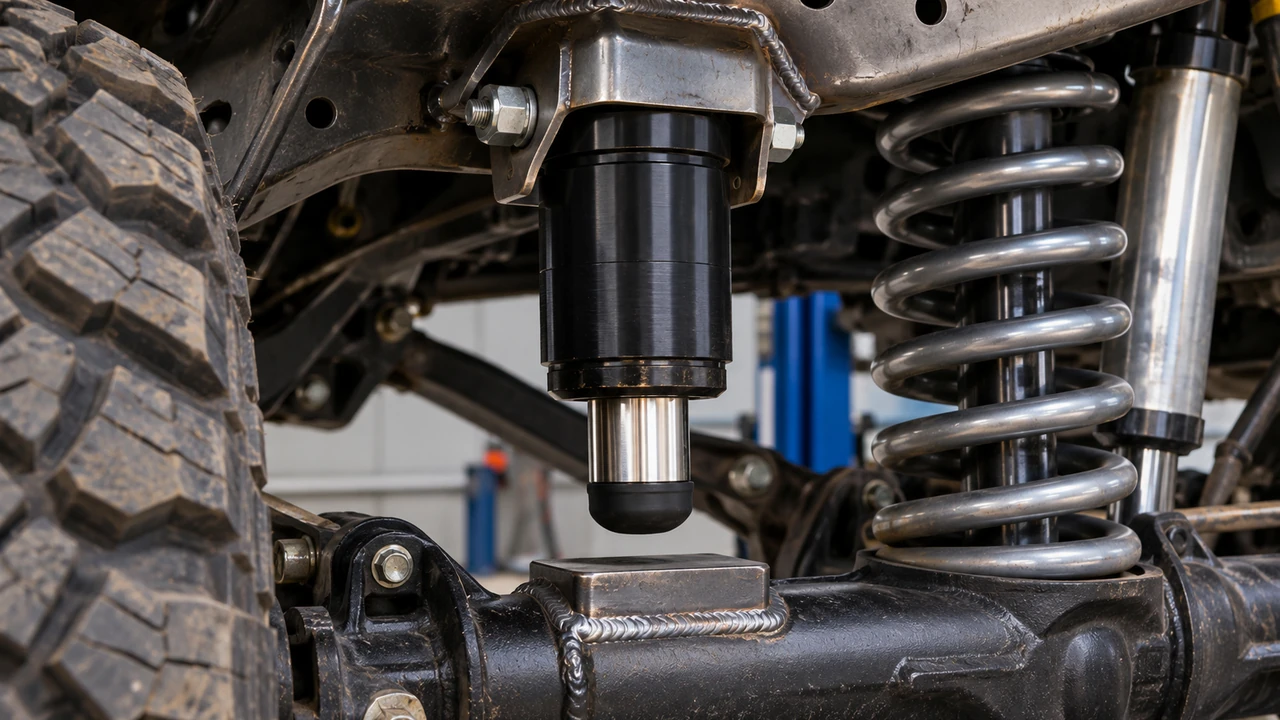
Hydraulic bump stops are worth considering when an off-road suspension hits the end of its compression travel hard enough to damage shocks, mounts, or the chassis. For most builds, the buying decision comes down to body diameter (commonly 2.0 or 2.5 inches), usable stroke (often 2–4 inches), installed length, and the mounting kit. A matched, properly positioned 2.0-inch unit is a better purchase than an oversized 2.5-inch bump that contacts too early or cannot fit above the axle.
Before ordering, find out what physically limits your suspension at full bump, how much distance the intended strike pad travels, and whether the frame has room for a mounting can. Then choose a bump stop that can absorb the impact before the shock or another component reaches a damaging limit. Nitrogen pressure comes later; it cannot rescue a bad mounting position.
What Size Hydraulic Bump Stops Should You Buy?
Here is the short version for the common U.S. off-road builds. These are starting points, not universal vehicle fitments. Tire size, sprung weight, suspension leverage, and the available mounting space can overturn the usual recommendations.
| Vehicle and use | Starting point to investigate | Critical measurement |
|---|---|---|
| Trail-focused Jeep or midsize 4×4 | 2.0-inch body, shorter stroke when packaging is tight | Shock compressed clearance and axle-to-frame strike position |
| Tacoma / 4Runner with moderate trail use | 2.0-inch or a model-specific compact kit | Front IFS control-arm travel versus rear axle travel |
| Long-travel prerunner or hard-use desert truck | 2.0- or 2.5-inch units, often with more usable stroke | Actual wheel path, motion ratio and repeated-impact loads |
| Heavier truck or highly leveraged trailing-arm setup | Consider 2.5-inch body and matching mount | Mount strength, leverage and space for the body |
| Mostly stock daily driver | Verify whether factory jounce bumpers are adequate first | Real bottom-out problem versus normal occasional bump engagement |
If you only know the lift height, you do not have enough information to buy. A four-inch lift is not four inches of hydraulic bump-stop stroke. The shock length and suspension geometry decide where the stop has to work.
A 2.0-Inch Body Is Often the Practical Starting Point
The 2.0 designation normally refers to the nominal body size, not the distance the shaft can compress. It is common on custom Jeeps, lighter trail rigs, and trucks where space around a coil spring or control arm is limited. The smaller package may be easier to place correctly, but it still needs a mount capable of handling severe repeated impacts.
Do not choose a 2.0 merely because another vehicle on a forum uses one. A heavily loaded truck that spends long periods at speed on rough terrain may need more energy capacity than a low-speed rock crawler of similar size.
A 2.5-Inch Body Makes Sense When Loads and Leverage Justify It
Larger-body units can offer greater potential impact-control capacity, but their outside diameter and mounting hardware take up more room. On an independent front suspension, the distance traveled by the lower arm at the contact point can be very different from wheel travel. The same goes for rear trailing-arm systems. A larger bump stop attached too far inboard can be a poor substitute for one installed at a better point of leverage.
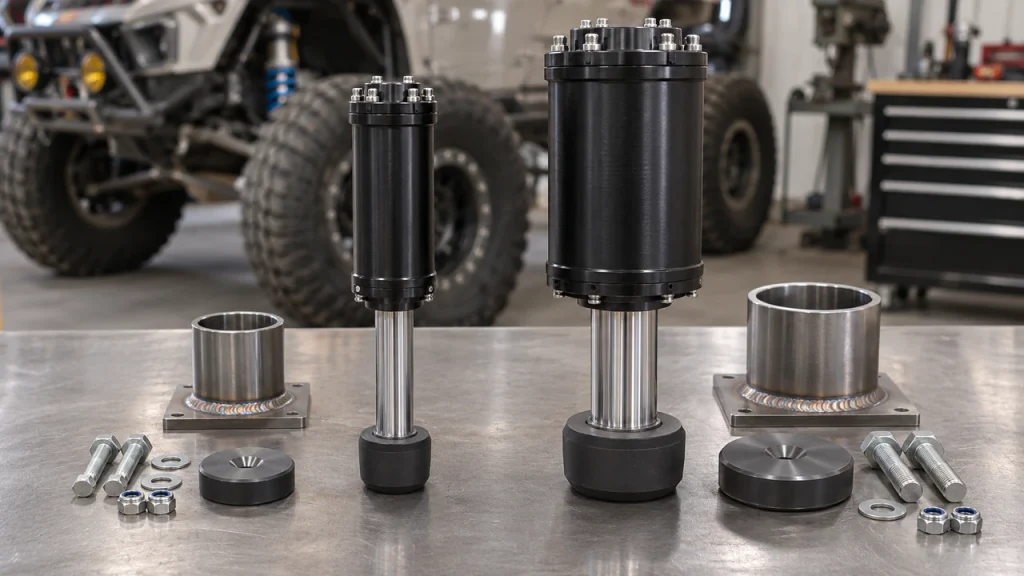
Manufacturers do not all use the same outside dimensions. Dobinsons, for example, lists 56 mm and 66 mm threaded-body families rather than simply labeling every product 2.0 or 2.5 inches. Compare actual dimensions, not category names.
Choose 2-, 3-, or 4-Inch Stroke From the Compression Path
Shorter-stroke bumps suit tighter packaging and vehicles that should contact the stop late in travel. Longer strokes can provide a more gradual deceleration over a greater distance when the chassis and suspension allow it. Neither option is automatically more comfortable. Put a long bump in a cramped suspension and the truck may ride against it during ordinary driving; use too little stroke on a fast, heavy rig and the stop may run out of useful travel.
Some manufacturers offer 2.5-inch or approximately 3-inch variants, and some sell vehicle-specific kits with non-round stroke specifications. The catalog part number is more reliable than a generic “2-inch air bump” label.
Measure These Four Dimensions Before Buying a Kit
A bump-stop listing often shows a glossy cylinder and one travel number. That is nowhere near enough to confirm fit. Record the manufacturer’s extended length, compressed length, stroke, and mount/body dimensions together with your vehicle’s full-bump measurements.
Stroke Is Not the Same as Body Diameter or Wheel Travel
Stroke is how far the bump-stop shaft can move between its extended and compressed positions. The wheel may move more or less than that distance, depending on where the bump contacts a control arm or axle. An air bump with 3 inches of shaft stroke does not guarantee 3 inches of additional wheel travel. In fact, it can reduce usable uptravel if positioned too low.
This is especially important on a long-travel build. Our long travel suspension guide covers the wider geometry question; here, measure the actual path of the intended contact point.
Extended and Compressed Length Determine Packaging
Two units advertised with equal stroke may have different overall body lengths. Look at the dimensions from the specified upper mounting reference to the impact face, not a guessed measurement from a product photo. Then account for the mounting can, lock rings, any bumper pad and clearance to the chassis.
For a concrete example, Dobinsons lists the HBS56-006 with a 50 mm stroke and a shorter compressed length than the HBS56-001, although both belong to its 56 mm body family. That illustrates why a stroke-only comparison can lead you to buy the wrong part. The detailed measurements are in Dobinsons’ official bump-stop specifications.
Mounting Can, Top Style, and Impact Pad Must Match
A threaded-body bump stop may use threaded sleeves and lock rings. A smooth-body design may require a pinch-style mounting can. Some units use a stem or threaded top arrangement. These are different retention systems, and it is a mistake to assume that a Fox can, King can, or an older-generation mount fits any cylinder with a similar nominal diameter.
Check the exact part number and revision. Also confirm what the lower tip is intended to hit. A flat, reinforced strike pad is very different from a thin axle tube, an angled control arm edge, or a rubber isolator not designed for a concentrated hydraulic impact.
Leave Room for Steering, Spring, and Tire Clearance
The stop needs a safe home at full compression, but that is only half the packaging problem. Check the spring diameter, spring perch, sway bar, brake hose, ABS wiring, and the path of the tire at full lock. If the bumper sits close to a moving control arm, confirm that the contact area stays aligned as the arm swings through its arc.
A shop photo taken at normal ride height rarely reveals these clashes. Suspension cycling does.
Hydraulic Bump Stop Mounting: Position Comes Before Pressure
Mounting is where a good component can become a bad suspension modification. A properly designed kit gives the bump stop a rigid location and a predictable surface to strike. A poorly placed one may bend a bracket, stop the axle prematurely, or transmit a heavy impact into a part of the frame that was never meant to take it.
Mounting Cans: Weld-On, Bolt-On, and Vehicle-Specific Kits
For universal installations, a fabricator may need to build or weld mounting cans onto the chassis. The structure should support the impact path, not just hold the cylinder while the truck sits still. Other products are sold with application-specific brackets, including bolt-on solutions for certain rear truck installations. “Bolt-on” still requires checking the vehicle model, year, suspension options and any aftermarket changes.
The can itself may be sold separately. A product page saying “pair” can refer to the bump stops without the mounts, strike pads, reinforcement plates, or hardware. Read the box contents line by line before comparing prices.
The Strike Pad Needs a Predictable Contact Path
On a solid axle, the axle rolls relative to the frame during one-wheel compression. An inboard bump-stop position can experience a different travel path and leverage than a location closer to the tire. On an A-arm suspension, the lower arm sweeps through an arc rather than moving straight upward. That geometry is why a landing pad should be checked through articulation, not only at straight-line full bump.
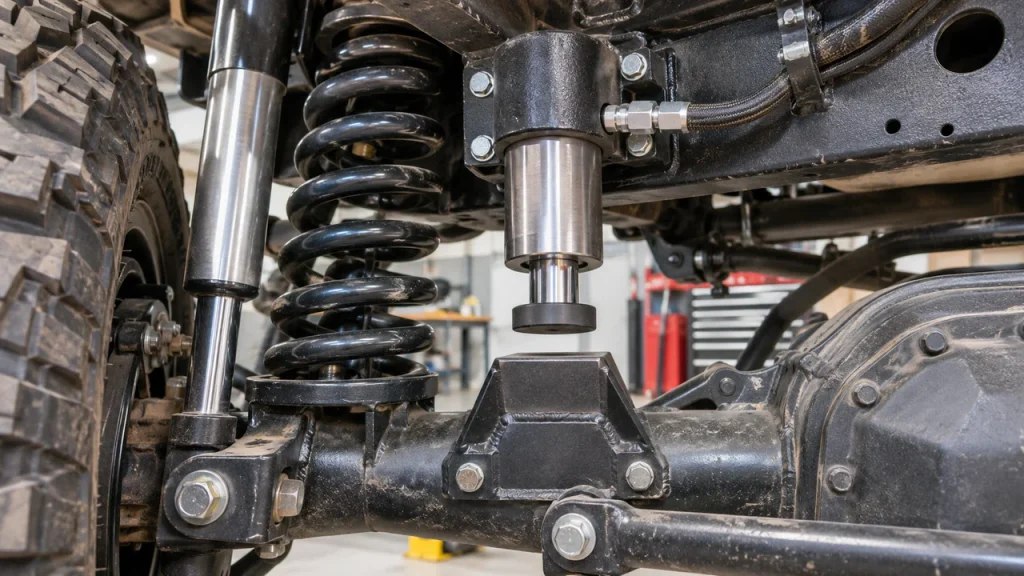
The contact face should remain suitable for the manufacturer’s bump-stop tip throughout the intended engagement. A narrow edge loading one side of the shaft is not a clever way to “gain clearance”; it is a reason to move or redesign the mount.
Cycle to Full Bump Without Using the Shock as a Hard Stop
A qualified installer should establish the safe maximum compression position, taking account of shock compressed length, tire-to-body clearance, coil bind, joints, steering components, and driveline clearance. The hydraulic bump must intervene in time to protect these parts, with the remaining margins prescribed for the specific setup. Do not assume that all the shaft travel should be consumed before the tire or axle reaches its first interference point.
If you need to confirm shock lengths, our shock length calculator explains how extended, compressed and travel dimensions relate. Its outputs are not a substitute for physically cycling a modified suspension.
Front and Rear Locations May Need Different Solutions
The front may have an independent control-arm pad while the rear hits a solid axle or leaf-spring perch. That can mean different bump-stop stroke, diameter, mount style and engagement timing at opposite ends of the same vehicle. Buying four identical cylinders because the truck has four corners is not a fitment strategy.
If the truck is being rebuilt around a new coilover or four-link system, design the bump-stop mounting and main shock positions together. Do not tack a can into place based on a catalog diagram and discover later that the spring occupies the same space.
How to Set Hydraulic Bump Stop Engagement and Nitrogen Pressure
Once the hardware fits and the suspension has been cycled safely, setup becomes a question of when the bump begins working and how it reacts under load. The hydraulic unit is a small damper with oil and, on common designs, a pressurized nitrogen charge. It is not simply a hollow cylinder whose firmness is determined by gas pressure alone.
Set Contact Height to Protect the Weakest Compression Limit
Start with the full-bump limit: the nearest point at which the shock, tire, coil, steering or driveline would become unsafe. The bump-stop mounting height and available stroke must be arranged so contact starts early enough to slow the suspension before that point. Moving the cylinder down to make it touch sooner may improve impact control but can also create harsh ordinary-road engagement; moving it up may make it too late to protect anything.
There is no reliable universal “one-inch gap” rule. A fixed gap at rest means different things on a short-travel Jeep front end, a long-travel rear axle, and a truck with heavily leveraged control arms. Use the manufacturer’s geometry and travel checks.
Nitrogen Pressure: Follow the Exact Unit, Not a Forum Number
Nitrogen contributes to the behavior of many hydraulic bumps, while the internal piston, oil level and valving also matter. Adjusting pressure can change initial resistance and rebound behavior, but acceptable pressures differ by brand and part number. Dobinsons publishes a 100–300 psi adjustment range for its listed units; that is not an instruction to run 100–300 psi in a Fox, King, or any other product.
These components contain high-pressure gas. Do not open, heat, drill, clamp, or attempt to vent and recharge them without the approved equipment and training. Internal oil and shim-stack tuning belong with a qualified suspension service shop. A safe, correct pressure setting must come from the manual for the actual bump stop.
Read the Shaft Travel Indicator After Controlled Testing
Some hydraulic bump stops have an O-ring on the shaft so the installer can see how much stroke was used. After a controlled test on suitable terrain, compare the indicator with the available stroke, check for rubbing marks and inspect the strike pad. If the O-ring never moves far, the stop may engage too late or the test may simply not have challenged it. If it repeatedly reaches the body, review height and tuning before hitting the terrain harder.
A single test bump does not prove the design is ready for repeated high-speed impacts. Heat buildup, vehicle load and more severe one-wheel compression can produce a very different result.
Rebound, Noise, and Heat Are Part of the Setup
A bump stop that rebounds too aggressively can make the axle kick back after a hard hit. Units with suitable rebound control aim to limit that effect, but there is no universal “softer gas equals better ride” shortcut. Excessive noise can come from a worn strike pad, loose mounting can or poor contact angle as easily as from the pressure setting itself.
Hydraulic bumps are not designed to live in constant contact on most street/trail vehicles. Continuous engagement makes heat and harshness a real problem. If the truck feels as though it is riding on the bumps during normal commuting, revisit ride height and contact position rather than treating that as normal race-truck behavior.
Jeep, Tacoma, and Prerunner Fitment: What to Check
Searches for hydraulic bump stops often include a vehicle name, but a badge does not tell you the available room. Here are the fitment traps that show up most often when someone moves from a stock jounce bumper to a custom hydraulic assembly.
Jeep Wrangler TJ, JK, JL, and Cherokee XJ
Jeep fitment varies by generation, axle setup and front versus rear. A JK front kit designed to fit inside or above a particular coil-spring location does not automatically fit a TJ or JL. A Cherokee XJ may use another upper mount and contact surface. Confirm whether the supplier includes reinforcement, bump-stop cans and a suitable strike pad rather than treating a generic threaded cylinder as a complete Jeep kit.
Lift amount alone also tells only part of the story. Different shocks, tire diameters, control arms and fender clearance can put two otherwise similar Wranglers at very different safe full-bump positions.
Toyota Tacoma and 4Runner: Separate IFS Front From Rear Axle
A Tacoma or 4Runner can need different solutions at the two axles. Up front, control-arm geometry, CV angles and the location of the factory jounce point constrain any hydraulic conversion. In the rear, leaf springs or a linked axle change both available contact surfaces and the path through compression. Do not assume an aftermarket rear kit gives the same wheel-travel clearance as a front kit.
Toyota platform names also span multiple generations. Verify the exact model year, suspension arrangement and replacement shock dimensions before selecting a body diameter or mounting bracket.
Ford Raptor, Bronco, and Desert-Oriented Trucks
Prerunner and desert-truck hardware often makes larger hydraulic bumps attractive, particularly on trucks that carry speed through repeated whoops. But these platforms also have heavily engineered stock suspension systems, and some already use sophisticated hydraulic or internal jounce control. An additional external bump should solve a documented problem rather than compete with a factory travel-control system.
A vehicle-specific kit from a known fabricator may be the more reliable route because it includes a matched strike pad, can position and clearance assumptions. Compare its installation notes with the suspension configuration you actually own, not the photo on the box.
Leaf Springs, Rear Axles, and Trailer Loads
A leaf-spring truck may place the strike surface near the axle, on a perch, or on a bracket attached to the spring assembly. If a lift or spring conversion removed an original riser block, the bump-stop engagement point can change substantially. Extra payload also changes how often the rear suspension approaches the bumps.
A hydraulic bump stop is not a substitute for appropriate spring capacity or a towing-assist system. If the truck is constantly sitting near the stop with its usual load, address the spring and ride-height problem first. Our off-road suspension types guide covers the broader layout differences.
Fox vs King vs Dobinsons: Compare What You Are Actually Getting
Brand searches are common, but there is no single winner independent of the installation. The sensible comparison is between exact part numbers and their matched mounts, not a 2.0-inch Fox photo beside a 2.5-inch King photo with no information about stroke or can height.
Body Size and Stroke Are Only the First Two Specs
Fox sells universal and application-specific units with different top-mount designs. King offers multiple strokes and mounting sleeves. Dobinsons publishes metric threaded-body dimensions and interchangeable rod-end materials on certain products. Those differences matter because the wrong mounting interface makes a good bump stop unusable. Compare the actual compressed length, extended length, retained body diameter and mount style for every candidate.
For an older or used part, look up the generation or revision as well. Replacement pads, sleeves and service parts may change even when the product name stays similar.
Serviceability and Replacement Pads Matter Off-Road
Look beyond the main cylinder. Can you buy a replacement strike pad? Is there a documented service procedure? Are seals, oil and nitrogen services supported locally? A bump stop that works brilliantly for a race weekend but cannot be serviced near home might not be the best choice for a trail vehicle driven year-round.
Rubber-contact tips can be quieter on the street; harder nylon or Delrin-style tips may prioritize wear resistance in some applications. Always follow the maker’s intended pad or tip choice. Swapping to a random hard puck can increase noise or damage the contact plate.
Budget for the Full Pair, Not Just the Two Cylinders
The checkout total may include bump-stop bodies, two mounting cans, strike pads, mounting brackets, reinforcement, coatings, hardware, welding, and professional setup. A sale price for a bare bump is not comparable with a complete vehicle-specific kit. It can also be more expensive to move an incorrectly positioned mount later than to have the suspension cycled and measured before ordering.
When comparing brands, ask for a written list of included parts and any machining, fabrication or service steps the installer expects. That request reveals more than another star rating.
Common Hydraulic Bump Stop Problems and Why They Happen
Hydraulic bump stops can improve bottom-out control, but only after installation geometry and tuning are correct. When something feels wrong, this table helps separate a likely setup issue from a damaged part. It is a diagnostic starting point, not a permission slip to keep driving through harsh impacts.
| What you notice | Plausible cause to inspect | First safe check |
|---|---|---|
| Harsh impact at nearly every normal road bump | Contact height too low, limited available uptravel, incompatible setup | Measure ride-height gap and inspect witness marks |
| Loud metal hit at maximum compression | Bump engages too late, insufficient effective stroke, or another component hits first | Physically verify safe full-bump clearance |
| Sudden axle kick after a hard landing | Inappropriate rebound behavior, excessive gas setting for the unit, or other suspension setup issue | Check exact manual and ask a qualified tuner |
| Bent brackets or side wear on shaft/tip | Misaligned strike pad, one-wheel articulation or mount flex | Inspect contact alignment throughout suspension travel |
| Oil residue or declining performance | Worn seal, damaged shaft, leak or service requirement | Stop hard use and arrange professional inspection |
| Rattling can or loose rings | Improper retention, damaged fastener or inadequate mounting structure | Inspect hardware and follow model-specific retorque instructions |
Do Not Solve a Mounting Problem by Increasing Pressure
More nitrogen pressure is tempting when the bump runs through its stroke too quickly, but it does not move a contact pad, strengthen a cracked bracket, or create extra room for a shock that is already bottoming. Confirm the physical setup and load path first. If the hardware is right but the stop still bottoms harshly, that is when a qualified tuner can evaluate gas pressure, oil level and valving within the manufacturer’s limits.
A Hydraulic Bump Stop Does Not Replace the Main Damper
The regular shock manages motion throughout most of the suspension stroke. The hydraulic bump is there for the final part of hard compression. Some performance shocks use internal bypass circuits or hydraulic bottom-out control, but their behavior is not interchangeable with an external bump-stop kit. Our bypass shocks guide explains the separate role of position-sensitive main damping.
Are Hydraulic Bump Stops Worth It for Your Truck?
They make the most sense for vehicles that genuinely use deep compression with substantial energy: purpose-built trail rigs, aggressive prerunners, heavy or long-travel builds, and trucks with a proven bottom-out problem that cannot be solved more sensibly with the correct factory-style jounce parts. Properly positioned hydraulic bumps can help manage the final hit instead of sending it straight into the chassis.
For an otherwise stock daily driver, the tradeoffs are real. You may add noise, inspection needs, fabrication work and a significant bill without improving the ordinary ride. A rubber or microcellular jounce bumper can still be the right engineering choice. For an overview of all styles and what they do, see our guide to bump stops; this page is about choosing and setting up hydraulic units specifically.
The Five Things to Confirm Before You Spend Money
The order matters. First establish the safe compression limit and the existing contact location. Then check physical space and mount strength. Only after that compare bump-stop dimensions and the complete kit, and finally plan the pressure and travel verification with the installer.
- Safe full bump: the shock, tire, coil, steering and driveline clearances have been physically checked
- Correct working stroke: the chosen unit engages in time without consuming normal ride travel
- Matching hardware: body, can, retention style and strike pad are compatible by part number
- Structural mount: chassis and bracketry can carry repeated impact loads without side-loading the shaft
- Service and setup plan: the installer has the model-specific gas, inspection and maintenance information
Hydraulic Bump Stop FAQs
These questions come up while comparing air bump kits for Jeeps, Tacomas and high-speed off-road trucks. They are quick checks to make before relying on a catalog recommendation.
Are air bumps and hydraulic bump stops the same thing?
In common off-road shopping language, usually yes: both terms often mean a nitrogen-charged, oil-damped bump stop. The hardware is not simply an air spring, though. Look at its hydraulic damping design and the exact model specifications rather than assuming every item labeled “air bump” works identically.
What size hydraulic bump stops do I need?
Begin with the manufacturer’s recommended body size for the vehicle and duty cycle, then select stroke from the actual compressed suspension geometry. A 2.0-inch unit is a common starting point for compact trail setups; a heavier or highly leveraged system may justify 2.5 inches. Neither size is a substitute for measuring mounting clearance and contact travel.
Are 2-inch hydraulic bump stops always 2 inches of travel?
No. “2.0” often identifies the nominal body diameter. A 2.0-inch-family product can be offered in several shaft strokes. Read the separate body-diameter and travel lines on the manufacturer’s datasheet.
How much gap should a hydraulic bump stop have at ride height?
There is no single correct gap. The stop must engage before the shock bottoms or another component binds, but not so early that the vehicle rides on the bump during normal use. The correct answer depends on full-bump geometry, the stop’s stroke, where it hits the arm or axle, and the manufacturer’s setup instructions.
What nitrogen pressure should I run in hydraulic bump stops?
Use the pressure specified or approved for the exact bump-stop model and application, then have a qualified technician adjust it if the manufacturer permits. Pressure ranges published by one brand cannot be carried over to another. Never release high-pressure nitrogen simply to make installation easier unless the approved procedure is performed by trained personnel.
Can hydraulic bump stops be installed without welding?
Some application-specific kits use bolt-on mounts, while many universal conversions require welding or fabrication. Check whether the product is a complete vehicle-specific kit or just a cylinder and can. Even a bolt-on kit needs full-compression and mounting-strength checks.
Can I add hydraulic bump stops to a Jeep JK or Tacoma?
Often, yes, but a correct fit depends on the axle, generation, shock length, tire size and available mounting position. Front and rear kits can be completely different. Choose components designed for the actual vehicle and suspension modification rather than ordering only by the nameplate.
Can I use hydraulic bump stops with leaf springs?
Yes, if the bump engages an appropriately reinforced surface through the axle’s motion and the suspension retains the correct compression clearance. A spring-pack swap or removed riser block may change that point. Hydraulic bumps do not replace spring support for constant heavy loads.
Are hydraulic bump stops better than rubber for everyday driving?
Not automatically. Hydraulic stops shine during heavy end-of-travel events, but they cost more and require more attention. Many ordinary road vehicles are well served by the factory-style rubber or foam bumper. The better choice is the one that fits the actual use and compression limits.