Leaf Spring Hangers: Types, Fitment & Replacement
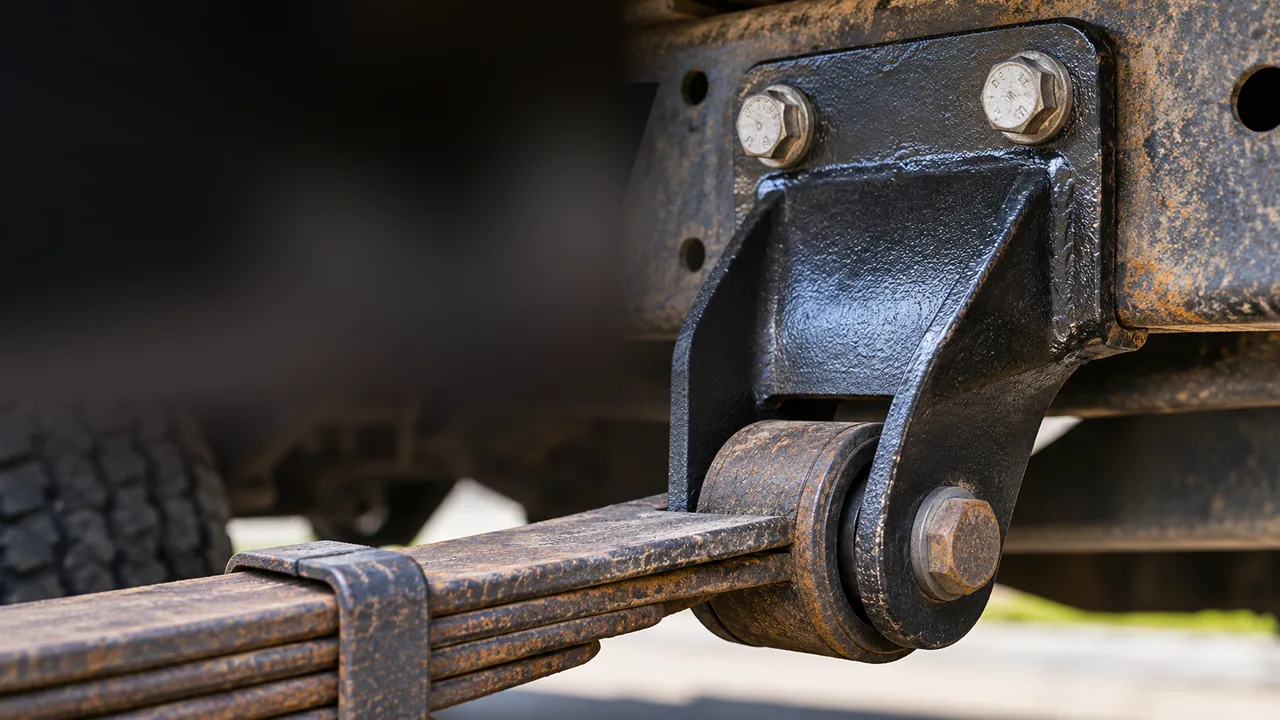
A leaf spring hanger is the steel bracket that anchors a leaf spring—or its shackle—to a vehicle’s frame. On many pickups, the front end of the rear spring bolts directly into a fixed hanger, while the other end connects through a swinging shackle. To buy the right leaf spring hanger, identify its exact mounting position first, then match the vehicle, spring width, frame-hole pattern, pivot location and required hardware. A rear bracket that looks almost identical to the front one is not necessarily interchangeable.
If a hanger is rusted through, cracked or pulling away from the frame, don’t continue driving the truck. The spring end may no longer be held in its designed position. A replacement bracket can fix a damaged hanger only when the frame rail it attaches to is structurally sound. That is the distinction worth checking before ordering a replacement bracket for what could turn out to be a substantial chassis repair.
Which Leaf Spring Hanger Do You Need?
Parts catalogs use position names that can look backwards until you know what they refer to. The first word identifies the end of a spring; the second identifies which spring assembly, front or rear. On a pickup with rear leaf springs, front of rear and rear of rear describe two completely different mounting locations.
Use this guide to narrow the search before comparing photographs. The position is a filter, not proof that a particular bracket fits your truck.
| Catalog term | Where the hanger sits | Typical connection | What to verify |
|---|---|---|---|
| Front of Rear (FOR) | Ahead of the rear axle, at the front eye of a rear spring | Spring eye to fixed frame bracket | Spring width, pivot position, frame mounting pattern |
| Rear of Rear (ROR) | Behind the rear axle, at the other end of a rear spring | Often frame bracket to moving shackle | Shackle pivot fit, bracket offset and frame pattern |
| Front of Front (FOF) | Forward mount on a front leaf-sprung axle | Depends on front suspension design | Exact front-axle arrangement, not a rear-spring catalog photo |
| Rear of Front (ROF) | Rear mount on a front leaf-sprung axle | May connect to a shackle | Front-suspension geometry and the correct application |
Front of Rear and Rear of Rear Are Not Two Names for One Bracket
Imagine looking along the driver’s side of a conventional pickup. The front eye of its rear spring sits in a hanger ahead of the wheel. Follow the spring past the axle and you may find a shackle hanging from a second, rearward frame bracket. In catalog language those are FOR and ROR, respectively.
The FOR hanger often carries a single spring-eye pivot. The ROR hanger may instead hold the upper end of the shackle. Their shape, height and bolt pattern can differ even when the vehicle model and spring width match. If you order “rear leaf spring hanger” without specifying which end, the listing may describe the wrong one.
What If Your Vehicle Has Front Leaf Springs?
Some older pickups, four-wheel-drive vehicles and specialty suspensions also use a leaf-sprung front axle. The front-spring hangers may be listed as FOF and ROF. They should not be selected using a rear-suspension diagram just because the bolt sizes look similar.
Position also doesn’t guarantee that the hanger is the fixed eye mount. The shackle may be at the front or rear according to the design. Inspect the actual vehicle and confirm the part diagram; the FOR/ROR and FOF/ROF labels tell you where the bracket lives, not every detail of what bolts to it.
Start With the Truck, Then Check the Spring Package
Year, make and model get you into the right catalog. They may not get you to one part number. Two versions of a pickup can use different spring widths, hanger offsets, mounting-hole arrangements or suspension packages. A replacement spring pack or an earlier frame repair can add another complication.
Stengel Bros, for example, distinguishes Ford hangers by front-versus-rear position and by spring widths such as 2½ and 3 inches. Its kits also vary by what hardware they include. Treat those as clues about what to compare, not permission to mix parts between Ford generations or trim packages.
What a Leaf Spring Hanger Does at the Frame
The hanger gives the spring a known mounting point on the chassis. The bracket itself is supposed to remain solidly attached to the frame; the designed movement occurs in the spring-eye or shackle pivot. If the bracket begins flexing, the rivets loosen or its bolt hole wears into an oval, the suspension is moving somewhere it shouldn’t.
The Fixed Spring Eye and the Rear Shackle Are Different Connections
At a common front-of-rear hanger, a pivot bolt passes through the bracket and a bushing in the spring’s front eye. At the opposite end, a rear-of-rear hanger often holds a shackle pivot. The shackle then connects to the spring’s rear eye and swings as the spring changes shape.
Our leaf spring shackles guide deals with the moving link and its fitment. For this page, the central question is whether the fixed frame bracket is correctly located, solid and capable of holding its pivot without unwanted metal movement.
A Good Bracket Can Still Have a Bad Pivot
A truck can clunk at the hanger even though the stamped steel is sound. The bushing may be torn, its inner sleeve seized to the bolt, or the pivot hardware may be loose. Conversely, fitting new bushings to an ovaled or cracked hanger will not restore a correctly located pivot.
Inspect the two together, but keep the repair decisions separate. If it’s the rubber or sleeve that has failed and the steel remains serviceable, our leaf spring bushings guide covers that repair in detail.
How to Match the Replacement Hanger Before Ordering
Vehicle fitment is the starting point; the bracket’s physical dimensions are the cross-check. This matters most when rust has erased the original part number or a previous owner has installed aftermarket springs. You want a replacement that locates the spring in the manufacturer’s intended position without new holes or forced alignment.
Compare the Frame Bolt or Rivet Pattern
Count the attachment holes and note their layout in both directions. On a frame-side bracket, three holes arranged in a triangle are not equivalent to three in a straight line. Some replacements are designed around a four- or six-hole pattern; others have extra flanges or need a specific crossmember configuration.
Measure from the centers of intact holes using the replacement supplier’s diagram. Check flange orientation and which side of the frame the bracket sits against. A corroded, torn hole can give a misleading measurement, so use original frame dimensions and a trustworthy part drawing when damage is present.
Spring Width Is Not the Hanger’s Inside Width
A catalog may call out a 2½-inch or 3-inch spring, but the bracket must also accommodate the specified bushing sleeve, bolt, washers and side clearance. The spring width alone is not the complete dimension across the hanger’s pivot opening.
Compare the original pivot arrangement with the replacement drawing. The correct bolt should be supported where the design expects it, without having to crush the hanger ears inward or spread them apart. Avoid a bracket that’s merely “close enough” across the spring eye.
Pivot-Hole Height, Offset and Bracket Shape Matter
The vertical and fore-and-aft position of the eye or shackle pivot affects where the axle sits relative to the frame and how the spring moves. Two hangers can share a mounting pattern while positioning the spring pin differently. A formed offset may also make the bracket clear the frame rail, fuel tank mount or nearby body hardware.
This is one reason a universal-looking hanger can be an expensive mistake. Matching the general outline on a product thumbnail is not the same as reproducing the original suspension geometry. If the truck has been modified, the spring or suspension manufacturer should confirm the intended hanger location.
Left, Right and “Fits Both Sides” Need Checking
Some parts are symmetrical and fit either side; others are handed or require distinct brackets because of their flange shape and surrounding hardware. Don’t infer left-versus-right interchangeability by flipping the product photo. Look for an explicit LH/RH or driver/passenger listing and compare actual mounting faces.
If one hanger is badly rusted, inspect the opposite side before placing the order. That doesn’t mean you must automatically replace both. It means you should know whether the other bracket, its frame attachment and its pivot hardware are safe before ending the job.
Bolt-On, Riveted and Welded Leaf Spring Hangers
Searches for bolt on leaf spring hangers often come from owners looking at factory rivets and wondering how the replacement attaches. The answer depends on the exact vehicle and kit. “Bolt-on” describes an approved mounting design, not a guarantee that any rusted bracket can be removed and replaced with ordinary hardware-store bolts.
Why Factory Rivets Are Common on Older Trucks
Many pickup hangers were riveted to the frame at the factory. Their rivet heads can look like permanent bumps in the steel until the surrounding paint and rust are cleaned away. Other designs use bolts, and some use welded or mixed attachments.
A vehicle-specific replacement kit may permit removing the factory rivets and installing approved bolts in the original locations. TruckSpring describes that approach for many conventional pickup hangers. It does not follow that every riveted bracket on every chassis is approved for the same conversion.
A Bolt-On Kit Should Identify the Frame Hardware
Before buying, check whether the box contains only the hanger or also includes its mounting bolts, matching locknuts, washers and the spring-eye or shackle pivot hardware. A listing that says hanger kit can still mean one bracket for one position, not a complete axle’s worth of parts.
Where a rivet-to-bolt conversion is approved, the fasteners must have the correct grade or property class, shank length, diameter, locking arrangement and tightening method. The service procedure may also specify how the frame holes are prepared. Generic “Grade 8 fits everything” advice can miss important design requirements.
Weld-On and Fabricated Hangers Are Not Generic Substitutes
Weld-on hangers appear in restoration, custom suspension and frame-repair catalogs, but mounting them is structural work. Welding procedure, frame material, joint location, bracket geometry and nearby components all matter. Some replacement parts are bolt-on; others are part of an engineered weld-on frame section.
The distinction becomes especially important if the original bracket has already pulled metal from the frame. A new piece of stamped steel does not repair a weak attachment surface. Use the vehicle or repair-kit manufacturer’s procedure and an appropriately qualified frame-repair shop rather than guessing at weld size or drilling a new pattern.
Don’t Make an Incorrect Hole Pattern Fit by Force
A bracket that won’t align may be for a different year, spring package or frame. It can also signal frame distortion. Reaming or elongating the holes to make the bolts go in may compromise clamp contact and shift the spring from its proper location.
Stop and identify the mismatch first. The original holes should not be enlarged, and the frame should not be drilled or welded, unless the specific approved repair procedure calls for it. That rule is especially important near a frame flange or a crossmember where local reinforcement and fatigue resistance matter.
Signs a Leaf Spring Hanger Needs More Than a Coat of Paint
Most trouble starts quietly. Water and road salt collect behind the bracket, and an aging pivot can add movement that the steel was never meant to take. The most useful inspection separates surface appearance from evidence that the hanger has lost strength or its mounting geometry.
Rust Scales, Holes and a Flange Pulling Away From the Frame
Light surface corrosion is not the same as a hanger with layers of flaking steel, perforations, splitting around rivet holes or a visibly thinning flange. Some brackets look reasonable from the outside but trap rust between the hanger and frame rail. Check the edges and mounting faces, not just the most visible surface.
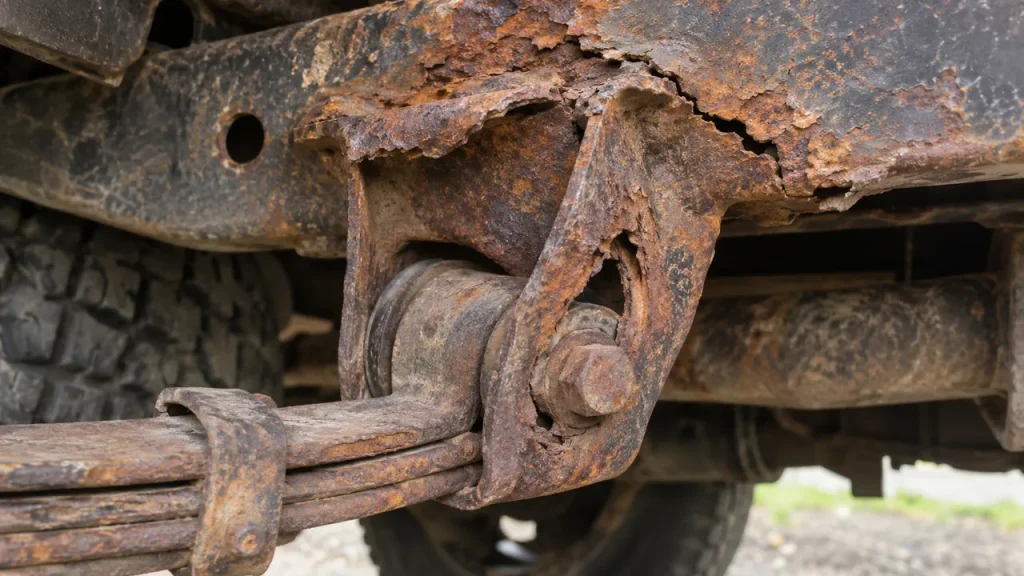
If the bracket is cracked, holed through or separating, it needs a proper structural assessment and usually replacement. Spraying rust converter over an open seam won’t restore the missing metal. The same is true of a bolt pulled halfway through its mounting hole.
An Oval Pivot Hole or a Bolt That Moves Against the Bracket
The pivot is meant to rotate or flex through its designed bushing or bearing arrangement, not grind away at the hanger hole. When a sleeve seizes or a retaining bolt loses its intended clamping, the bolt may begin moving in the bracket instead. Polished metal, a round hole worn into an egg shape or rusty powder around the pin are warning signs.
A new nut may stop an obvious rattle but cannot make an oval hole circular again. If the spring-eye mounting point has already shifted, check the connected bushing and bolt as well as the hanger. The repair has to restore the correct joint, not merely make the hardware tighter.
Cracks, Bent Ears and Fresh Contact Marks
A hanger can be damaged by impact, overload or years of motion at a loose connection. Look closely around the corners where the flanges bend and where mounting holes interrupt the steel. One bent ear can pinch the spring-eye bushing while the other side leaves excess space.
Fresh contact marks at a bed floor, frame rail or neighboring bracket deserve attention. They do not prove the hanger is at fault on their own. A broken shackle, displaced spring or other suspension component might have made the mark, so trace the movement before condemning the bracket.
Clunks or Dog-Tracking Are Clues, Not a Diagnosis
A damaged mount may produce a hard knock when the truck brakes, accelerates or crosses a bump. If one spring end no longer stays in its intended location, the rear axle may appear to track crookedly. A driver might describe that as the truck “walking sideways” or needing steering correction on a straight road.
Those symptoms can also come from bushings, U-bolt looseness, a shifted axle seat or unrelated parts. Our suspension clunk and rattle guide covers other noise sources; here, visible bracket damage and unwanted movement at the frame attachment carry more weight than sound alone.
When It’s Unsafe to Drive
If a hanger is broken, pulling away from the frame, badly cracked or no longer containing the spring end, stop using the vehicle and arrange professional transport or repair. The rear spring helps locate the axle as well as support load. Losing a frame-side mounting point can therefore change vehicle control without much warning.
Don’t drive a short distance to “see if it settles,” and don’t rely on the remaining spring mount to keep a damaged side in place. A cosmetic rust problem and a structural mounting failure are very different situations; when the condition isn’t clear, get it inspected before driving.
The Frame Rail Can Be the Bigger Problem
The bracket bolts or rivets to the frame. That sounds obvious, but it’s easy to forget while shopping: the replacement only works if the frame around those mounting holes can still carry the load. On an older pickup, corrosion behind the hanger may be more serious than corrosion on the bracket itself.
Look Behind the Hanger, Not Just at Its Outer Face
Rust may begin in the narrow gap between two pieces of metal. It can expand, lift the bracket away from the frame and eat away at the rail without leaving a neat, visible hole on the outside. A technician should inspect the surrounding frame web, lower flange and attachment holes after the old bracket is safely removed.
If the holes are torn or the rail has lost substantial metal, bolting a new hanger into the same location does not restore the intended structural capacity. That becomes a frame-repair decision, with its own approved method and possible limits on repairability.
Frame Repair Sections and Reinforcement Kits Are Application-Specific
Some manufacturers sell engineered frame sections for commonly rusted areas around spring hangers. These are not simply flat plates to cover a rusty spot. They may specify how much material to remove, how to establish the bracket’s location and how to protect the repaired metal against corrosion.
For that kind of job, a shop needs to assess the frame’s condition and follow the specific repair instructions. A generic reinforcement patch, extra washers or unapproved weld around a cracked hanger flange may conceal damage while leaving the spring mount misaligned.
Corrosion Protection Matters After the Hardware Is Installed
A repaired bracket can start rusting again if bare steel and trapped seams are left exposed. The applicable repair method may include cleaning, coatings, seam protection and keeping drainage paths clear. Protect fastener and pivot surfaces as the instructions require; don’t simply fill every gap with undercoating that can hide later damage.
It also helps to check the opposite frame rail and adjacent mounting points. If one side has been exposed to years of road salt, its partner may deserve attention even if it hasn’t made noise yet.
How a Shop Replaces a Leaf Spring Hanger
Replacing a hanger is more involved than unbolting a loose accessory. The spring end and axle must be controlled before the bracket is disconnected; a riveted or welded factory attachment may require careful removal and verification of the frame. The steps below explain what a proper repair typically includes, not a universal under-vehicle procedure.
The work generally follows these checkpoints:
- Confirm the correct location and part. Identify FOR, ROR or the actual front-axle position; verify frame and spring options, pivot hardware and how the original hanger is attached.
- Support the vehicle and axle independently. Use the manufacturer’s lifting and support method so the leaf spring end is not released unexpectedly when its frame connection is removed.
- Inspect adjacent suspension parts before disassembly. Look at the shackle or spring eye, bushing, sleeve and nearby axle hardware so a seized pivot or damaged spring is not overlooked.
- Remove the old attachment by the approved procedure. Factory rivets, bolts and welded mounts require different tools and precautions; avoid damaging the frame rail or nearby fuel, brake and electrical components.
- Assess the exposed frame and mounting holes. Check for thinning metal, distortion, corrosion between surfaces and damage that may require a separate frame repair.
- Fit the correct hanger with specified fasteners. Confirm its orientation, contact with the frame, bolt-hole alignment and the original spring pivot location before final tightening.
- Restore the pivot and check the suspension. Follow the required bolt torque and bushing ride-height procedure, check spring/shackle clearance, and perform any specified alignment or follow-up inspection.
Rivet Removal Is Not a Reason to Damage the Frame
On older riveted brackets, the original fasteners can be more stubborn than the hanger itself. Cutting or drilling must be controlled so the frame’s existing holes and mounting surfaces remain sound. Punching a rivet through an already rust-thinned frame without checking the surrounding metal can make the repair worse.
A workshop with the right equipment can also decide when removing a spring assembly improves access or safety. The job is not complete simply because a new bracket lines up with most of the holes; the frame and hanger need to make full intended contact.
Final Pivot Tightening Depends on the Bushing Design
Some spring-eye bushings use bonded rubber that should be finally tightened at the specified normal ride position. Other assemblies use sleeves or pins with different instructions. Do not assume that a bolt tightened with the axle hanging free is correct, or that leaving it loose will let the suspension move better.
Frame mounting bolts and the spring-eye pivot bolt may have different specifications. Use the applicable service or kit instructions for each connection. There is no safe universal torque number for every leaf spring hanger and pivot design.
Check Where the Spring Sits Before Driving
Once the hanger is secure, the spring should return to its intended position without contacting the frame, bed or nearby lines. On a shackle-end hanger, the shackle must have its required clearance through the suspension movement range. On a fixed-eye hanger, the spring eye and pivot must sit squarely, with no bracket distortion.
The shop should verify side-to-side mounting position, wheelbase relationship where relevant and any change in tracking. An apparently straight replacement bracket can still place the spring eye incorrectly if the rail or mounting holes were previously bent.
What Should Be in a Leaf Spring Hanger Kit?
Online listings often show a beautiful new bracket and leave you wondering what arrives in the box. A one-side hanger kit, a pair of replacement brackets and a full shackle-and-hanger package can all appear under nearly the same search term. Inventory the hardware before the truck is disabled.
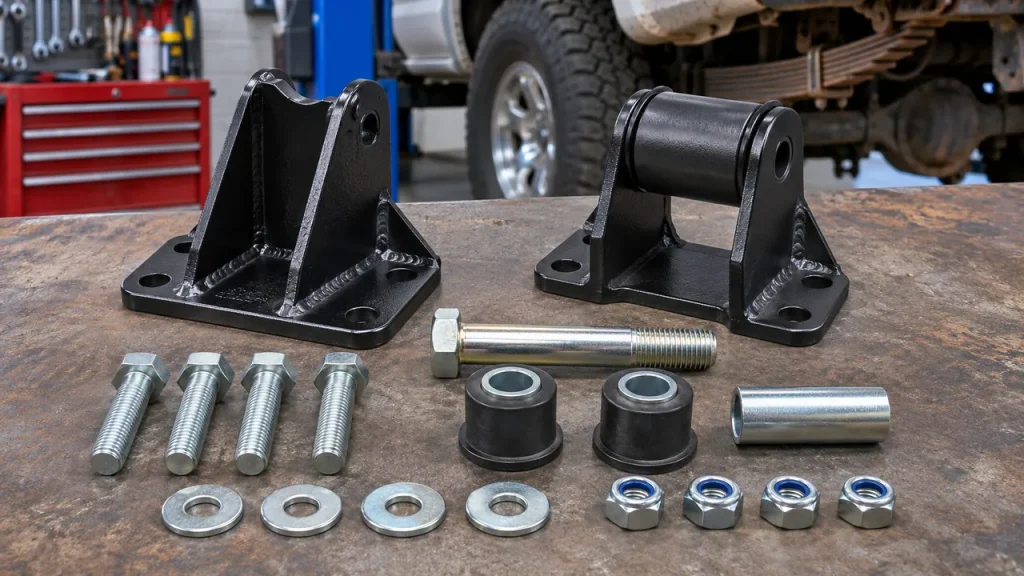
Bracket Only, One-Side Kit or Full Rear Mounting Package
A bare hanger may not include the spring-eye cross bolt, shackle pivot, locknuts or the bolts that attach the bracket to the frame. Some kits are sold for one wheel position; others cover both sides or include front and rear hangers for a complete spring setup.
Stengel Bros lists Ford kits with different combinations of hangers, shackles, cross bolts and frame bolts. That kind of parts breakdown is what you need to read, rather than counting components in a thumbnail photo. Ask whether the installation requires replacement of any prevailing-torque hardware or non-reusable fasteners.
Examples From Ford, Chevrolet/GMC and Ram Catalogs
Ford Ranger and F-Series catalogs commonly split front-of-rear and rear-of-rear hangers, sometimes with separate choices for spring width or model year. Chevrolet and GMC offerings also vary between truck generations and spring packages. Older Ram/Dodge applications can distinguish light- and heavy-duty spring configurations.
These are fitment examples, not a promise that a bracket from one model fits another. A search such as “73–87 Chevy front leaf spring hangers” has its own vehicle-specific details and could justify a separate installation guide. This article helps you ask the right questions before you reach that level of specificity.
The Parts Counter Needs More Than the Registration Year
If the truck is modified or the bracket has no readable marking, gather the following information before contacting a spring shop or comparing aftermarket parts. A good photo of the frame side and an undamaged hole pattern can be useful, but measurements still need verification.
- Mounting position: front of rear, rear of rear, or the appropriate front-axle location.
- Vehicle configuration: exact model year, drive arrangement, frame or cab/chassis version and suspension option.
- Spring and pivot: spring width, bushing sleeve arrangement, pivot-bolt diameter and required clearance.
- Frame interface: mounting-hole count, spacing, flange shape and bracket orientation.
- Kit contents: hanger quantity, frame bolts, locknuts, washers, cross bolts and any shackle parts.
- Damage and modifications: corrosion at the frame, prior repair, aftermarket spring pack or altered suspension mounts.
If the mounting holes are badly worn or the frame is distorted, note that explicitly rather than giving the parts counter dimensions from damaged metal and treating them as factory measurements.
Hanger Replacement Cost Depends on What the Rust Has Reached
The bracket itself can be a relatively inexpensive part on a common older pickup. The labor is where the estimate can change sharply: seized eye bolts, riveted factory hardware, bed or body access and especially damaged frame steel can add substantial work. A low bracket price doesn’t predict the final shop bill.
Straightforward Bracket Replacement Versus Chassis Repair
On a clean truck, the task may involve removing the old bracket, replacing approved hardware and restoring the existing spring connection. On a rust-belt truck, the shop may find perforated mounting steel, failed rivets, a seized sleeve or a spring eye damaged from years of movement. The scope is no longer “just a hanger.”
Ask for an itemized estimate that distinguishes bracket, frame mounting hardware, pivot parts, labor and any frame repair. If the complete spring pack also needs replacement, our leaf spring replacement cost guide covers that separate job rather than treating every spring-related expense as part of the hanger price.
Should You Replace Hangers on Both Sides?
Not by default. Replace a damaged hanger according to the manufacturer-approved procedure and inspect its matching position on the other side. If both brackets are badly corroded, replacing them as a pair during one service visit may be practical. If one is sound and the damage was isolated, there may be no technical reason to remove it.
The frame condition is the deciding factor, not the price difference between buying one bracket and two. A matched pair of shiny hangers will not compensate for structural rust in the frame beneath them.
Trailer Hangers and Custom Mounts Are Separate Fitment Problems
The same phrase leaf spring hanger appears in trailer, heavy-truck and fabrication catalogs. Some components share the same basic idea—a bracket connecting a spring to a frame—but the layouts and design requirements can be very different. Don’t use this pickup-focused article as a universal installation guide for all of them.
Trailer Hanger Spacing and Equalizers Deserve Their Own Guide
A tandem-axle trailer may use front, center and rear hangers, with equalizers and shackle straps between spring ends. Double-eye springs and slipper springs have different arrangements. Hanger height and spacing can affect axle separation, clearance and how load moves between axles.
Those are application-specific trailer questions, not minor variations of a pickup’s rear spring hanger. Trailer owners should follow the axle or suspension-kit manufacturer and its specified geometry. We are intentionally leaving detailed trailer hanger selection and spacing for a dedicated page rather than folding a second search intent into this one.
Universal and Fabricated Hangers Still Need an Engineered Location
A custom bracket may be appropriate when a vehicle has an engineered suspension conversion or a specialist is rebuilding a chassis. The words universal, fabricated and weld-on do not define correct strength, alignment or travel clearance on their own.
Fabrication also shouldn’t be used to hide a misidentified stock part. If the vehicle has an original suspension and a correct replacement exists, comparing the original part number and mounting dimensions is usually the more reliable first step.
Questions to Settle Before the Truck Goes Back Into Service
Owners commonly discover the difficult questions after they have bought a bracket or removed a wheel. These are the ones worth answering before the final repair decision.
Is a Leaf Spring Hanger the Same as a Shackle?
No. The hanger is the fixed frame-mounted bracket. The shackle, where fitted, is the moving link between a hanger and a spring eye. Some retailers sell both in a combined kit, which explains why product names can blur the distinction. Order by the physical position and included components rather than the kit name alone.
Can You Replace a Riveted Hanger With a Bolt-On One?
Yes, on applications where the replacement and service instructions specifically approve that change. Many older truck hanger kits are designed to use specified bolts in place of factory rivets. It is not a general permission to drill new frame holes or substitute unlisted hardware on another vehicle.
Can a Bad Hanger Make the Truck Sit Crooked or Need an Alignment?
A failed hanger can change a spring mounting point and potentially shift axle position. A correct like-for-like repair does not automatically require adjustment to the front wheel alignment, but a vehicle that dog-tracked, had a bent bracket or needed frame work deserves a check of rear axle position and thrust angle. Our alignment after suspension repairs guide explains that distinction.
Does a Rusty Hanger Mean the Leaf Spring Is Bad Too?
Not necessarily. A healthy spring can be attached to a ruined frame bracket. Equally, a cracked spring eye or a worn bushing can damage an otherwise sound hanger. Inspect each part where the load passes through the joint and replace what has actually failed, according to the applicable repair procedure.
Can I Drive With a Broken Rear Leaf Spring Hanger?
No. A separated or structurally failed spring hanger compromises a load-bearing connection between the suspension and frame. The spring end can move unexpectedly and affect axle location. Have the vehicle recovered or repaired professionally instead of attempting a cautious drive to the workshop.
Before the New Hanger Is Tightened, Check the Frame It Attaches To
A freshly painted bracket can disguise an unfinished job. If the frame rail is thin, the bolt holes are distorted or the spring pivot has shifted from its intended location, installing new hardware won’t make the suspension secure. The bracket and frame must make the contact the repair was designed to provide, and the spring must sit correctly in its mount.
Once those conditions are satisfied, the specified fasteners, pivot tightening method, corrosion protection and final axle-position check complete the repair. The aim isn’t simply to make the rusted piece disappear. It’s to restore a solid, correctly located connection between the spring and the vehicle’s frame.