How to Adjust Camber Angle on a Car: Step-by-Step Guide

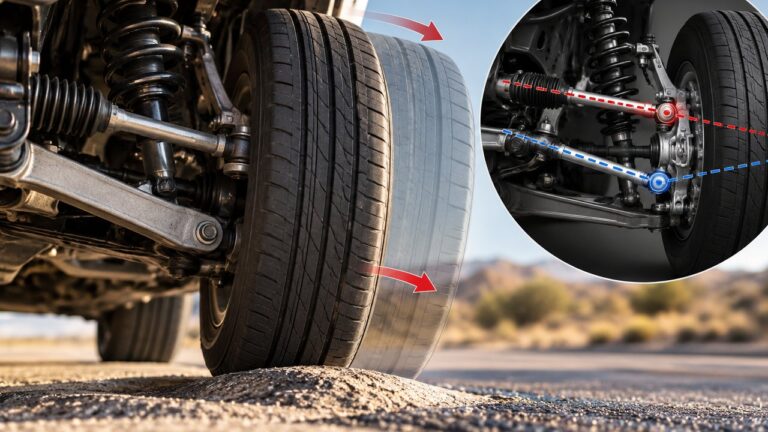
To adjust camber angle on a car, first identify whether the suspension has a factory or aftermarket camber adjuster. Measure the current angle at normal ride height, use the correct eccentric bolt, strut mount or control-arm adjustment to move the wheel toward its specified angle, then tighten the hardware and recheck the alignment.
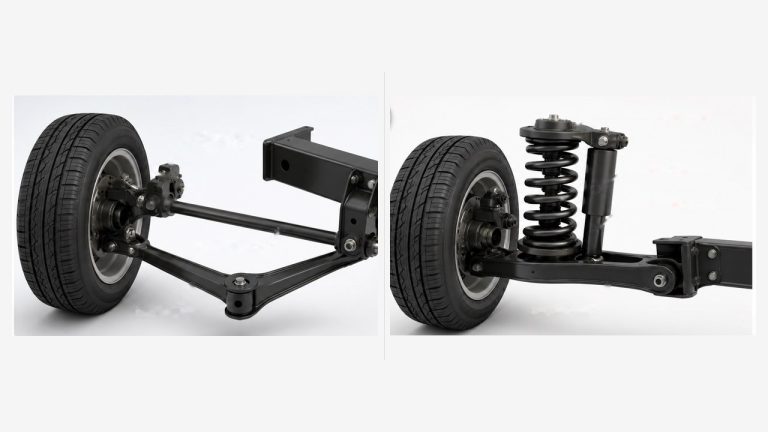
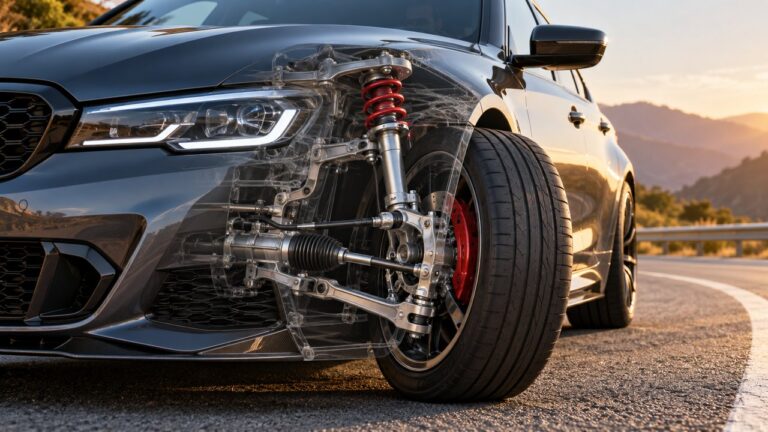
That is the basic process, but the actual adjustment depends on the suspension. A MacPherson-strut car may use eccentric camber bolts or adjustable top mounts. A double-wishbone suspension may use control-arm eccentrics or shims, while an independent rear suspension may have adjustable links. Some cars have no factory camber adjustment at all.
Important: Never loosen suspension mounting bolts without understanding how the knuckle, control arm and spring are supported. Use the vehicle-specific service procedure, correct fastener torque and approved lifting points. A home camber measurement can help you make a preliminary correction, but a complete alignment is still needed before treating the setting as finished.
Where Do You Adjust Camber on a Car?
The first step is finding out how your particular suspension changes wheel angle. There is no universal camber adjustment bolt that every car has.
| Suspension type | Possible camber adjustment | What to check first |
|---|---|---|
| MacPherson strut | Eccentric strut-to-knuckle bolt, slotted mount or camber plate | Factory service manual and strut mounting design |
| Double wishbone | Control-arm eccentrics, shims or adjustable arms | Upper and lower control-arm mounting points |
| Independent rear multi-link | Eccentric bolts or adjustable camber links | Rear subframe and control-arm adjusters |
| Rear torsion beam | Often no factory adjustment | Axle condition and manufacturer specifications |
| Aftermarket coilovers | Camber plates or adjustable lower mounting provisions on compatible designs | Exact coilover model and instructions |
If the suspension has a documented adjustment mechanism, camber may be corrected without replacing parts. If it has none, forcing the wheel into position is not a valid repair.
For the underlying difference between positive, negative and zero wheel tilt, see our camber angle explanation. This guide focuses on changing and verifying the actual setting.
Tools Needed to Adjust Camber at Home
You do not necessarily need a commercial alignment rack to take a preliminary camber measurement, but you do need a reliable way to measure wheel inclination and safely access the adjustment hardware.
- Vehicle-specific service information: camber specifications, adjustment procedure, lifting points and fastener torque values.
- Digital camber gauge or inclinometer: preferably with a wheel-rim adapter or other accurately referenced mounting surface.
- Level measuring surface: the floor slope must be checked and accounted for.
- Wheel chocks: to prevent unintended vehicle movement.
- Floor jack and appropriately rated jack stands: when the procedure requires lifting the vehicle.
- Torque wrench: covering the torque range required by the relevant suspension fasteners.
- Correct sockets and wrenches: including any special tools specified for the eccentric adjuster.
- Paint marker: for marking the starting position of an adjustable component.
- Approved suspension-settling or slip equipment: when needed for accurate loaded measurements.
A professional alignment shop also uses wheel targets, compensation procedures and calibrated equipment to measure all four wheels relative to the vehicle’s geometry. A handheld angle gauge does not provide all of that information.
How to Adjust Camber Angle: Step by Step
The workflow below applies to a vehicle with a manufacturer-approved or properly installed adjustable camber mechanism. The location, direction of movement and tightening procedure must come from the instructions for that specific suspension.
Step 1: Find the Correct Camber Specification
Before touching any hardware, identify the correct camber range for your vehicle’s year, model, suspension and intended operating condition.
Check whether the specification applies to the front or rear axle and whether it requires a particular ride height, vehicle load or preparation procedure.
For example, a measured value of -2.0° does not automatically mean the car has excessive negative camber. It might be appropriate on one vehicle and significantly outside specification on another.
Record the target and allowable range for each wheel. Do not assume both axles need the same setting or that every vehicle requires identical left and right values.
Step 2: Inspect the Suspension and Prepare the Vehicle
Before measuring or adjusting anything, verify that the suspension is in a condition where an alignment can be performed reliably.
- Set the tires to their specified cold pressures.
- Check for bent wheels, damaged tires and uneven tread wear.
- Inspect ball joints, tie rods, control-arm bushings and wheel bearings for excessive play.
- Confirm the vehicle is at its intended ride height.
- Park on a suitable level surface and secure it against movement.
- Settle the suspension using the procedure recommended by the manufacturer.
If a wheel has excessive movement from a worn ball joint or damaged control arm, correct that mechanical fault first. Otherwise, the camber reading can change under load and invalidate the adjustment.
Never work beneath a vehicle supported only by a hydraulic floor jack. Some alignment adjustments also require the suspension to remain loaded, which calls for appropriate professional equipment rather than improvised support arrangements.
Step 3: Measure the Current Camber Angle
With the vehicle at the required ride height, use a calibrated camber gauge to measure the inclination of each wheel.

A rim-mounted gauge is generally preferable to placing a straightedge against a tire sidewall because tire sidewalls bulge and may not provide an accurate reference.
Measure the left and right wheels using the same method. Record the values before changing anything.
| Wheel | Measured camber | Manufacturer specification |
|---|---|---|
| Front left | Record reading | Check service data |
| Front right | Record reading | Check service data |
| Rear left | Record reading | Check service data |
| Rear right | Record reading | Check service data |
Repeat any suspicious measurement before attempting correction. A gauge referencing a sloped floor or a bent wheel can display an incorrect angle even when the suspension is properly aligned.
Step 4: Locate the Approved Camber Adjuster
Consult the service procedure to identify the actual adjustment point. It may be an eccentric bolt, a slotted strut mount, a shim arrangement or an adjustable control arm.
Mark the starting position where appropriate so that movement can be tracked. Confirm whether the relevant fastener is reusable, uses a locking nut or must be replaced after loosening.
Do not assume an ordinary suspension bolt is an eccentric adjuster just because it is near the steering knuckle. Some suspension connections have no provision for adjustment and must remain in their designed position.
Step 5: Make a Small Camber Adjustment
Follow the vehicle or adjustment-kit instructions to release the specified locking hardware while keeping the assembly correctly supported.
Make a controlled, small adjustment using the appropriate mechanism:
- Rotate an approved eccentric cam to reposition its mounting point.
- Slide an adjustable strut top within its permitted travel.
- Move a control-arm mounting point according to its service procedure.
- Change an adjustable link’s length only within the component manufacturer’s permitted range.
There is no universal clockwise or counterclockwise direction that always produces more negative camber. The result depends on where the adjuster is installed, its orientation and the suspension geometry.
Recheck the angle after a small movement rather than trying to reach the target in one large adjustment.
Step 6: Tighten the Hardware Correctly
Once the adjustment is where it needs to be, secure it according to the applicable service instructions.
Use the specified torque value, retain the adjuster’s position while tightening and install replacement locking hardware wherever required.
Pay particular attention to bonded rubber suspension bushings. Some control-arm mounting bolts must receive final torque at normal ride height so the bushing is not locked into an artificially twisted position while the suspension hangs.
The correct procedure depends on the component. Do not apply the ride-height tightening rule indiscriminately to every bolt on the suspension.
Step 7: Settle the Suspension and Recheck the Alignment
Return the vehicle to its specified measurement condition and settle the suspension according to the service procedure.
Measure camber again on both sides. Verify that the hardware remained secure and the adjustment did not move during tightening.
The job is not finished until the other alignment angles have also been checked. In particular, changing camber can change toe, especially when the steering knuckle or control-arm mounting points have been repositioned.
Complete the vehicle’s required four-wheel alignment procedure before normal road use. If you cannot verify the angles or fastening requirements, have the adjustment completed by a qualified alignment technician.
How to Adjust Front Camber With Eccentric Bolts
Eccentric camber bolts are a common adjustment method on certain MacPherson-strut vehicles.
The strut connects to the steering knuckle through mounting hardware. Where an approved eccentric bolt and suitable mounting geometry are used, rotating the eccentric changes the relative position of the strut and knuckle.
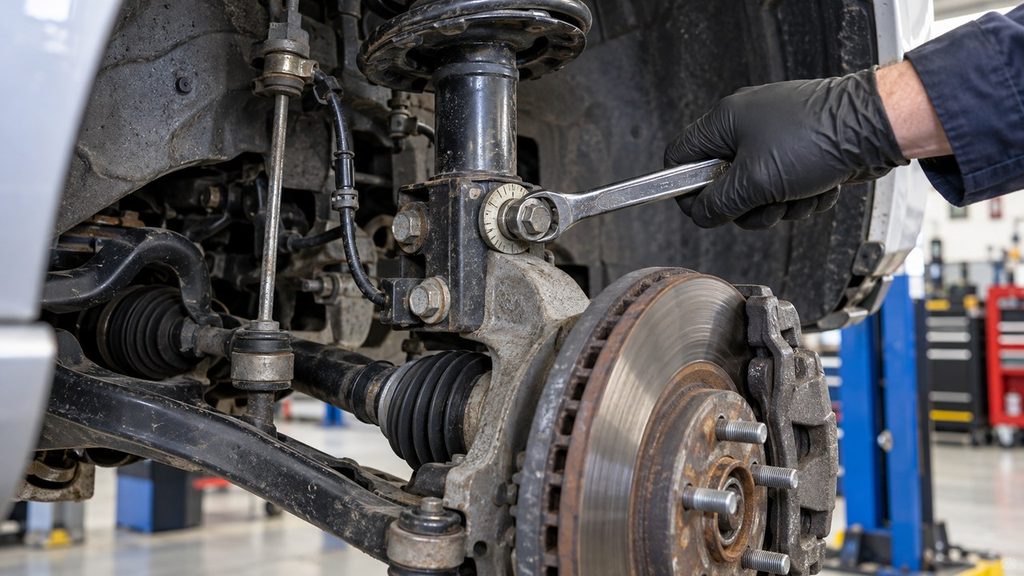
That changes the wheel’s camber.
A typical approved adjustment sequence involves:
- confirming the correct bolt, washer and mounting location;
- supporting the assembly as specified;
- releasing the appropriate fastener enough to permit adjustment;
- rotating the eccentric while monitoring camber;
- holding the eccentric in position while tightening to specification;
- rechecking camber and toe afterward.
Some vehicles already have an eccentric factory bolt. Others may require a vehicle-specific aftermarket component, and some are not compatible with a camber bolt conversion.
For example, SPC Performance’s EZ Cam XR instructions and fitment information identify a specific lower-bolt mounting position on compatible two-bolt strut assemblies. That does not make the same mounting position correct for every car or every camber-bolt design.
Do not install two aftermarket eccentric bolts simply to increase adjustment range unless the manufacturer explicitly permits that combination. Substituting suspension fasteners without a compatible, approved procedure can compromise the joint.
How to Adjust Camber With Camber Plates or Coilovers
Some aftermarket MacPherson-strut coilovers use adjustable upper mounts called camber plates.
These plates allow the upper strut position to move laterally within a designed range. Moving the upper mount inward usually increases negative camber; moving it outward generally reduces negative camber on compatible designs.
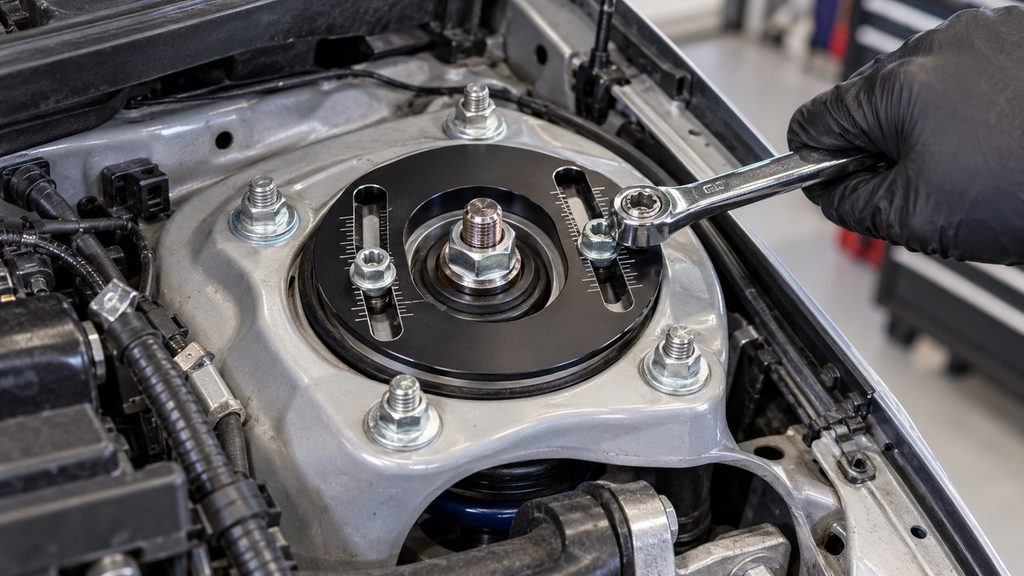
The procedure is different from rotating a strut-to-knuckle eccentric.
For an installed and correctly configured camber plate, the adjustment generally follows this sequence:
- Confirm the mount is designed to adjust camber on the vehicle’s suspension.
- Identify its sliding adjustment hardware and permitted range.
- Follow the manufacturer’s instructions for unloading or supporting the assembly.
- Release only the designated adjustment fasteners.
- Move the plate a small amount in the desired direction.
- Secure the fasteners and remeasure camber.
- Verify the final setting, component clearances and complete alignment.
Do not loosen the large center nut on a loaded strut assembly. It is not the normal camber adjustment fastener and may retain spring or damper components under load.
Also, not every coilover offers camber adjustment at the upper mount. Some double-wishbone coilover installations use fixed top mounts, while others adjust camber through the control arms instead.
On systems that provide both a slotted lower strut mount and an upper camber plate, the manufacturer may specify one adjustment for the baseline and the other for fine tuning. Follow that procedure rather than maximizing travel at both locations.
How to Adjust Camber on Double-Wishbone Suspension
Double-wishbone or short-long-arm suspension uses upper and lower control arms to locate the wheel.
Unlike a MacPherson-strut system, camber is commonly changed by repositioning one or more control-arm mounting points.
Depending on the vehicle, that may involve:
- Control-arm eccentric bolts: rotating a cam moves an arm pivot within its mounting bracket.
- Alignment shims: changing approved shim arrangements repositions an arm shaft or mounting point.
- Adjustable control arms: modifying an approved arm’s effective length changes the wheel’s position.
On some designs, changing the upper control-arm position affects both camber and caster. If caster also needs correcting, our guide to adjusting caster angle covers the relevant eccentric and shim methods. An alignment technician must account for that interaction rather than adjusting one angle in isolation.
Never remove alignment shims at random or assume that changing one eccentric affects camber only. The correct sequence and direction depend on how the control arms attach to the chassis.
How to Adjust Rear Camber Angle
Rear camber adjustment depends especially heavily on axle design.
Independent Rear Suspension
Many independent rear suspensions, including certain multi-link designs, have eccentric adjustments at control-arm or subframe mounting points.
Rotating the specified eccentric changes an arm’s position and therefore the inclination of the rear wheel.
Some rear suspensions instead use adjustable camber links. Their length can be changed within the manufacturer’s specified range and secured using locking hardware.
However, changing a rear link can also influence rear toe and thrust angle. The final rear-wheel alignment must therefore be measured rather than assuming camber alone has been corrected.
Rear Torsion-Beam Suspension
Many torsion-beam rear suspensions do not include an ordinary factory rear-camber adjuster.
In those cases, a camber reading outside specification may indicate a bent axle beam, damaged mounting point, worn component or another geometry problem.
Some vehicles have approved correction parts or application-specific shims, but these should never be assumed compatible with every torsion-beam axle.
If the manufacturer specifies a fixed rear camber value and the axle is visibly damaged, fitting adjustment hardware to hide the error is not a substitute for repairing the damage.
Can You Adjust Camber Without a Professional Alignment Machine?
Yes, a mechanically experienced owner can sometimes measure and make a preliminary camber adjustment using a suitable gauge and an approved adjustment mechanism.
But a homemade setup is only as accurate as its reference surfaces and measurement procedure.
Several details are easy to overlook:
- Floor slope: a digital gauge must be referenced correctly; zeroing the tool in an arbitrary orientation does not make a sloped floor level.
- Wheel runout: a bent wheel or inconsistent mounting position can affect the reading.
- Tire sidewall shape: measuring against the tire rather than a suitable wheel reference can introduce error.
- Suspension loading: readings taken with the wheels hanging may differ from those at normal ride height.
- Ride-height consistency: tire pressure, vehicle load and settling can change the measured angle.
- Steering position: front camber readings can change with steering angle, so the correct measurement position matters.
A digital angle finder attached to a carefully referenced rim adapter can be useful for comparing adjustments. It cannot, by itself, verify rear thrust angle, total toe or the complete alignment of the vehicle.
Use home measurements to understand and check the correction, not as evidence that the entire alignment is finished.
Why Toe Must Be Checked After Camber Adjustment
One of the biggest mistakes during camber correction is assuming that toe will remain unchanged.
On many suspension designs, moving the steering knuckle or control-arm mounting point also changes the relationship between the wheel and its steering or toe-control linkage.
That can change individual toe even when the only intended adjustment was camber.
Technicians sometimes call this interaction alignment cross-talk: changing one geometry setting influences another.
The general workflow is to establish the required rear geometry, complete the front caster and camber settings as applicable, and finish with the necessary toe adjustments, subject to the vehicle-specific procedure.
Incorrect toe can wear tires rapidly, even if camber is now inside specification. For the difference between the two toe directions and their effects on tire scrub, see our toe-in vs. toe-out comparison.
What If Your Car Has No Camber Adjustment?
If the service information says camber is not adjustable, the next step is identifying why the measured angle is outside specification.
Possible causes include:
- incorrect ride height or weak springs;
- damaged control arms or steering knuckles;
- worn suspension bushings or ball joints;
- subframe displacement;
- previous collision or curb damage;
- incorrectly fitted replacement parts;
- aftermarket suspension modifications;
- incorrect measurement setup or equipment calibration.
Some vehicles can accept manufacturer-approved correction hardware, while others require damaged components to be repaired or replaced.
Do not grind or elongate structural mounting holes, alter suspension fasteners or add generic correction parts without a specifically approved procedure. Some specialist camber kits require modifications performed by trained personnel using exact installation instructions; that does not make the same modification suitable for another vehicle.
Common Camber Adjustment Mistakes
Even when an adjuster is available, a few errors can turn a simple correction into an expensive alignment problem.
Adjusting the Wrong Bolt
Ordinary mounting hardware is not automatically a camber adjuster. Loosening the wrong connection can allow a suspension component to move unexpectedly or disturb a joint that should remain fixed.
Measuring With the Suspension Hanging
Camber changes as many independent suspensions move. A reading taken with the car raised and the wheels unloaded may not represent its normal alignment.
Using Generic Camber Targets
More negative camber is not always better. A setting intended for track tires and aggressive cornering may be unsuitable for normal street driving.
Ignoring Fastener and Bushing Requirements
Using incorrect torque, reusing a single-use locking nut or tightening certain rubber-bushed control arms in the wrong suspension position can cause problems even when the angle initially measures correctly.
Skipping the Final Toe Check
Camber can be within specification while toe remains significantly wrong. The result may be steering problems or accelerated tire wear despite apparently successful camber correction.
Camber Adjustment Troubleshooting
Why won’t my camber move when I turn the eccentric bolt?
Possible causes include using the wrong fastener, a seized eccentric, an incorrectly positioned washer, insufficient adjustment clearance or a mechanism that has reached the end of its range. Stop and verify the exact part and installation procedure rather than applying more force.
Why does the camber change again after lowering the car?
The suspension follows an arc as it moves from full droop to normal ride height. Its wheel angle can therefore change as the car is lowered and the springs, bushings and tires settle. Final measurements must use the specified loaded condition.
Can I adjust just one wheel?
Sometimes one wheel is the only one outside specification, but the complete axle and side-to-side relationship must still be checked. An adjustment on one wheel can also influence other alignment measurements.
Do I need camber bolts after lowering my car?
Not automatically. Some vehicles retain acceptable camber within the factory adjustment range after a modest ride-height change. Others may require an approved correction method. Measure the actual alignment before choosing additional hardware.
Can an alignment shop fix camber that is not adjustable?
An alignment shop can diagnose the cause and determine whether approved correction components are available. If the angle is wrong because of a bent arm, displaced subframe or damaged axle, repairing the underlying issue may be necessary before alignment can be completed.
Should I get an alignment after installing camber plates or arms?
Yes. Installing camber-adjustment hardware can alter the position of the wheel and affect other geometry. Our guide to alignment after replacing suspension parts explains why these changes require measurement and verification.
Finishing the Job: Measure, Secure, Verify
A successful camber adjustment is more than getting a digital gauge to display the desired number.
Before considering the work complete, verify that:
- the final camber values meet the correct vehicle specifications;
- left-to-right differences are within the manufacturer’s permitted range;
- all suspension and adjustment fasteners are secured correctly;
- any specified replacement nuts or bolts have been installed;
- the suspension sits at its intended ride height;
- the adjuster has adequate clearance throughout its intended movement;
- toe and the remaining alignment measurements have been checked and corrected;
- the vehicle has passed the specified final inspection and road test.
If your car has compatible camber bolts, plates or control-arm adjusters, a properly equipped and experienced owner may be able to perform the preliminary correction. If the suspension has no approved adjustment, the hardware is damaged or the correct loading and torque procedures cannot be followed, a professional inspection is the better choice.
The goal is not simply to change camber angle. It is to achieve the specified wheel geometry without compromising the suspension connection—and to confirm that the rest of the alignment remains correct afterward.