How to Replace Sway Bar Bushings: Step-by-Step Guide
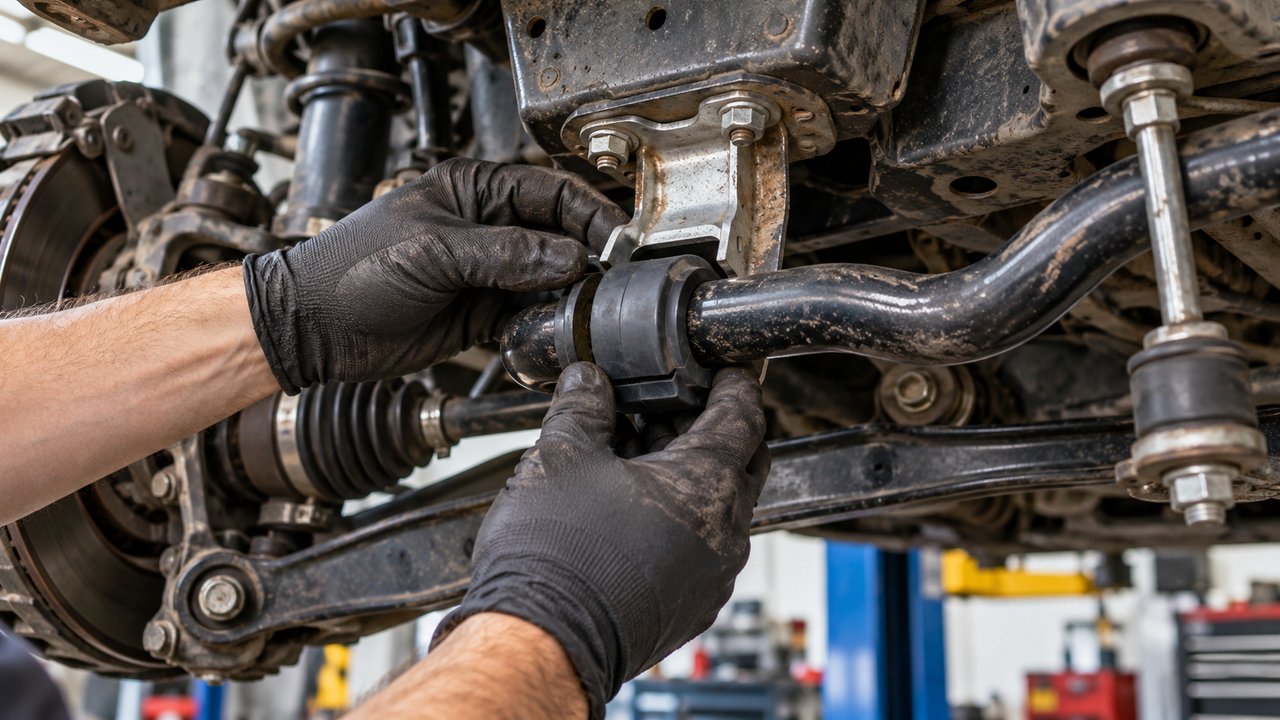
To replace sway bar bushings, support the vehicle safely, remove the metal brackets holding the sway bar to the chassis, take off the worn bushings, clean the mounting surfaces and install correctly sized replacements. Refit the brackets and tighten their fasteners to the vehicle manufacturer’s specifications.
That’s the basic job. On a car with exposed brackets and split rubber bushings, it may take a DIY mechanic around one to two hours. On another vehicle, those same brackets might be hidden above the subframe or steering rack, making the repair considerably more involved.
The guide below covers conventional front and rear sway bar mounting bushings—the pieces that hold the bar to the frame or subframe. It also explains how to choose the correct diameter, whether grease is necessary and what to check if the new bushings still make noise.
Before You Start: Tools, Parts and Safety
Take a look underneath the vehicle before ordering parts. The most useful thing you can do at this stage is confirm that you can actually reach both bushing brackets.
A typical sway bar has two chassis mounting bushings, usually held by stamped-steel brackets. Some brackets use two bolts. Others have a single bolt and a locating tab or hook. There are also vehicles with integrated mounts that require a different removal procedure.
For a conventional, accessible installation, gather the following:
- Replacement sway bar mounting bushings of the correct inside diameter
- Vehicle-specific service instructions and fastener torque specifications
- Floor jack and appropriately rated jack stands, or suitable vehicle ramps
- Wheel chocks and safety glasses
- Socket set, ratchet and combination wrenches
- Torque wrench suitable for the specified fasteners
- Penetrating oil for corroded bracket bolts
- Soft brush, cleaning cloths and a suitable cleaning product
- Calipers for checking sway bar diameter when necessary
- Manufacturer-approved bushing lubricant, but only if required
Check whether the replacement kit includes brackets or new hardware. If the service instructions specify single-use bolts or nuts, have those replacements ready before dismantling anything.
Never work underneath a vehicle supported only by a hydraulic jack. Use approved lifting and support points on firm, level ground. Keep the vehicle secured against rolling, and follow the manufacturer’s lifting procedure. If the work requires lowering a subframe, supporting an engine or removing other structural components, it is no longer a straightforward bushing replacement.
How to Replace Sway Bar Bushings: Step by Step
These steps apply to a common design with replaceable, split mounting bushings. They are general instructions rather than a substitute for the service procedure for your exact vehicle.
Step 1: Locate the Sway Bar Mounting Bushings
Find the sway bar first. It’s the steel bar running across the vehicle, generally connected near each end to the suspension through sway bar links.
Follow the bar inward toward the middle of the vehicle. Look for two rubber or polyurethane bushings surrounded by mounting brackets and secured to the chassis, crossmember or subframe.
These are the bushings we’re replacing. They’re different from the small bushings or ball joints found at the ends of some sway bar links.
Inspect the brackets and confirm how they attach. Notice whether the bushings have a visible split, a locating lip or a particular orientation. A quick photograph before disassembly can save a surprising amount of guesswork later.
Step 2: Confirm the Replacement Bushing Diameter
Don’t assume every vehicle of the same model uses the same sway bar diameter. Manufacturers sometimes fit different bars according to engine, trim level, drivetrain or optional suspension package.
Check the replacement part number against the vehicle’s parts information. If the diameter still needs confirming, measure the outside diameter of the sway bar at the actual bushing location using calipers.
Measure a clean section, not a bend, heavily rusted area or damaged edge. The new bushing’s inside diameter must match the specified bar size. Also verify the bracket profile and any locating features.
A bushing that is too large can leave the bar loose enough to knock. One that’s too small may be impossible to seat correctly or may create unwanted binding. Forcing the bracket down over an obviously incorrect bushing is not a solution.
Step 3: Raise and Secure the Vehicle
Park on a firm, level surface, switch off the engine and secure the wheels as appropriate for the axle being serviced.
When the brackets are accessible from underneath, correctly rated drive-on ramps can sometimes provide enough working room while keeping both wheels on that axle at a similar suspension height.
If lifting is required, use the manufacturer’s jacking points and suitable stands. The support arrangement must be appropriate for the work and must not obstruct or overload the components you’re removing.
There’s an additional concern with sway bars: unequal suspension loading can leave the bar twisted and place force on its brackets or links. Do not assume the assembly is unloaded simply because the vehicle is stationary. Follow the specified support procedure and avoid putting yourself in the path of a part that could move when a fastener is released.
Step 4: Remove Any Necessary Access Covers
Some vehicles have an underbody splash shield or small cover hiding the mounting bolts. Remove only the panels required to reach the brackets, keeping the clips and fasteners organized.
Look carefully at the space above each bracket. Can you fit a socket squarely onto the bolt head? Is the steering rack or subframe directly in the way? Does the repair manual require other components to be moved?
If you discover that the subframe must be lowered or the powertrain supported, don’t improvise a way around it. Those operations may require special support equipment, new fasteners and additional alignment checks.
On an accessible vehicle, you may be able to proceed without disconnecting the sway bar end links. Only release them when the specific procedure requires it, and first make sure the bar and suspension are not carrying unexpected loads.
Step 5: Remove the Bushing Brackets
Brush loose dirt from the bracket fasteners. If corrosion is present, apply penetrating oil to the accessible threaded areas and allow it to work according to the product instructions.
Use a properly fitting socket, preferably a six-point socket on stubborn fasteners. Support the bracket and bar as required while loosening the mounting bolts.
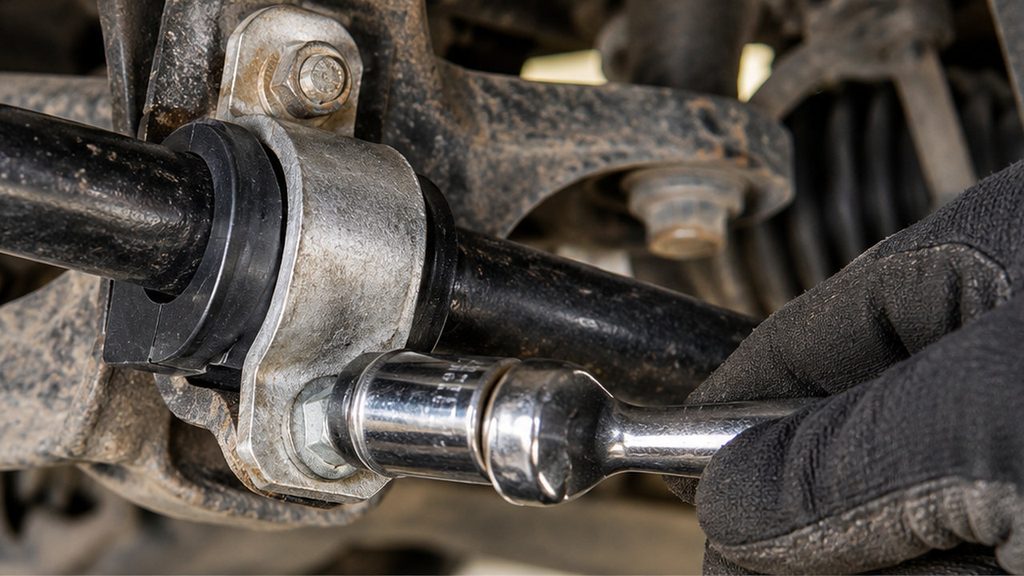
Remove the bolts or nuts according to the bracket design. If the bracket has a locating tab, release that tab carefully rather than bending the bracket out of shape.
Some brackets spring open slightly once their fasteners are released; others fit closely around the bushing. Pay attention to the original arrangement and any spacers or locating hardware.
If a bolt begins to seize, twist excessively or damage its threads, stop. Breaking a captive nut inside a subframe can turn a modest repair into a much larger job. Do not use an open flame near fuel, brake, electrical or rubber components to free a stubborn bolt.
Step 6: Remove the Old Bushings
With the bracket removed, examine the old bushing. Most conventional replacement designs have a lengthwise split that allows the bushing to open and come off the bar without removing the entire sway bar.
Open the split gently and lift the bushing away from the mounting area. If it’s stuck, first check whether dirt, hardened rubber or the bracket design is preventing removal.
Don’t immediately reach for a knife. A blade can gouge the bar’s protective coating or damage nearby hoses. If removal truly requires cutting, use the method specified for that bushing design and keep cutting tools away from the bar itself.
Inspect the removed part. A flattened center, deep cracks, torn rubber or an enlarged inner bore helps explain why the bar may have been moving inside its mount.
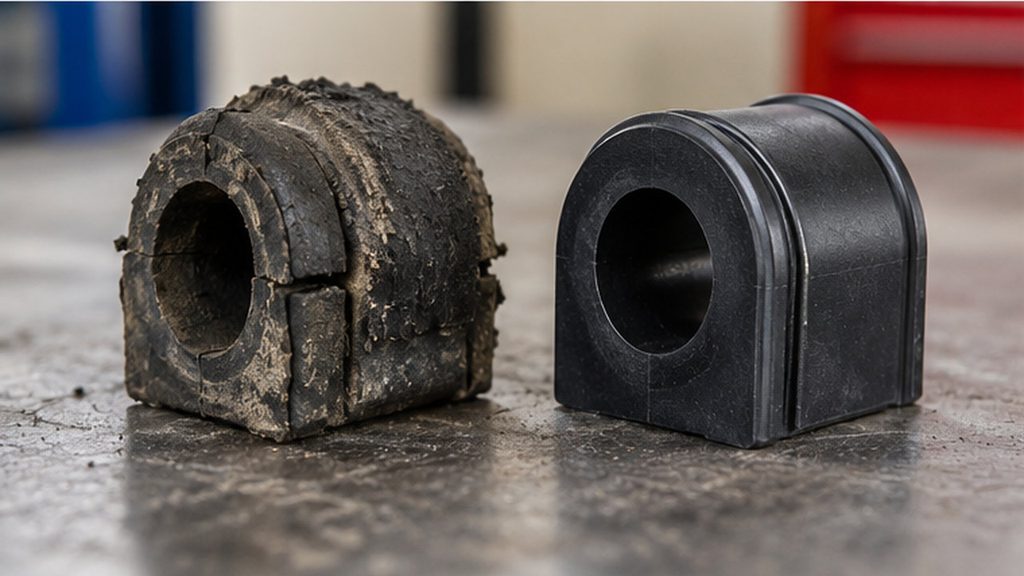
If the original bushing is bonded to the bar, captive within a special mounting assembly or not designed to split apart, do not assume this procedure applies. Check whether the manufacturer requires replacement of a larger assembly.
Step 7: Clean and Inspect the Sway Bar
Before fitting the new bushing, clean the area where the old one sat. Remove loose dirt, old lubricant and rubber residue using a suitable cleaner and a soft brush or cloth.
Take a close look at the bar’s surface. Light staining is different from deep corrosion or actual metal loss.
Check for:
- Deep rust pits or significant reduction in the bar’s diameter
- Worn or polished areas showing unwanted lateral movement
- Damaged paint or protective coating
- Cracks, bends or other visible bar damage
- Distorted mounting brackets, damaged threads or loose mounting points
Don’t aggressively grind or sand away sound metal to make a rough bar look smooth. The new bushing needs a correctly sized, serviceable surface to locate the bar properly.
If the mounting area has deep corrosion, a distorted shape or evidence of structural damage, investigate that before installing fresh rubber. A new bushing cannot compensate for a badly worn bar.
Step 8: Install the New Sway Bar Bushings
Compare the new bushing with the old one before placing it on the bar. Check its inside diameter, overall width, bracket contact surfaces and any ridges or locating tabs.
For a split design, gently open the new bushing and position it around the sway bar at the correct mounting point.
Follow the manufacturer’s instructions for the split orientation. Some bushings use a specific slot direction, molded locating feature or bracket arrangement. Don’t assume the opening must always face the front, rear, top or bottom.
If the kit requires lubricant, apply the specified product to the surfaces identified in its instructions. If it calls for a dry installation, leave those surfaces clean and dry.
Make sure the bushing is seated at the correct position on the bar rather than twisted or partly riding on a bend. A misaligned bushing can prevent the bracket from seating properly, even when the part number is correct.
Step 9: Refit the Brackets and Torque the Fasteners
Place the bracket over the new bushing, engaging any locating tab or hook before installing the mounting bolts.
Start every bolt by hand. If one immediately binds or enters at an angle, back it out and correct the alignment instead of driving it in with a power tool.
Bring the bracket into position gradually and evenly, following the manufacturer’s sequence if one is specified. The bracket should seat correctly without crushing the bushing beyond its intended shape or leaving one edge trapped outside the mount.
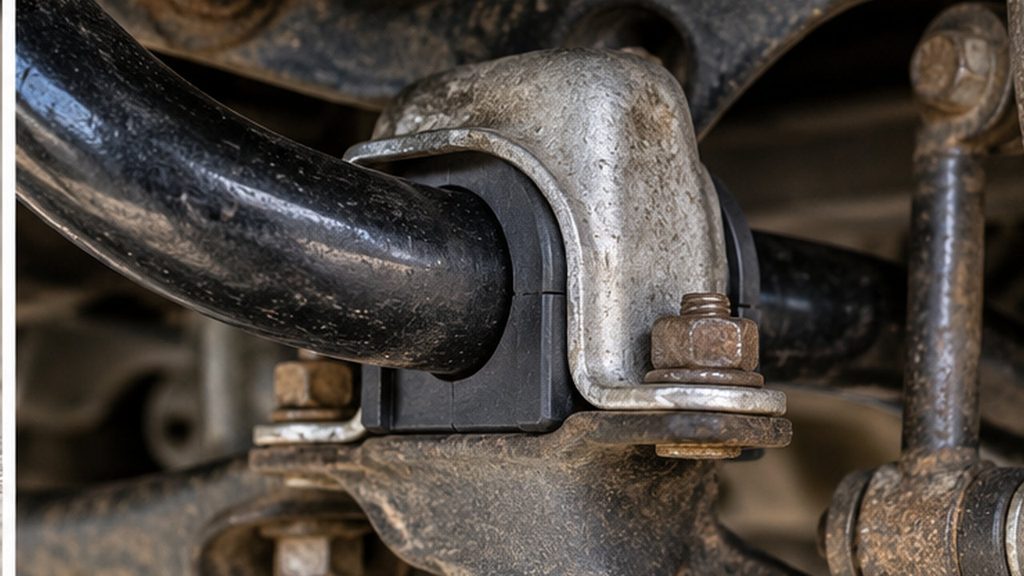
Use a torque wrench for the final tightening and follow the exact specification for the vehicle and fastener. There is no universal sway bar bushing bracket torque. Thread size, mounting material, bracket design and fastener type all matter.
Some service procedures specify a particular suspension loading condition for final tightening. Follow those instructions rather than applying a generic rule intended for bonded control-arm bushings. The two types of suspension mounts do not necessarily work in the same way.
If you disconnected the end links or removed protective covers, reinstall them according to their own procedures. Use replacement hardware wherever required, and torque every disturbed fastener correctly.
Step 10: Inspect the Installation and Road-Test the Car
Before lowering the vehicle or removing its supports, make a final visual inspection of both mounting points.
Check that the bushings are centered, the brackets are properly seated, nothing is trapped between the mating surfaces and every fastener removed during the job has been reinstalled.
Confirm adequate clearance from nearby steering, brake, exhaust and suspension components through any movement checks required by the service instructions. Refit any wheels removed for access and tighten their fasteners to the correct specification.
Once everything is fully assembled and safe, take a short, cautious test drive. Listen for the original clunk or squeak over gentle bumps and during low-speed turns. Avoid aggressive cornering until you’ve confirmed the suspension behaves normally.
If a new noise appears, or the vehicle feels unstable, stop and inspect the installation rather than assuming the parts just need to settle in.
Should You Grease Rubber or Polyurethane Sway Bar Bushings?
This is one of the easiest places to make a mistake. Not every sway bar bushing is designed to operate with grease, and using the wrong product may damage the material or attract dirt.
| Bushing type | Installation guidance |
|---|---|
| Conventional OE-style rubber | Often installed dry; follow the factory instructions |
| Aftermarket polyurethane | Many kits require a specified assembly grease on the bar-contacting surface |
| Greaseable polyurethane design | Follow the supplied lubrication and maintenance instructions |
| Prelubricated or specialty bushing | Use only the procedure and products approved for that specific design |
Rubber bushings are commonly designed to isolate vibration without routine lubrication. Some operate through controlled deformation or a particular friction relationship with the bar. Applying grease indiscriminately can change that behavior.
Polyurethane bushings may work differently. Many aftermarket designs allow the bar to rotate against the bushing’s inner surface, making the correct lubricant important for preventing squeaks and premature wear.
However, “use silicone grease” isn’t a universal rule either. Some kits specify a proprietary synthetic lubricant. Others have maintenance fittings and different lubrication requirements.
For polyurethane bushings, use the lubricant supplied with the kit or one explicitly approved by its manufacturer. Follow the installation instructions for the exact contact surfaces and amount; a grease that works for one product may not be suitable for another.
If the kit doesn’t clearly identify whether lubrication is needed, verify the instructions with its manufacturer. Don’t substitute penetrating oil, general-purpose spray lubricant or an unknown grease merely because the bushing feels tight.
Front vs. Rear Sway Bar Bushing Replacement
The basic mounting arrangement is similar at either axle: a bar, two chassis mounting bushings and brackets that secure it in place.
Access is where the experience can be completely different.
Replacing Front Sway Bar Bushings
Front mounting brackets may sit close to the steering rack, engine cradle, transmission or exhaust. On some cars, you can see the bracket but still cannot reach its bolts with a conventional socket.
Sometimes a small undertray is all that needs to come off. Other layouts require more substantial access work, and certain vehicles specify partial subframe removal.
Before starting a front replacement, inspect both bracket locations—not just whichever side looks easier. Finding out halfway through that the second bracket is inaccessible is a frustrating way to spend an afternoon.
Replacing Rear Sway Bar Bushings
Rear mounting bushings are sometimes more exposed, particularly on trucks and SUVs. If both brackets are visible and the fasteners are in good condition, the repair may be comparatively straightforward.
But rear does not automatically mean easy. Rear differentials, exhaust pipes, fuel tanks, suspension links and subframe structures can all limit access.
Also check that the vehicle actually has a rear sway bar. Some vehicles use a front stabilizer bar without a separate rear one, so there may be no rear bushings to replace.
What If the Sway Bar Bushings Won’t Come Off?
An old split bushing may stick to the bar because of dirt, age, corrosion or deteriorated rubber. Before applying force, make sure you’ve fully removed the retaining bracket and identified the bushing’s split or fastening arrangement.
If the bushing is simply stuck around an otherwise serviceable bar, gentle hand pressure or the removal method specified by the manufacturer may free it.
If it appears bonded to the bar, has no split or uses an integrated metal housing, consult the service information. Some assemblies are not designed for a simple split-bushing swap.
Resist the temptation to use heavy leverage against the chassis or steering components. A damaged bracket, mounting thread or bar surface is a much bigger problem than a stubborn piece of rubber.
New Bushings Still Squeak or Clunk: What Went Wrong?
A correctly performed replacement should not introduce a new metal-on-metal knock. If the noise returns immediately, investigate before buying another set of bushings.
| Problem after replacement | What to inspect |
|---|---|
| Clunk over small bumps | Wrong bushing diameter, loose bracket, worn end links or movement elsewhere |
| Squeaking during suspension movement | Lubrication requirements, bushing material, contamination and installation position |
| Bracket will not sit flush | Incorrect bushing profile, trapped locating lip, wrong bracket or improper seating |
| Bar moves sideways excessively | Bushing fit, stops or collars, bracket condition and correct bar location |
| Noise only during turns | Bar contact with nearby components, end links and suspension loading or clearances |
One detail worth checking is whether the new bushing has exactly the same mounting profile as the original. Two parts can share the same nominal inside diameter yet use different bracket widths or locating features.
And don’t overlook the other pieces of the stabilizer system. A worn link can continue to knock after the frame-mounted bushings have been replaced perfectly.
If you’re still unsure which component is making the noise, our guide to finding suspension clunks and rattles explains how to narrow down the source before replacing more parts.
When Should You Replace Sway Bar Bushings?
There isn’t a universal mileage interval for these parts. Some last for many years; others deteriorate because of road salt, heat, contamination, heavy use or rubber aging.
Replacement makes sense when inspection confirms meaningful deterioration: torn material, excessive clearance, visible bar movement, damaged mounting surfaces or a noise traced to the bushing location.
A faint squeak isn’t enough on its own to prove the bushings are bad. Sway bar links, control-arm bushings and other joints can produce similar sounds.
Most conventional stabilizer bars have two mounting bushings, and replacing them as a pair is often sensible because they experience similar age and use. Still, a localized oil leak or damaged bracket can cause one side to fail independently, so the decision should follow inspection.
How Long Does It Take to Replace Sway Bar Bushings?
For a DIY mechanic familiar with working underneath a vehicle, an accessible pair of split mounting bushings may take roughly one to two hours from setup through final checks.
That’s a planning estimate, not a standard labor time. Rusted fasteners, limited access and unfamiliar bracket designs can extend the work substantially.
If an engine cradle or subframe has to be supported or lowered, the procedure may become a multi-hour professional repair. The low price of the bushings themselves tells you very little about how difficult it will be to reach them.
Can You Replace Sway Bar Bushings Without Removing the Bar?
Yes, on many vehicles with accessible brackets and split bushings. You remove the bracket, open the old bushing around the bar, fit the new one and reinstall the bracket without withdrawing the complete sway bar.
That is the simplest version of the job and the one most suited to a home garage.
Some vehicles have one-piece, bonded or captive bushing arrangements, while others have brackets that cannot be removed without additional disassembly. In those cases, leaving the bar installed may not be possible.
Do You Need an Alignment After Replacing Sway Bar Bushings?
Not usually. A conventional bushing-only replacement doesn’t normally change toe, camber or caster because it does not reposition the main wheel-locating suspension components.
The exception is when the repair requires disturbing other components. Lowering or repositioning a subframe, removing control arms or altering suspension mounting points may justify an alignment check afterward.
Our guide to alignment after replacing suspension parts explains which kinds of work are more likely to affect wheel geometry.
When Is It Better to Let a Shop Handle the Job?
A pair of exposed brackets and ordinary hand tools? That’s a reasonable project for someone with basic repair experience and the equipment to support the vehicle safely.
But there’s no prize for continuing when a simple job becomes complicated.
Professional repair is the better option if:
- The service procedure requires lowering the subframe or supporting the engine
- You cannot safely reach the brackets with the vehicle correctly supported
- A captive mounting bolt is seized, broken or stripping its threads
- The stabilizer bar or its mounting surface has significant structural damage
- The vehicle has an active or electronically controlled anti-roll system requiring specialized procedures
- The replacement parts don’t match and the correct specification cannot be confirmed
If you decide to have the work done professionally, separate the price of the bushings from the labor involved in reaching them. Our sway bar bushing replacement cost guide covers typical U.S. repair prices and why difficult access can make the bill much higher than expected.
Common Questions About Sway Bar Bushing Replacement
Do you need a press to replace sway bar bushings?
Not for most conventional split chassis-mount bushings. They normally open around the bar and fit inside a retaining bracket. A different procedure may be needed for bonded, pressed or integrated designs.
Should you replace both sway bar bushings at once?
Often, yes. The two mounting bushings usually experience similar age and operating conditions. Replacing them as a pair also reduces the chance of having to repeat the access work soon afterward. Inspect both before deciding.
Do sway bar end links have to be removed first?
Not always. Some mounting bushings can be replaced with the end links connected. Other layouts require the links to be released to move or remove the bar. Follow the vehicle-specific procedure and account for any load in the stabilizer assembly.
Can you replace sway bar bushings without lifting the car?
Only if you can safely access the brackets without going beneath an unsupported vehicle or working in an unsafe position. Adequate clearance and the manufacturer’s support requirements determine whether lifting or ramps are necessary.
Can you use universal sway bar bushings?
Some aftermarket bushings are offered in universal-style sizes, but the inside diameter, bracket dimensions, shape and mounting requirements still have to match the application. A similar-looking bushing is not automatically a suitable replacement.
Will replacing sway bar bushings improve handling?
If the old bushings allow the bar to move excessively, replacing them can restore its intended location and response. If the original bushings are still in good condition, installing new ones is unlikely to transform how the car corners.
What if the new bushings squeak right away?
Check the material-specific lubrication instructions, bushing orientation, diameter and bracket fit. Polyurethane designs may require a particular grease, while some OE-style rubber bushings are meant to be installed dry. Don’t assume every squeak can be fixed with spray lubricant.
The Small Details Make This Repair Work
Swapping the rubber itself is rarely the hardest part. It’s getting the right bushing, reaching the bracket without disturbing other components and reinstalling everything exactly as intended.
If the parts match, access is straightforward and the mounting hardware is in good condition, sway bar bushing replacement can be a manageable home repair. Take the time to confirm the bar diameter, follow the lubrication instructions and torque the brackets correctly.
And if the job calls for more disassembly than you expected, check the service procedure before going further. A correctly installed $20 bushing is far more useful than a damaged mounting bracket and a repair that can no longer be finished safely.