Pinion Angle Shims: Degrees, Direction & Fitment
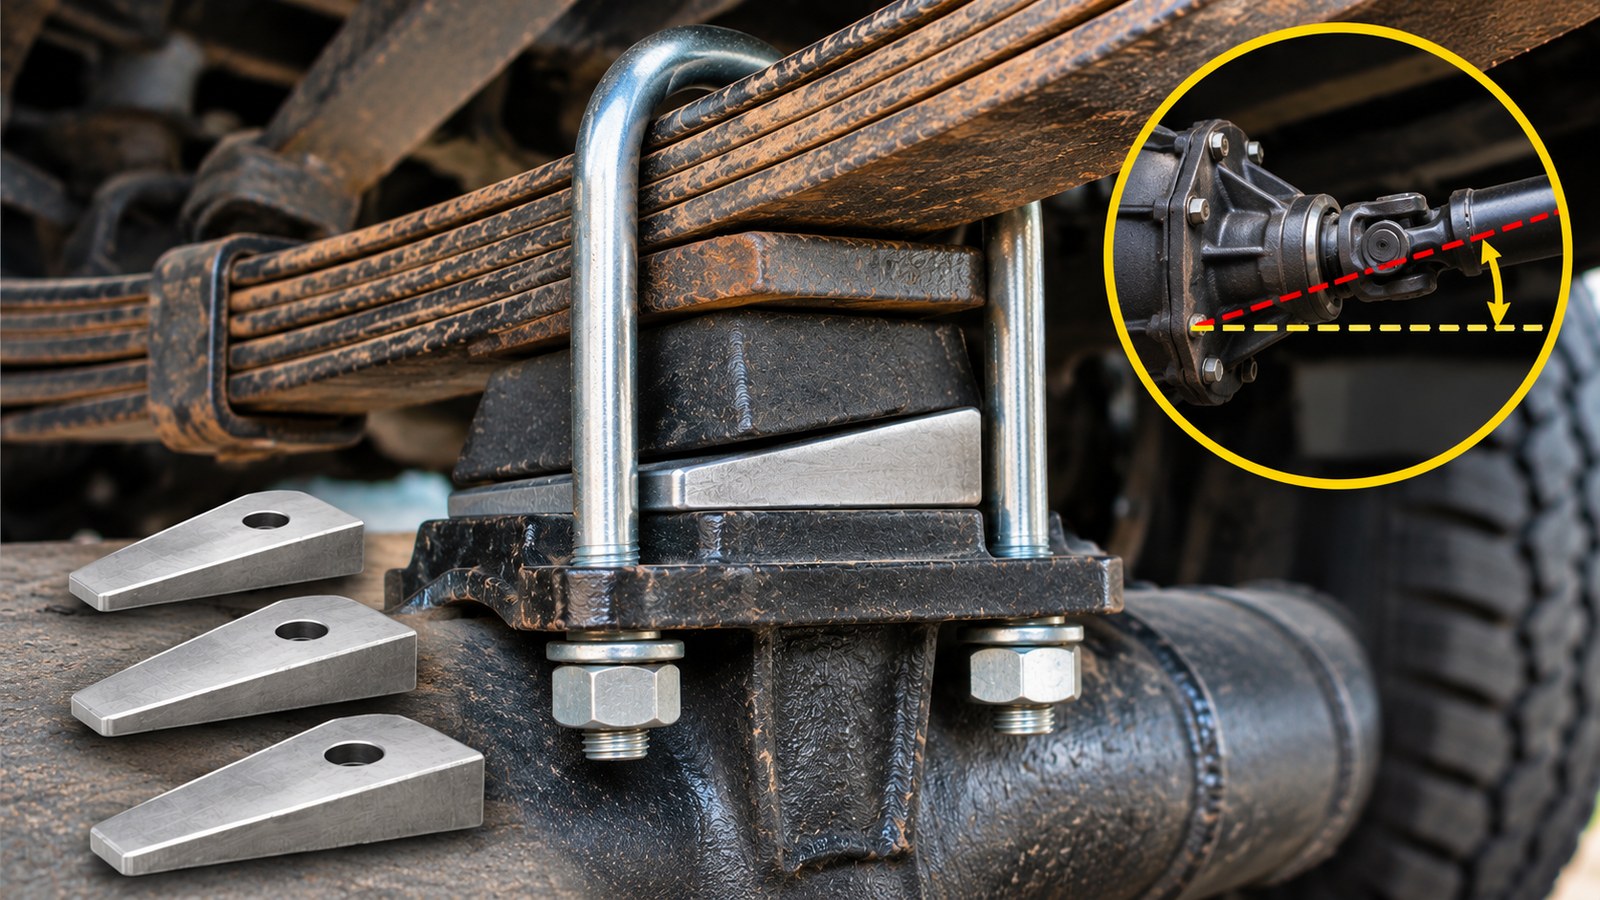
Pinion angle shims are thin, wedge-shaped plates that rotate a leaf-sprung axle housing slightly to change the relationship between its pinion and the driveshaft. If a truck develops a driveline vibration after a lift or lowering job, the right shim can be the missing correction. But a 4-degree wedge is not a standard cure for a 4-inch lift, and the thick end does not point the same way on every axle.
Shopping for one? Start with the measured correction, spring width, axle layout and center-pin engagement. Buy a shim designed for that spring seat, with a secure locating method and the appropriate axle-clamp hardware. If you do not know whether the truck has a conventional two-joint shaft or a double-cardan/CV-style shaft, identify that first: the required pinion relationship may be different.
Which Pinion Angle Shims Should You Buy?
Most listings offer 2-, 3-, 4- or 6-degree wedges in steel or aluminum, sometimes in multiple spring widths. The quickest useful comparison is not brand versus brand. It is the reason you need a wedge and what you have actually measured at normal ride height.
| What you found | What to look for | What not to assume |
|---|---|---|
| Measured small correction on an approved leaf-spring axle | Vehicle-compatible 1–2° or other specified low-angle shim | A 2° shim is not automatically right for every 2-inch lift |
| Measured correction around 3–4° | Single engineered wedge of the required angle and proper footprint | Buying 4° without checking shaft type or present angles |
| Large correction after a major lift or SYE conversion | Verify driveline design and full geometry before choosing a 6°-class shim | A steep wedge can compensate for a fundamentally unsuitable driveshaft setup |
| Shim fits spring width but not the locating hole | Different part or manufacturer-approved center-pin hardware | A loose center pin will be held safely by U-bolt tension alone |
| Truck already has a tapered lift block | Engineered replacement arrangement specified for the kit | Stacking a generic wedge beneath a tapered block is acceptable |
| Front leaf-sprung steering axle | Vehicle-specific alignment and caster/pinion assessment | A rear axle shim is automatically suitable for front steering geometry |
That last point matters especially on 4x4s. The rear driveshaft may be your concern, but a wedge sold in the same online category can also be intended for front-axle caster work. Similar shape is not proof of the same job.
What an Axle Wedge Shim Actually Changes
Picture the spring pack and axle seat as two surfaces clamped together. A tapered plate placed between them creates a small angular difference. On a suitable solid axle, that rotates the housing and changes where the pinion yoke points. The shim is an angle-correction part; its advertised degree is the wedge angle, not a promise of a particular U-joint operating angle after installation.
A properly seated shim has to keep the same secure axle location that existed before. The spring center pin, shim, axle perch and U-bolts still function as one accurately located, tightly clamped assembly. This is one reason flimsy universal wedges are a poor place to save a few dollars.
Leaf Spring Wedges Versus Rear Lift Spacers
A thin axle shim primarily changes orientation; a rear lift block primarily adds separation and ride height. A tapered lift block can do both, but it is not interchangeable with a thin pinion shim just because both have an angled face. If you are choosing actual lift height or replacing factory blocks, use our rear lift blocks guide instead of treating this article as another lift-block shopping list.
The wedge may introduce a small change in effective spacing because it has thickness, but it is not a practical substitute for a rear-height kit. The axle housing also retains the same tire-controlled ground clearance beneath its lowest point.
Pinion Angle and U-Joint Operating Angle Are Not the Same Number
People use “pinion angle” loosely. It might mean the pinion shaft’s slope relative to level, its relationship to the transmission output, or its difference from the driveshaft. Those are three different descriptions. The universal joint feels the angle between the two shafts connected at that joint, not the number printed on the shim bag.
That distinction explains why a truck can show a pinion slope of several degrees and still be correctly configured—or have a pinion sitting near level while the driveline vibrates. It is the relationships between the components that matter.
How to Measure Before Choosing 2°, 4° or 6° Shims
Measure first, order second. A digital angle finder or suitable inclinometer is useful, but the method must follow the same reference convention across all readings. Put the vehicle on level ground at its normal operating weight, with tires properly inflated and the suspension settled. If the vibration occurs only while loaded, compare the condition with and without that load rather than copying another truck’s unloaded numbers.
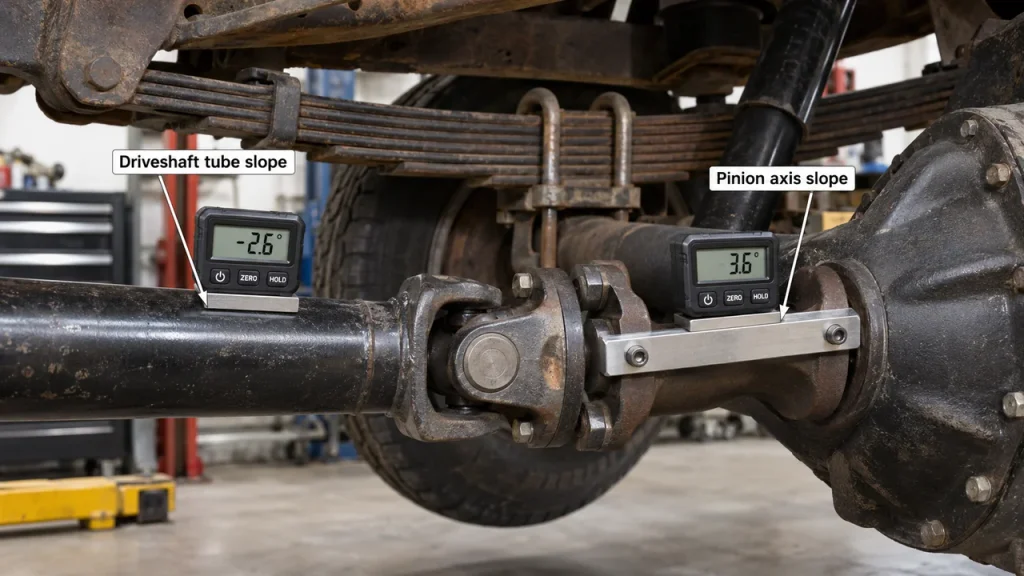
For a conventional rear driveshaft, a meaningful starting record includes these measurements and observations:
- Transmission or transfer-case output slope: measure the actual output axis or a reliable parallel/perpendicular machined reference and account for the reference face used.
- Driveshaft tube slope: record its inclination in the same front-to-rear sign convention.
- Pinion axis slope: use a suitable pinion yoke/flange reference; a flat face perpendicular to the pinion shaft must be converted correctly.
- Joint arrangement: identify single-cardan joints, a double-cardan assembly, any intermediate shaft and the relevant yoke positions.
- Normal condition: note ride height, cargo, lift/lowering components and whether the symptom appears accelerating, cruising or coasting.
Never take an angle from a random differential-cover rib or a curved driveshaft tube and treat it as a precision axis measurement. If the only accessible surface is perpendicular to the axis you need, its displayed angle may need a 90-degree conversion; manufacturer procedures show which reference to use.
Keep a Consistent Up-and-Down Sign Convention
A digital gauge can display the same physical tilt as a positive or negative figure depending on which direction you hold it. Write down whether each component rises or falls from the front of the vehicle to the rear. For example, “shaft slopes down toward rear” is far more useful than an unlabeled “5.0°.” A sign error can send you shopping for a wedge that turns the pinion the wrong way.
For a verified way to compare measured transmission, driveshaft and axle slopes, the Spicer driveline operating-angle calculator explains the measurement convention and calculates U-joint operating angles. It does not replace the vehicle maker’s target values or account for every compound-angle installation.
A Conventional Two-Joint Shaft Needs Matching Operating Angles
In a typical one-piece driveshaft with one single-cardan U-joint at each end, the two operating angles generally need to be similar so their speed variations cancel. Spicer’s general guidance is that a two-joint shaft should have operating angles within about 1° of each other; there must also be some nonzero angle for joint lubrication, with limits affected by shaft speed and application.
That is why aiming the pinion straight at the driveshaft is not a universal best setting for a conventional two-joint shaft. You can make the rear joint look beautifully straight while leaving the front joint doing nearly all the angular work.
A Double-Cardan/CV-Style Shaft Changes the Target
With a double-cardan assembly at one end, the usual rear pinion target is different: the pinion is often aimed much closer to the rear shaft’s centerline, allowing for the manufacturer’s intended operating allowance under load. A slip-yoke-eliminator (SYE) conversion on a leaf-sprung off-roader can therefore require a different correction from the original two-joint setup.
Do not borrow a “2° nose-down” or “pinion parallel to transmission” rule from a build that uses another shaft arrangement. Check the actual driveline supplier’s installation instructions. Some multi-piece or compound-angle designs need more measurements than a simple three-reading exercise.
What Degree Pinion Angle Shim Do You Need?
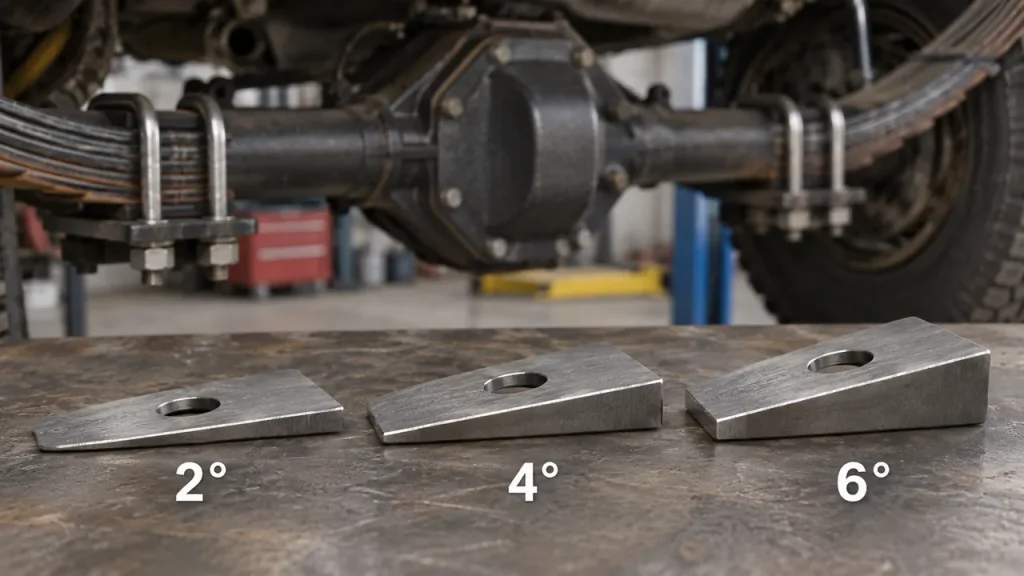
The correct degree is the angular change your measured axle needs to reach the appropriate target for its driveline. After that, find a wedge with that angle which physically fits the spring and perch. Common retail choices include 2°, 3°, 4° and 6°, with other angles and vehicle-specific corrective kits available. The catalog’s selection is not an engineering recommendation for your truck.
A Realistic Example: A Three-Degree Correction
Suppose you have established—using the proper driveline references—that the rear axle needs to rotate approximately 3° nose-up from its current position. You would investigate an approved shim close to 3°, oriented to rotate the housing in that direction. You would not choose 3° because the lift measures 3 inches. Those numbers have different units and describe different things.
The finished joint angles may not change by exactly the displayed shim angle: moving the pinion can also slightly alter the shaft’s orientation, especially on shorter driveshafts. Recheck with the vehicle back at normal ride height; do not treat this as a plug-and-play calculation guaranteeing the result.
Why a Six-Degree Shim Deserves More Questions
A 6° axle wedge is a real catalog product, useful in some heavily modified vehicles. It is also a large change in an assembly that carries axle torque through a relatively small clamped seat. Before choosing one, look at center-pin engagement, contact area, available driveline travel, U-joint operating limits, axle wrap and the exact suspension geometry. In some builds the right repair is a different driveshaft or a redesigned axle perch rather than a steeper wedge.
A persistent vibration with a large lift can have more than one cause. A wedge cannot correct a seized U-joint, damaged slip spline, bent shaft or a pinion bearing problem, even when it happens to change the symptom temporarily.
Pinion Angle Shim Direction: Thick End Forward or Rearward?
This is the question buyers ask after opening the box. There is no answer based only on whether the shim is 2° or 4°. First determine whether the leaf pack is above or below the axle tube, which direction the pinion must rotate, and which surface of the axle assembly the shim actually contacts. Then follow the instructions for that part number.
Spring-Over-Axle: The Common Rear Pickup Arrangement
On a conventional spring-over-axle rear arrangement—leaf pack above the axle—a properly designed wedge with its thick edge toward the rear generally tilts the pinion nose upward. Reversing that wedge generally moves the nose down. This describes a familiar geometry, not permission to install a generic shim without verifying its locating features and the vehicle maker’s instructions.
It is easy to remember the thick end and forget the goal. If the rear joint already runs at too little angle on a two-joint shaft, “more nose up” may make the driveline worse, not better.
Spring-Under-Axle: The Relationship Reverses
Where the leaf springs sit beneath the axle, the shim acts on the opposite side of the housing. The fore-and-aft thick-end direction that raises the pinion in a spring-over-axle setup will be reversed for a comparable spring-under-axle layout. That detail is why a one-line forum answer such as “fat end always forward” is unreliable.
Some applications have custom saddles, flip brackets, offset center pins or preexisting wedges. In those cases the actual engineering drawing, not a generic axle diagram, decides orientation.
Watch for Side-Specific Factory Correction Parts
There is an exception worth knowing before ordering two identical wedges: some manufacturer service procedures use labeled left- and right-hand shims with different shapes or thicknesses. Other aftermarket products are sold as a pair; an SPC F-150 two-hole shim, for example, is listed as one assembly per axle. Never assume “quantity two” is required just because most online wedge photos show two pieces.
The safest cue is the application sheet: it should say which side, which way is front, how the locating holes line up, and how many components are required.
Shim Fitment: Width, Length, Center Pin and Axle Perch
A degree marking tells you very little about physical fit. A shim can have the correct slope while sitting too narrow to support the spring, overhanging the seat, missing the locating pin or interfering with a block already installed. A snug fit at the axle is not optional.
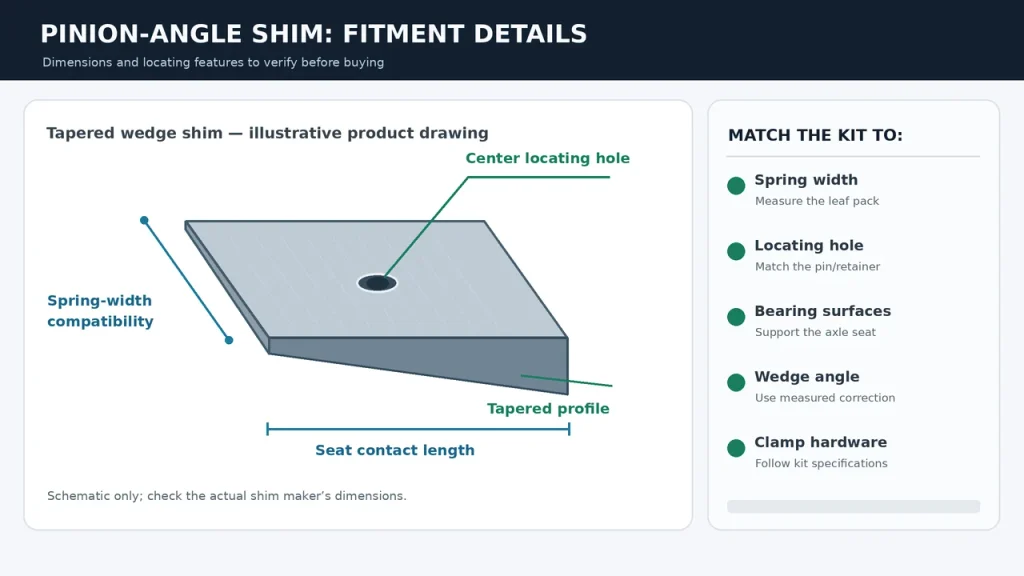
Check the part listing and the actual suspension for all of the following before paying:
- Spring width: 2-inch, 2.5-inch, 3-inch and other widths exist; measure the pack and verify the intended application.
- Wedge length and bearing area: the plate must contact the intended seat surfaces fully, without rocking or overhang that the maker forbids.
- Locating hole or pin: confirm hole position, diameter, correct head profile and positive engagement through the shim into the axle seat.
- Axle layout: spring-over versus spring-under, factory axle perch, cast/steel leaves and any flip kit or block already present.
- Mounting method: a bolt-in shim retained by a spring center bolt is different from a plate with its own designed locating features.
- U-bolt stack and clamping: the full assembly must accept the specified new axle U-bolts, washers, nuts and tightening method.
For a concrete illustration of why width matters, Tom Wood’s sells machined steel axle shims described as 2.5 inches wide and supplies replacement center bolts of a specified diameter. BDS lists different widths for apparently similar 4° products. Those details should stop you from buying a wedge solely because it appears under your vehicle’s make in a broad marketplace search.
Center-Pin Engagement Is a Safety Feature
Some axle shims attach using a longer spring center bolt; others use a defined raised pilot and mating hole arrangement. If the original center-pin head can no longer reach the axle seat after adding the wedge, the axle may not be positively located. Our leaf spring center bolt guide explains the head dimensions and locating function. Never grind away the locator or enlarge a seat hole just to persuade mismatched pieces to lie flat.
A bolt-in shim may require safe disassembly and reclamping of the spring pack by someone trained to work on loaded leaf springs. That detail belongs in the kit instructions, not an improvisation with a loose wedge.
Not Every Vehicle Uses a Conventional Steel Leaf Pack
Late-model pickups may have mono-leaf, composite or application-specific rear layouts. A universal shim photographed under an old steel multi-leaf spring does not establish compatibility with those designs. The same caution applies when a vehicle has an axle-flip kit, unique two-hole locator or a previously modified perch.
SPC, for example, catalogs a model-specific F-150 correction part for a two-hole design rather than a generic rectangular wedge. The correct purchase begins with the actual suspension under your truck, not a catchy product name.
Steel or Aluminum Pinion Shims: What Lasts?
Both materials are used in aftermarket catalogs. Quality is about the design and the application as much as the alloy on the label. An accurately machined steel wedge with secure center-bolt retention is not equivalent to a poorly made steel strip; likewise, a purpose-designed aluminum shim is not automatically unsafe because it is lighter.
Why Steel Is a Common Choice for Heavy-Duty Leaf-Spring Setups
Steel wedges are attractive where high clamp loads, repeated axle torque and thin edges make deformation a concern. Material strength alone still cannot rescue an undersized locating hole or poor spring-seat contact. Look for a maker that publishes dimensions, installation requirements and a vehicle application.
When an Aluminum Shim Is an Appropriate Product
Established manufacturers also sell aluminum axle wedges. Their suitability depends on alloy, thickness, surface finish, design, load and approved fitment. If a wedge shows crushing, cracking, fretting or movement, do not keep driving on it regardless of what metal it was made from.
Be cautious about combining different loose shims merely to reach a degree value. Certain specially engineered products have interlocking features and their own instructions, but that is not a blanket approval to stack unrelated wedges.
Will Pinion Angle Shims Cure Driveline Vibration?
They can help when the problem is a measured driveline-angle mismatch that the proposed correction will actually address. A common story is a leaf-sprung truck that was quiet before a lift, gained an acceleration vibration afterward and now has U-joint operating angles outside the intended relationship. That story is a reason to measure, not proof that wedges are the cure.
Acceleration Shudder Is Not Always Bad Static Pinion Angle
Torque can rotate a live axle housing against the leaf springs. This axle wind-up, or axle wrap, changes pinion position under load. A static angle reading in the driveway may therefore look acceptable while a launch shudder develops only when the driveline is working hard. Also inspect spring condition, worn locating components and the actual axle clamp before blaming the degree setting.
If the axle is shifting, U-bolts are loose or the center pin has sheared, fix that structural problem first. A wedge is not an axle-retention repair.
Speed-Related Vibration May Have a Different Cause
An out-of-balance shaft, worn U-joint, damaged slip yoke, poor U-joint phasing or failing driveline support can imitate an angle problem. Tire and wheel vibration can be mistaken for it too. Compare the symptom at acceleration, steady speed and deceleration, and get the assembly inspected if the cause is uncertain. Setting pinion angle by ear can hide the original defect while making joint life worse.
Pinion Angle Shims vs. Tapered Lift Blocks
If your vehicle already uses a tall rear lift block, do not automatically add a loose pinion wedge beneath it. A tapered replacement block may be the correct component if the suspension kit specifically permits it; alternatively the maker may specify a different rear-lift arrangement. Stacking two separate contact pieces increases the opportunities for mislocation and clamp loss.
If the existing rear height is satisfactory and the axle angle alone needs a small correction, a correctly secured, application-approved thin shim may be more relevant than a taller block. If the suspension is also being lifted, select the full system together so ride-height changes, pinion angle, clamp hardware and shock travel are verified as a package.
A shackle or add-a-leaf change can also affect rear suspension geometry. For the spring-mounting side of that decision, see our leaf spring shackles guide; this page stays focused on the wedge correction at the axle.
Installation and Safety Checks Before the Truck Goes Back on the Road
Installing a shim involves opening the axle-to-spring connection. That assembly holds a moving, torque-loaded axle in position, so it is more consequential than slipping a washer under a bracket. The chassis and axle need independently rated support, and the vehicle and shim maker’s procedure must govern any work. Never get beneath a truck held only by a jack.
The mechanic should confirm that the spring and seat are sound, both sides use the specified parts, locating features are fully seated, the wedge faces the specified direction and the finished clamp stack is correct. Follow the manufacturer’s new-U-bolt and tightening requirements, including any prescribed recheck after driving. Our leaf spring U-bolts guide covers the separate clamp-size and torque-selection issues; there is no universal torque for every shim installation.
Once the vehicle is back at normal loaded ride height, measure the working angles again. Then evaluate vibration under controlled driving conditions and inspect for shifting, fresh contact marks or looseness. Where a driveline or suspension component must be removed to obtain accurate angles, that is work for a qualified technician with the correct equipment.
Questions Buyers Ask About Leaf Spring Pinion Shims
The common search terms—“pinion angle shim kit,” “leaf spring wedges,” “rear axle shims”—often lead to the same parts shelf. These quick answers address the questions that the parts filters usually do not.
Does a 4-inch lift need a 4-degree shim?
No. Inches describe ride-height change; degrees describe angular correction. Two vehicles with the same lift height may have different driveshaft lengths, factory pinion orientations and joint types. Measure and compare with the correct target first.
Are pinion shims installed in pairs?
Many general-purpose rear leaf-spring shims are sold in left/right pairs, but not every application uses two identical pieces. Some factory correction kits have side-specific components; a product for a two-hole axle design may be sold as one assembly per axle. Check the actual required quantity and installation drawing.
Can I stack two 2-degree shims to make 4 degrees?
Do not stack unrelated wedges. Unless the manufacturer explicitly approves a designed interlocking configuration for that vehicle, choose one correct, properly retained shim or another engineered correction. Extra sliding interfaces inside the axle clamp are not a sensible workaround.
Can I use these shims on the front axle of a 4×4?
Not simply because the vehicle has front leaf springs. On a front steering axle, rotating the housing can alter steering caster as well as pinion orientation, and a driveline-only correction can create a handling problem. Our caster-angle guide explains that trade-off. Use a specific front-axle method approved for the vehicle.
Do pinion angle shims raise or lower the rear of the truck?
They are chosen for their wedge angle, not as a ride-height product. Their physical thickness can alter spacing slightly, but it is generally not the intended lift or drop. If you need a measured change in body height, choose the correct suspension-height component instead.
Will I need longer U-bolts or center bolts?
Possibly, and this must be resolved before installation. A retained shim may require a different center bolt or locating arrangement; the added thickness may also change U-bolt length and usable thread. Some kits include the necessary parts, others do not. Reusing old or undersized hardware because it barely catches the nut is not a safe compromise.
A Better Order Than “Pick a Degree and Hope”
Here is the order that avoids buying the same wedges twice: identify the axle and driveshaft arrangement, measure the driveline at the weight that produces the symptom, determine the required pinion correction, then choose the single approved shim or vehicle-specific correction whose angle, width, locating design and clamp hardware actually match. Only after it is installed and the vehicle is back on its wheels can the result be verified.
The part should disappear into a stable, correctly clamped spring seat—not become the reason a truck develops a new clunk or vibration. A careful measurement up front is worth more than a drawer full of two-degree wedges.